Adobe can provide analytics raw files in an sFTP, Amazon S3, or Microsoft Blob location. These file sets include lookups to provide context for common fields such as events, browser, and OS where the raw data fields are integers. The files may also include extra hits that are filtered out of the AA UI, such as video heartbeat events. Depending on how the raw feed was set up, you may be receiving the files on an hourly or daily basis with over 100 files per time frame. Once the files are delivered it is up to the receiver to make the data available in a format that is easily consumable by the analysts.
This is when the Syntasa Adobe Analytics Input Adapter comes into play by helping to process the Adobe raw files in a consumable format within an organization's data lake. Making it available to be joined with other datasets for a more holistic approach to understanding customer and prospect behaviors.
The purpose of this article is to provide step-by-step instructions for building, deploying and running an Adobe Analytics Input Adapter app.
Contents
- Acronyms
- Pre-requisites
- Adobe Analytics App creation
- Configure the Adobe Analytics Input Adapter App
- SYNTASA Development & Production Concept
- Output
Acronyms
- AA - Adobe Analytics
- AAM - Adobe Audience Manager
- AWS - Amazon Web Service
- GCP - Google Cloud Platform
- GCS - Google Cloud Storage
- S3 - Amazon Simple Storage Service
- SFTP - Secure File Transfer Protocol
- UI - User Interface
Pre-Requisites
As with most other apps, there are requirements for ensuring that data can be extracted, processed and written to the desired database and storage location(s). The following must be completed before setting up the adapter:
- Infrastructure screen needs to be populated.
- Connections need to be defined for Adobe API and raw source files.
- Event Stores need to be created.
Adobe Analytics App Creation
- Click on the menu icon (
 ) and under Apps select "Synthesizer" from the sub-menu.
 - Create a new app by clicking on the green and white plus sign (
 ) on the far right of the screen.
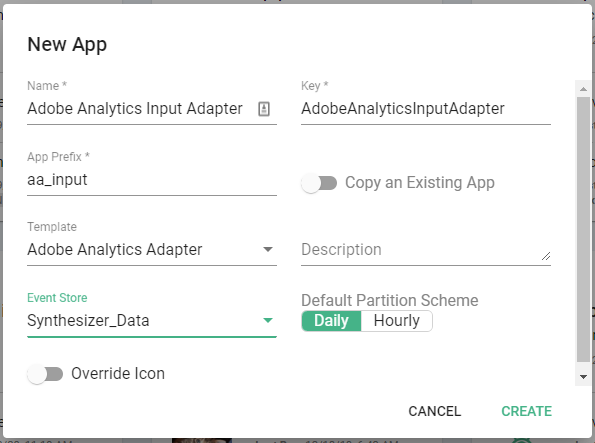
 - A new "New App" modal will appear:
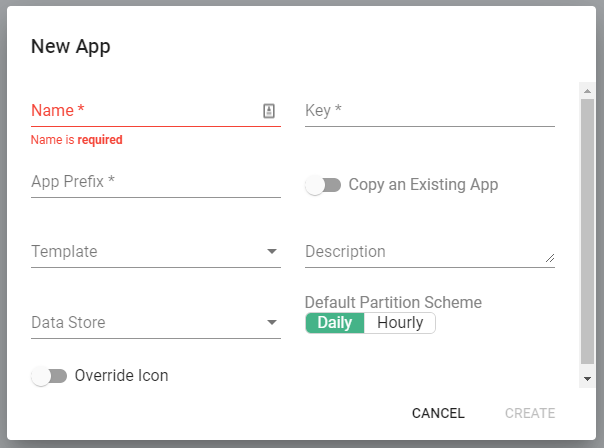
- Fill in the fields:
- Name - Descriptive, concise, and unique name of the app, e.g. Global Web Data.
- Key - This typically will auto-populate and is good to leave as-is.
- App Prefix - Provides a short string of text that will make it easy for the users to discern database tables, e.g. aam.
- Template - Select "Adobe Analytics Adapter".
- Description (Optional) - Provide a lengthier detailed description of the purpose of the app.
- Data Store - Select a relevant Data Store you'd like the data written. Our best practice is to create a "Synthesizer Event Store" that is used for all Synthesizer apps.
- Default Partition Scheme - Select "Daily".
- Override Icon (Optional) - Toggle if you'd like to upload your own image to display on the app tiles screen.
- Click the green "CREATE" button.
- The app will appear on the app tiles screen.
Configure the Adobe Analytics Input Adapter App
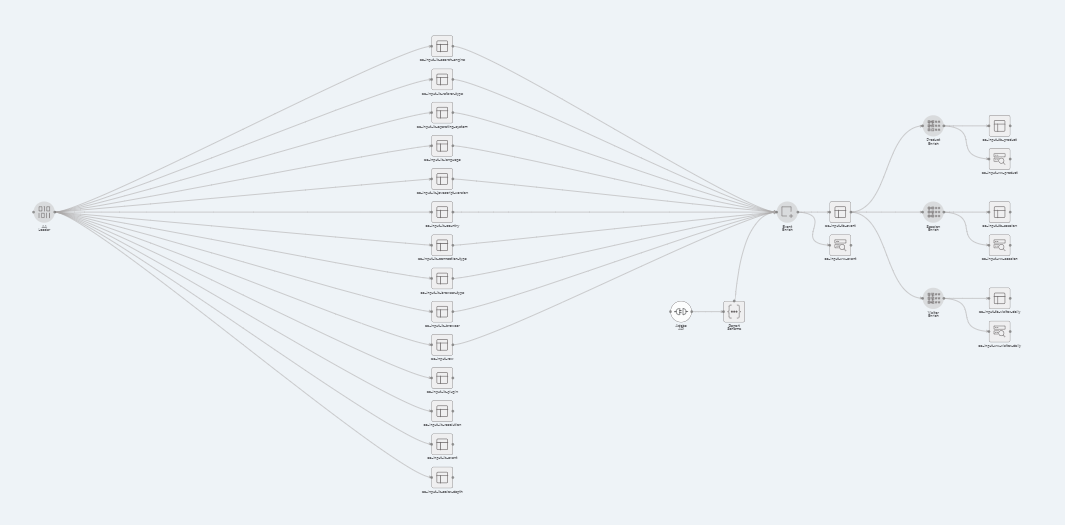
For Synthesizer apps such as the AA Input Adapter app, the source data will typically come from a non-Syntasa data source such as a cloud provider storage bucket, e.g. S3, GCS, Blob, or sFTP location and is stored in your environment storage location. The data will also be prepared in a manner that facilitates user access via a query interface such as BigQuery or Athena.
The focus of this section will the preparation of the six processes that make up the AA Input Adapter template.
Add a Connection
- Locate the newly created app and click to enter the app workflow:
- Click the (
 ) icon to unlock the app workflow.
 - Drag a "Connection" that relates to the connection created in the pre-requisite steps.
- Click the "Connection" node and select the connection name where the raw source files reside.
- Click the green and white checkmark (
 ) to accept changes.
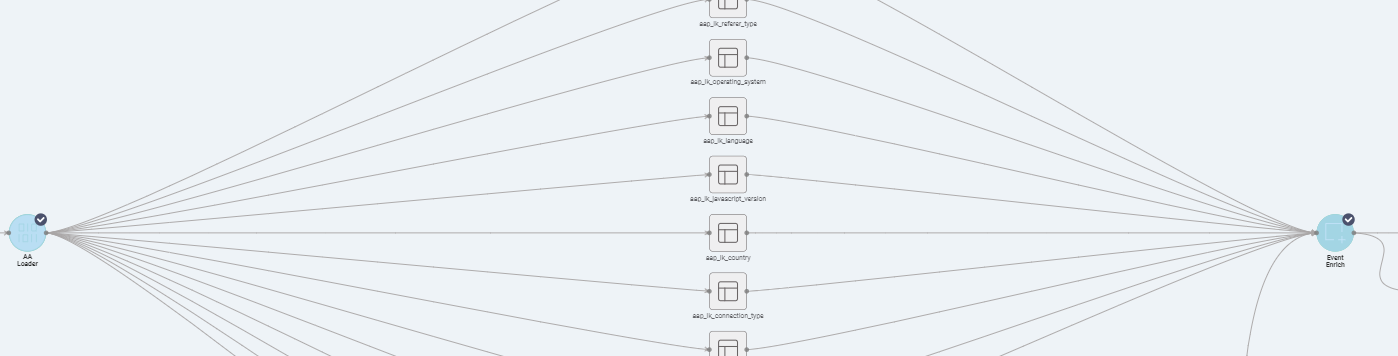
 - Connect the "Connection" node to the "AA Loader" node.
- The "AA Loader" node should turn white, click the "AA Loader" node:

AA Loader
- Click on the "AA Loader" process.
- Fill in the following fields:
- Source Path - This is the directory where the clickstream files are stored, be it sFTP, S3, GCP Bucket. If your path is /reportsuite/hit_data/01-reportsuite_2018-01-01.tsv.gz then the path should be set as "/reportsuite/hit_data".
- Source File Pattern - The naming scheme of the clickstream files. Using the example above it would be ".*.reportsuite_.*.tsv.gz". The regex is there to account for the dynamic portions of the file name.
- File Type - What kind of file is the archive that contains the event-level data? If the file name ends in .tsv.gz the file inside will likely be a tsv file, so here we choose "Textfile".
- Compression Type - Does the event file name end in ".gz"? If so we are using compression on the file, and more specifically, using Gzip compression.
- Event File Pattern - hit_data.tsv is the default, but this field indicates the name of the file inside the Clickstream archive that contains the event-level data.
- Lookup File Pattern - Adobe commonly packages the lookup files in a separate archive. This field is used to tell the app the name of that file. Example "reportsuite_.*.-lookup_data.tar.gz".
- Lookup Path - Location of the lookups if stored in a different location than the source files.
- Lookup Files - List of standard Adobe Lookup files the app will consider.
- Incremental Load Type - The interval the data will be loaded Daily or Hourly. When selecting Hourly an "Hour Group Number" field will appear to help the app understand how to extract the hour from the source file name.
- Date Pattern - The data format in the Adobe Clickstream file names. Usually "yyyy-MM-dd" or "yyyyMMdd".
- Date Extraction Type:
- Regex (Recommended) - Use regex to locate the date in the various Clickstream files. For example: ".*.reportsuite_(.*).tsv.gz".
- Index - Choose the start and end index of the date in the file name. Count starting at character 0. In our example, the indexes would be 15-25.
- Date Manipulation - Used when there is a delay in file delivery in the feed. If the feed is 1 day behind current, set this to 1 day.
- Click the green and white checkmark (
 ) to accept changes.
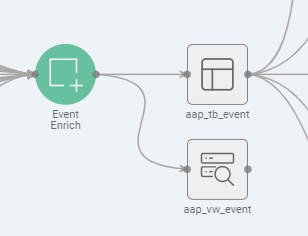
Event Enrich Process
The Event Enrich process forms the foundation non-aggregated "hit" level data set all valid data coming from the raw source files. Syntasa provides the ability to split the Adobe event_list into separate columns for each custom event, the ability to configure all eVars, s.Props and apply custom transformations on the fields providing the ability to categorize or use specific sections of a field, for example.
- Click on the "Event Enrich process" and note the four tabs.
- Leave the Join screen as default.
- Configure Mapping - this is where the source fields get mapped to the Syntasa schema and Hive functions configured to provide any needed data transformations:
- If using the API connection to populate Adobe fields, initiate the Autofill feature to programmatically pull in the Adobe events, s.props, and eVars. Choose the week start that corresponds to what is configured in your Adobe Analytics account, then choose Apply. The system will populate the function field and label field in the grid to the right for fields "cust_field[1-400]" and "cust_metric[1-400]".
- Any transformations or additional fields can now be added to the schema for this report suite. The function fields provide complete-as-you-type functionality to address any fields available in the raw clickstream files.
- Configure Filters - This tab shows the default (Adobe recommended) files applied to the raw clickstream data. Any additional filters can be applied here as well. For instance, if your report suite is global and you would like that broken up to countries, a filter on "geo_country" can be applied to break out Adobe apps by country.
- Configure Outputs - Show what tables will be output by this workflow:
- Choose to alias.
- Choose to have the table loaded to Big Query (or Redshift/Athena depending on the environment).
- Click the green and white checkmark (
 ) to accept changes.
 - Click the "Save & Lock" button (
 ) to ensure configurations are committed and workflow locked.
Product Enrich Process
The Product Enrich process provides the ability to split the Adobe provided post_product_list out into one row per product code string. An Adobe hit can reference multi-products, e.g. customer purchases five distinct products, that are placed in the post_product_list array along with each product have its own set of variables and metrics. By splitting this array up and creating a row for each product it provides the ability for analysts to do product level analysis that is much more difficult at the event level.
The product table is non-aggregated and Syntasa is designed to handle the splitting the product list up, the user just needs to make the configurations to transform in a manner that is most useful to the analysts. Configuration of the process is similar to the steps listed above for Event Enrich.
Session Enrich Process
The Session Enrich process provides the ability to roll user activity up to a session ID level providing a session-level summary of a visitor's activity. The session table is grouped by session ID and partition along with aggregated metrics and selected variables such as the first or last instance of the session.
Configuration of the process is similar to the steps listed above for Event Enrich except the input variables must be wrapped in an aggregation function, e.g. max(), first(), last(), min(), etc.
Visitor Enrich Process
The Visitor Enrich process provides the ability to roll user activity up to a visitor ID level providing a visitor-level summary of activity. Visitor Daily table is grouped by visitor ID and partition along with aggregated metrics and selected variables such as the first or last instance of the visitor activity. It is important to remember the visitor activity is cut off on a daily basis, meaning it is visitor activity for a given day.
Configuration of the process is similar to the steps listed above for Session Enrich except the input variables must be wrapped in an aggregation function, e.g. max(), first(), last(), min(), etc.
SYNTASA Development & Production Concept
The SYNTASA application has the concept of development workflow and production workflow. Changes are only made in the development workflow. Once changes are tested and validated, the workflow can then be deployed to production. From there, a production job can be configured, executed and scheduled (scheduling includes triggering, i.e. app, process, and/or time).
Test in Development
Now you're ready to test the configuration:
- Click on the "AA Loader" and "Event Enrich" nodes while holding the shift key. The nodes will be highlighted in grey with a tick (see the below screenshot) to indicate it's been selected:
- Click on the"Job" button (
 ) on the top-right.
 - Click "Create New +" (
 ) from the drop-down.
 - A "Create Job" window will appear:
- Name - Descriptive name of the job to facilitate searching for finding job logs for troubleshooting.
- Description (optional) - Detailed description of the purpose of the job.
- Define a Tag (optional) - Custom free text field to help segment jobs in the job logs.
- Process name - Auto-populated, not editable.
- Runtime Type - Auto-populated, not editable.
- Runtime - Drop-down to choose the type/size of the cluster necessary for processing.
- Process Mode - In Development workflow use "Replace Date Range" for most cases and "Drop and Replace" when table structure is modified.
- Date Range - In Development workflow use "Custom" and select the "From Date" and "To Date".
- Advanced - Use the default settings.
- Click "Save & Execute" (
 ) to start the job.
 - Click the "Activity" icon (
 ) to expand and show job details on the right side menu.
 - When the job completes the process nodes will either be solid green to signify success or red to signify failure.
- To verify the job successfully delivered the file, please check in the S3 bucket for the file.
Run Job in Production
- Initial deploy - From the development workflow, click the "Deploy" button (
 ).
). - A deploy screen should appear. Click the "Deploy" button (
 ).
). - Go to the Production Workflow.
- Hold shift and click on the "AA Loader" and "Event Enrich" processes.
- Click on the"Job" button (
 ) on the top-right.
 - Click "Create New +" (
 ) from the drop-down.
 - Click the "Activity" icon (
 ) to expand and show job details on the right side menu.
 - To verify the job successfully delivered the file, please check in the S3, GCS, or Blob bucket for the file.
Data Processing Validation
After successfully running the processes the data will get loaded into storage and made available for the user base to start analyzing. The best method to ensure the job ran is to check the process output node overview using the following steps:
- Click the "Event Enrich" output node labeled with "_tb_event":
- "Details" provides information about where the data is stored, format and partitioning:

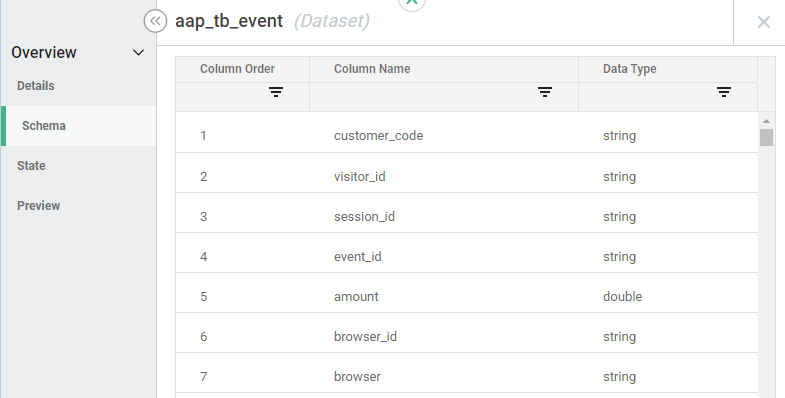
- "Schema" provides the name of the data set columns:
- "State" and verify the dates exist and there is a record count:

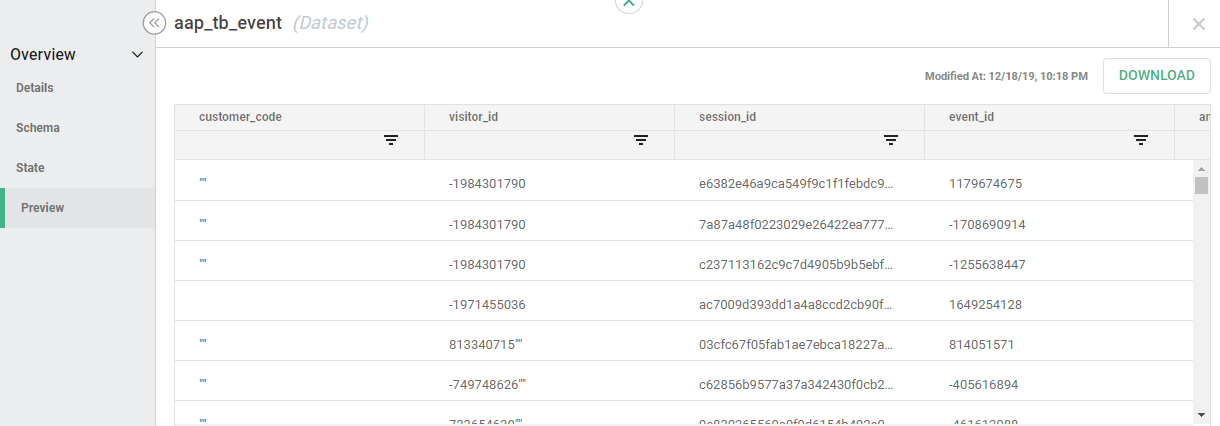
- "Preview" provides a 100-row sample of the data to provide the ability to run quick data point checks without running a query:
- Click the gray (
 )at the top-right of the window to close.
Output
Depending on the environment and data writing settings there could be multiple places the data resides. For environments such as GCP, the data will be written to GCS and most likely written to BigQuery to provide an easy and fast method for users to analyze the data. The data residing in GCS is accessible via Hive command line and only accessible with an actively running cluster. GCS data is typically made available for other Syntasa process. In AWS, the data is written to S3 and made available using Glue to query using Athena. The data may also be written to Redshift, depending on organizational requirements.
A full description of the Adobe Analytics Input Adapter tables and views that are constructed when processed can be found on the Synthesizer Datasets and Views article.