Synthesizer Free Form is a Synthesizer app that provides a blank workflow for the ability to create custom by using prebuilt processes like Transform or Spark process. Use cases for Free Form are very wide below are a few examples:
- Bring in Lookups, e.g. orders, customers, products, etc., from a verity of locations.
- Bring in event/non-event data directly from BigQuery / Athena / Database etc.
- Transform data from Hive to Cloud sources like BQ / Athena etc.
- Transform and manipulate data using our code process like Spark Leveraging languages like R, Python, Scala, SQL.
Pre-requisites
The following screens need to be populated before configuring this app:
- Infrastructure - All required fields populated with the environment details of your on-premise, Google Cloud Platform, or AWS environment.
- Event Store - Where data will reside in your cloud environment or HDFS cluster.
- Connection - Where data will be ingested from, for processing by SYNTASA.
App creation
- Click on the menu icon (
 ) and under Apps select "Synthesizer" from the sub-menu.
 - Click the green plus sign button (
 ) on the top right of your screen.
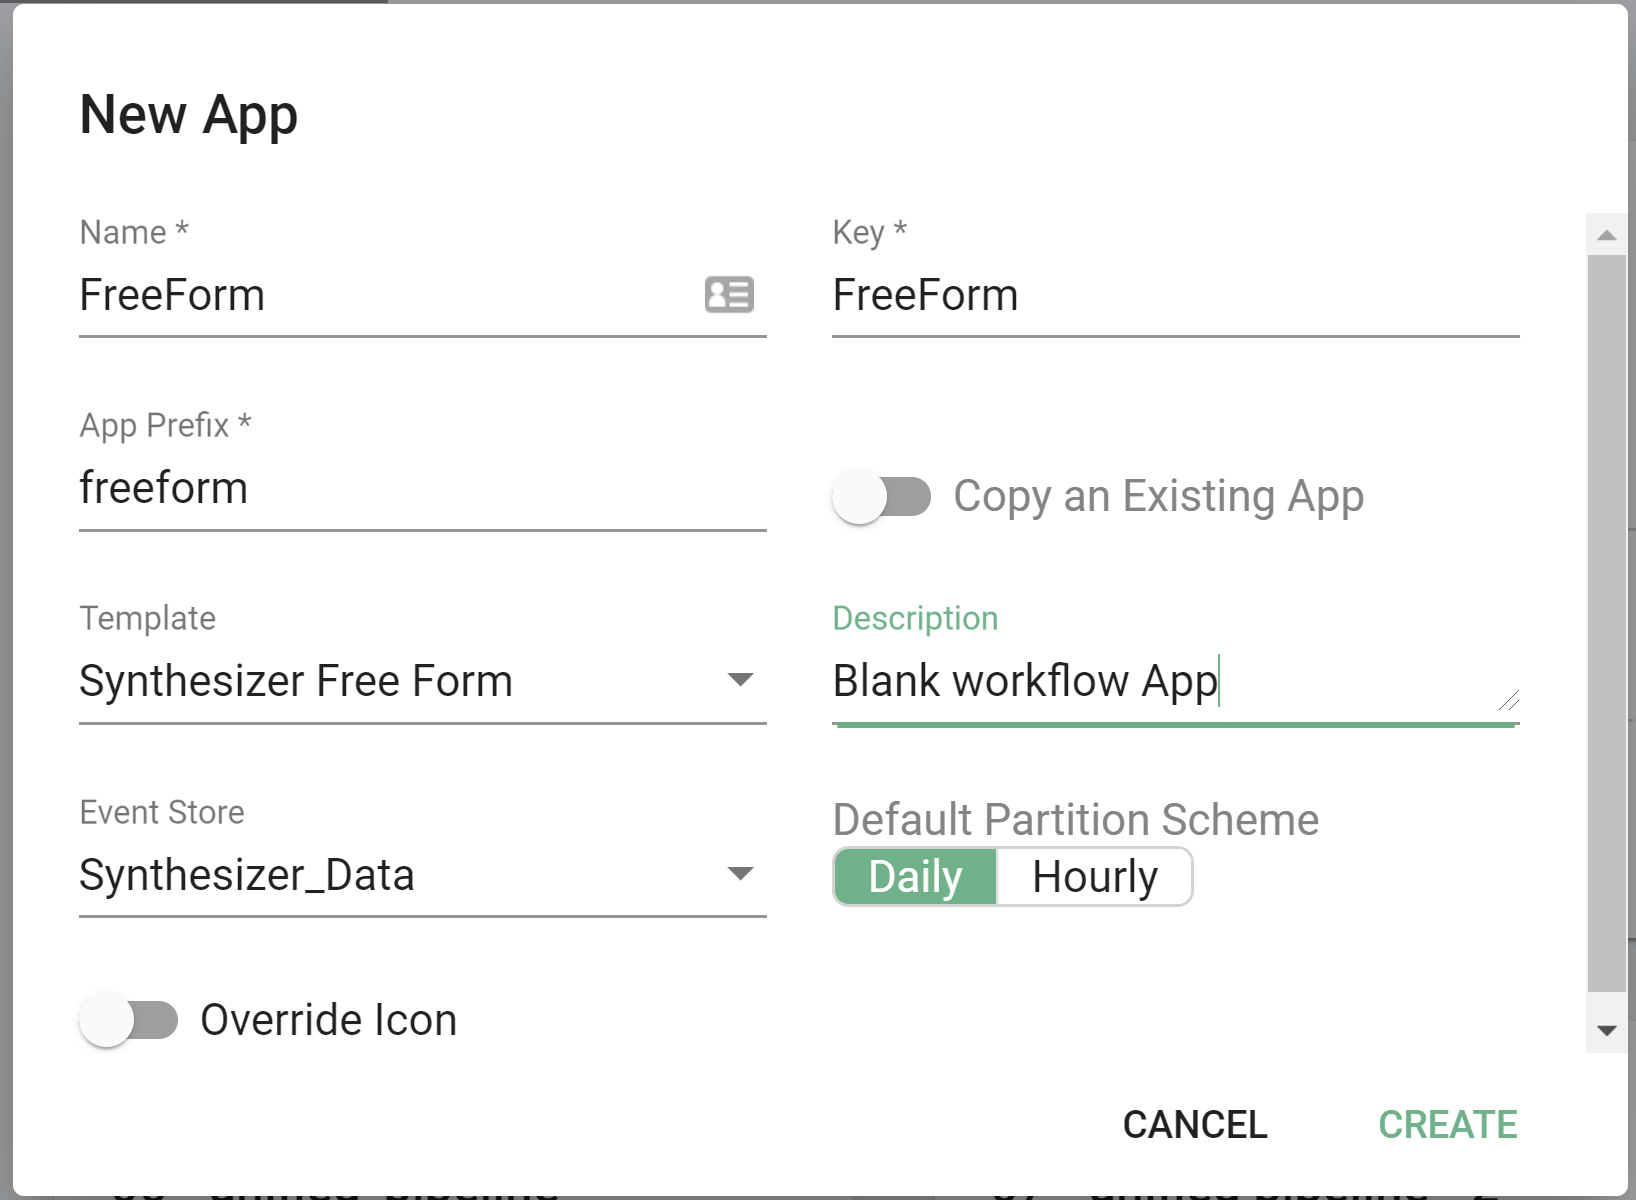
 - Fill in the New App screen:
- Name - Display the name of your new Synthesizer Free Form application.
- Key - Will automatically populate based on the name you enter.
- App Prefix - Will automatically populate based on the name you enter, you are able to change this if you prefer something else.
- Template - Choose your app template, in this case, Generic Input Adapter.
- Description - Purely informational text field.
- Event Store - Drop down where you can choose your pre-configured event store.
- Override Icon - Toggle button, only need to turn on if you would like to use a custom icon.
- Click 'Create'.
Configure Synthesizer Free Form
In this how-to guide, we will be covering one scenario to get you started. However, the principles will remain the same for worth with other sources/processes. Throughout the guide, we will provide hints on alternatives.
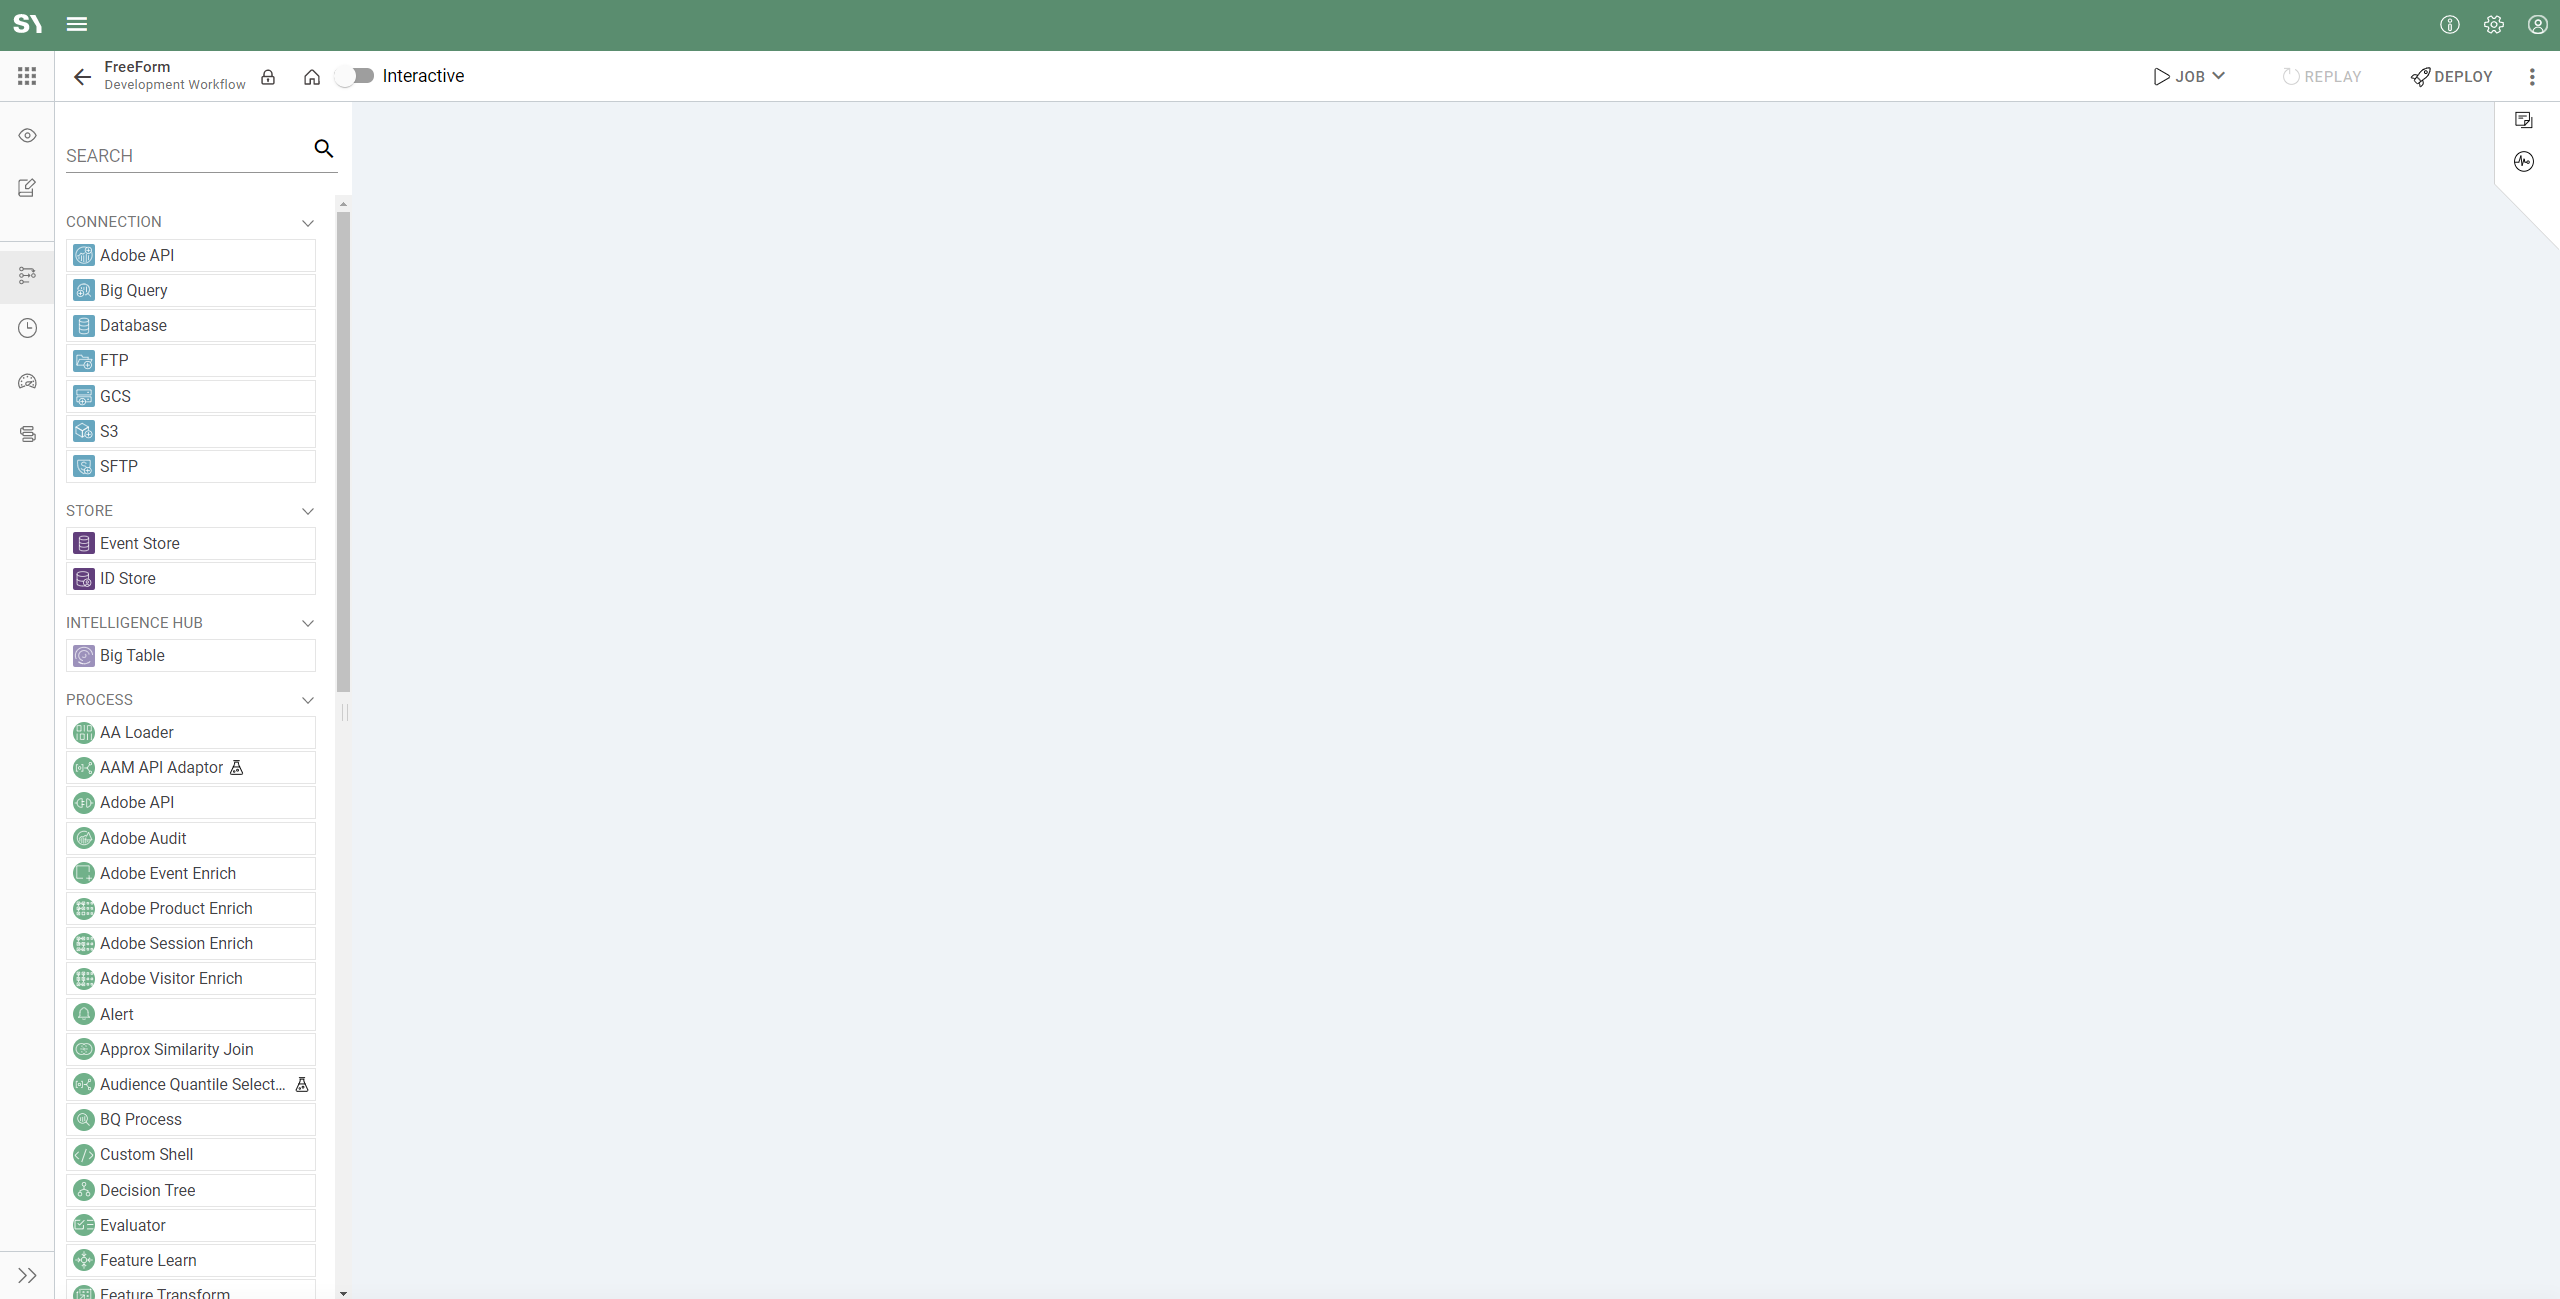
- Find your new app and click on it to open.
- The workflow will look like the screenshot below. We will then drag in our data connection sources, which will be tables generated by other apps.
- Click the lock icon (
 ) on the top-left to unlock the workflow.
 - From the left side menu, under Stores drag a Big Query Connection on to the workflow.
- Click on the new node you've dragged on and from the dropdown select your connection. Save the changes by clicking tick (
 ) on the right.
 - Now let's drag on a BQ Process (Big Query) and configure it. The BQ Process allows us to bring data into the Syntasa BQ environment.
This is a coding process, which uses Parameters that have already been predefined (see below). The code below does two things:
- Create a partitioned table using partition_date. We will then write our results which are returned from our query.
- Selects data and left-joins multiple data sets to it.
CREATE TABLE IF NOT EXISTS
@database.lookup_bq_process
(customer_code string, visitor_id string, session_id string, event_id string, browser string, browser_id string, amount float64, language string, language_id string, os string, os_id string, partition_date timestamp)
Partition BY date(partition_date)

--END--

SELECT customer_code , visitor_id, session_id, event_id,lookup_browser.browser,lookup_browser.browser_id, amount, language_lookup.language, language_lookup.language_id, os_lookup.os, os_lookup.os_id, cast(_PARTITIONTIME as timestamp) as partition_date  FROM `syn_prod_synthesizer.aap2_tb_event`as tb_event
 LEFT JOIN `demo_synthesizer.adobe_browser` AS lookup_browser
 ON tb_event.browser_id = lookup_browser.browser_id
LEFT JOIN `demo_synthesizer.adobe_languages` AS language_lookup
 ON tb_event.language_id = language_lookup.language_id
LEFT JOIN `demo_synthesizer.adobe_operating_systems` AS os_lookup
 ON tb_event.os_id = os_lookup.os_id
WHERE _PARTITIONTIME >= TIMESTAMP('@fromDate')
and _PARTITIONTIME <= TIMESTAMP('@toDate')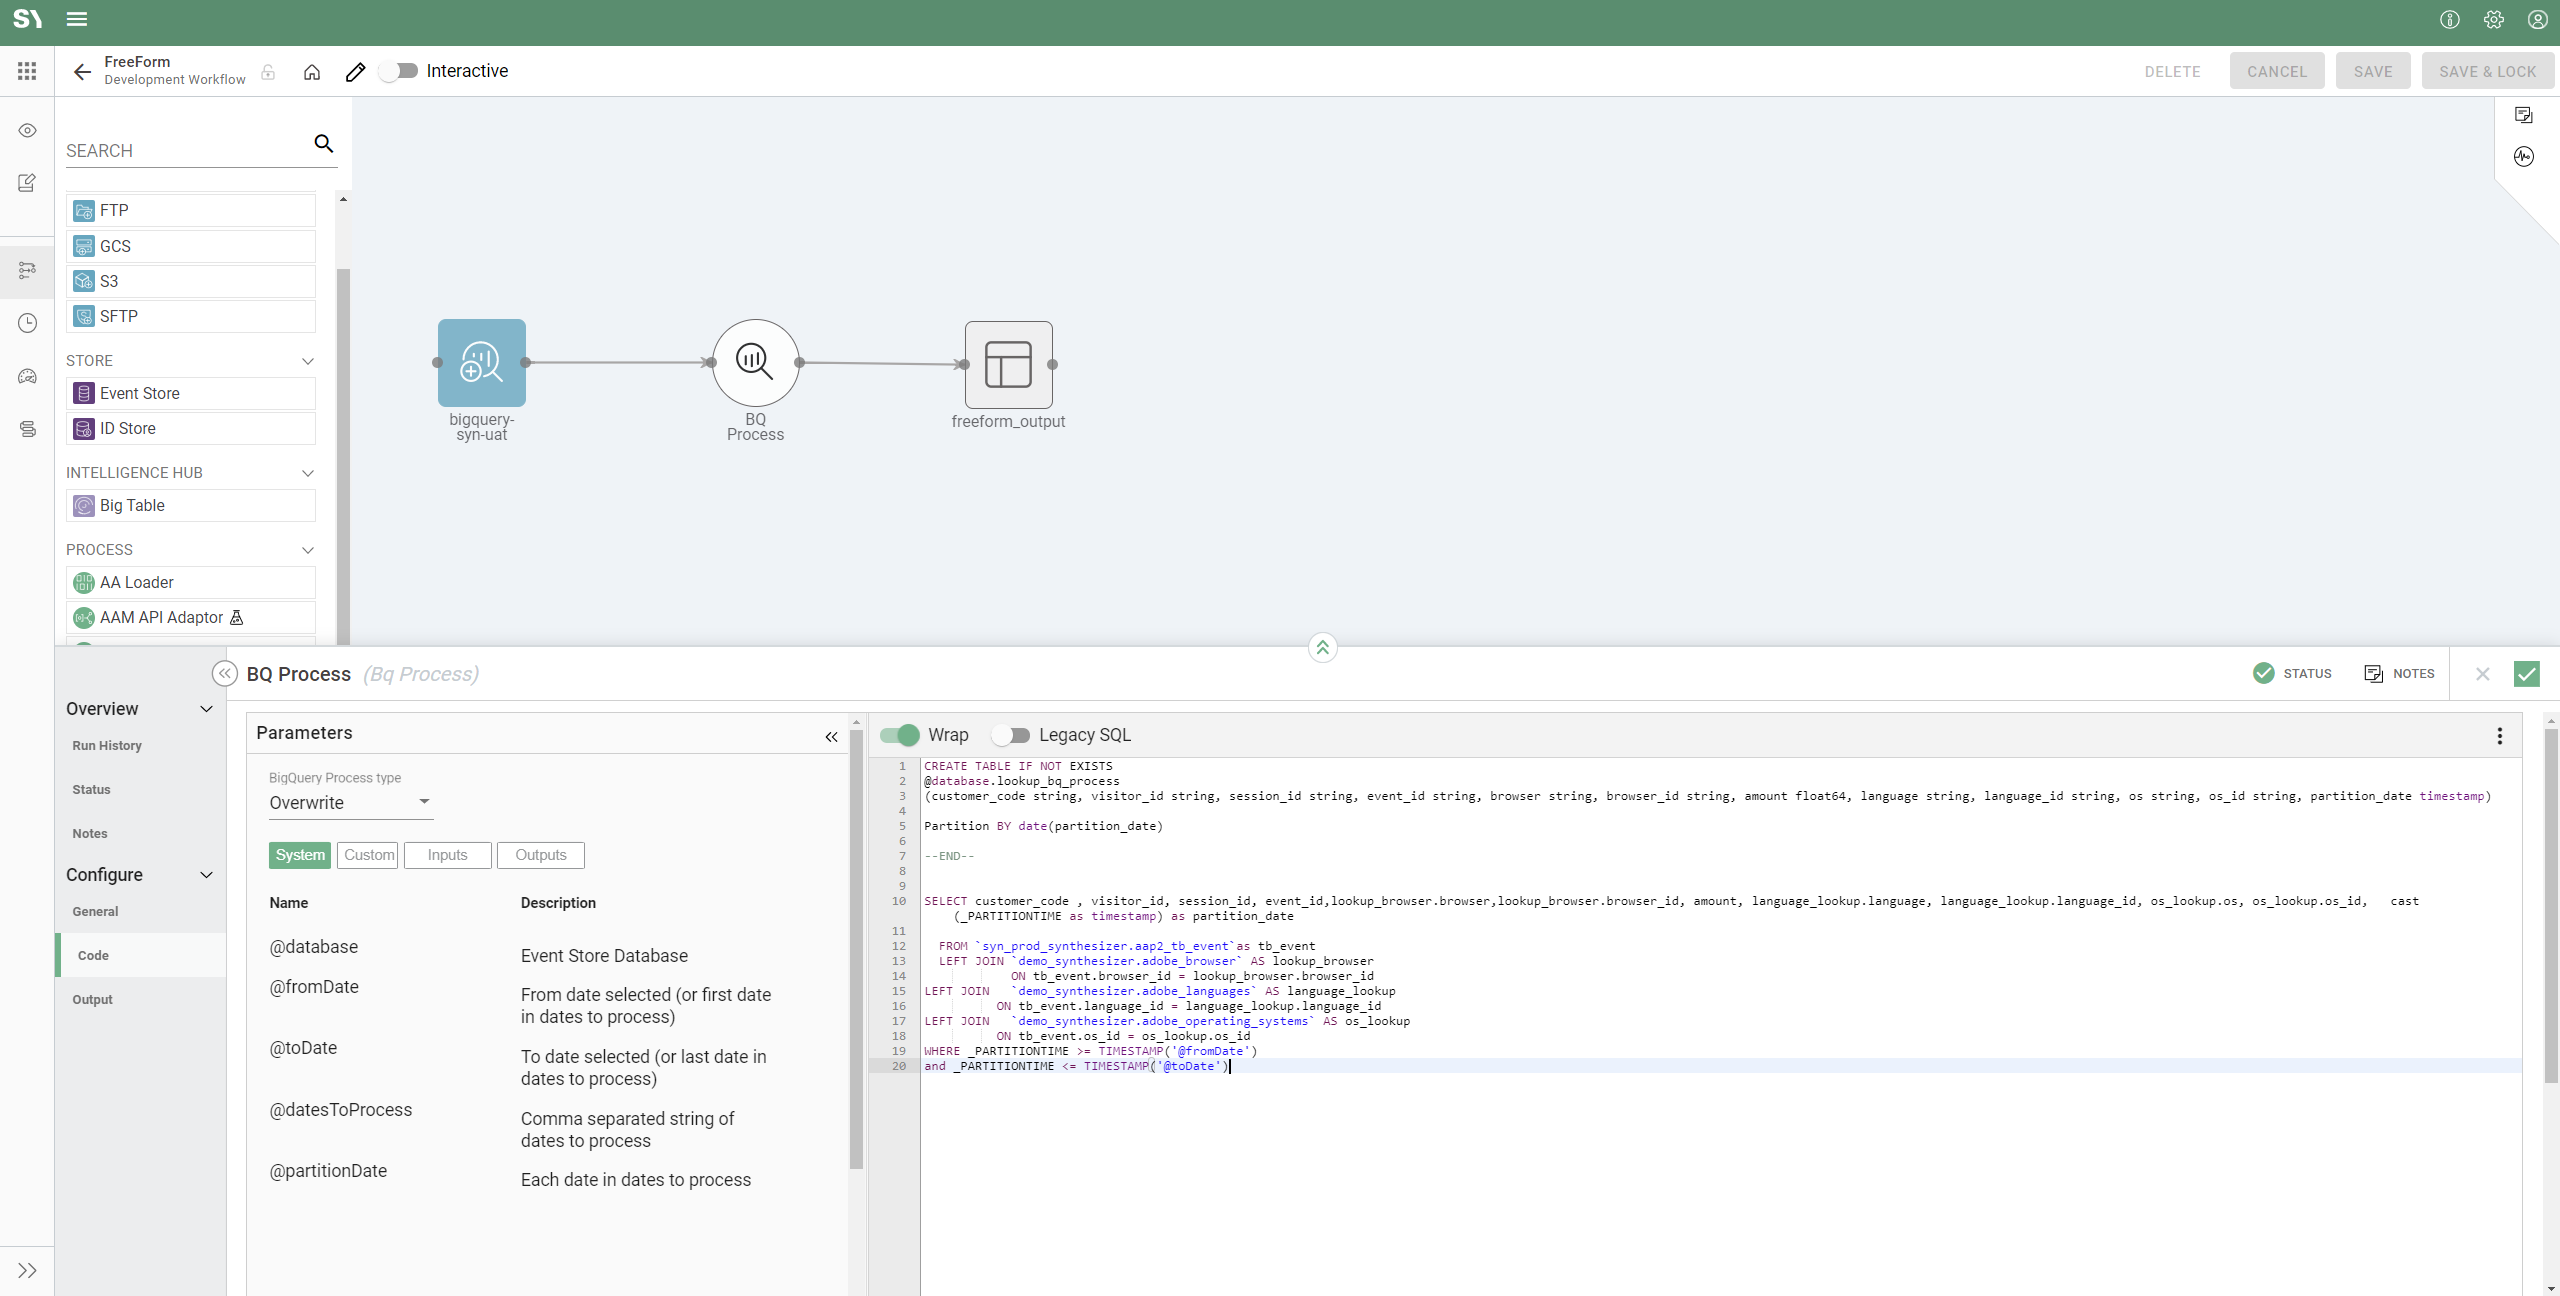
- Now click on Output and let's provide a name for the table.
- Let's also update the display name in the workflow. Please make a note of the table name and the database, We will need these credentials in the next process.
- Now save the changes by clicking tick () on the right.
- Now drag From BQ on the workflow. This will allow us to bring our new dataset into Hive and make it natively available to other apps via Event Stores.
- Click on the edge of the BQ Process and connect it to the From BQ. This will enable From BQ for editing:
- Click on From BQ and now enter the dataset (database) name and table name of our new table.
- Click on "Schema" on the left-side menu.
- Click on "Add Columns" and enter all of the column names we created.

- Click on Output and let's provide a name for the table. Update a Display name in the workflow.
- Save the changes by clicking tick () on the right.
- From the left-side menu, drag Transform onto the workflow.
- Click on the edge of From BQ and connect to transform, enabling transform for configuration.
- Click on Transform transform and update the Alias to something that's relevant and aligns with your naming convention.
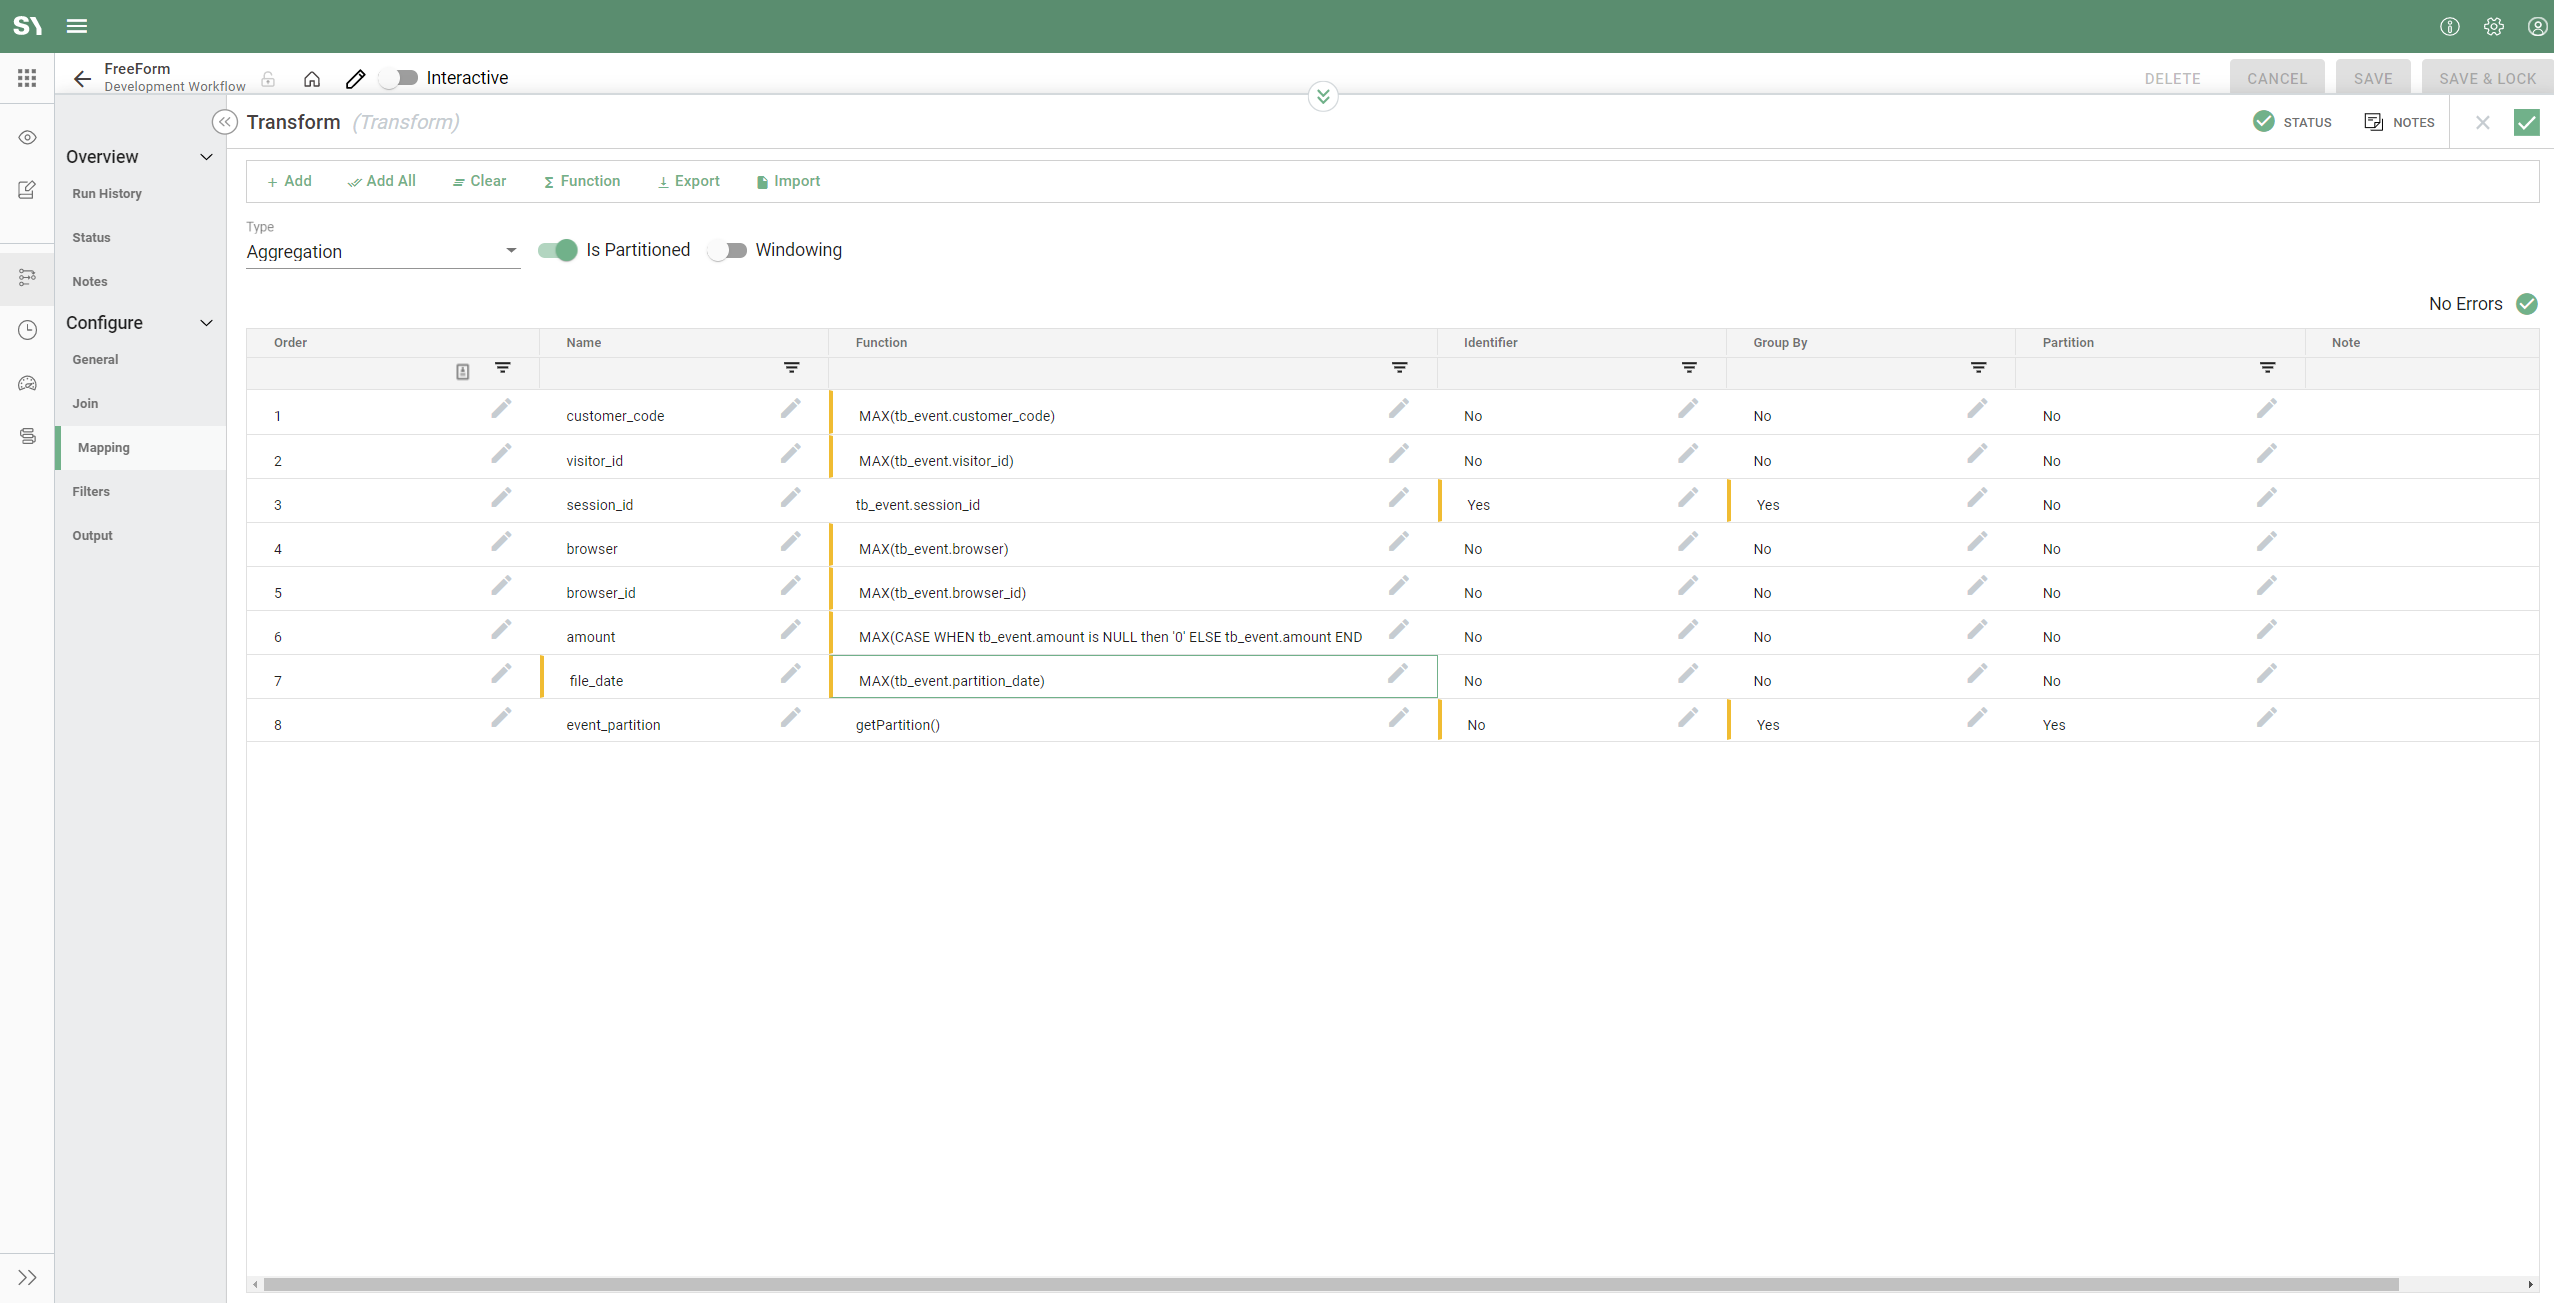
- Click on Mapping and we will aggregate the data and add enrichment on a few columns.
- Click on Type and from the dropdown select Aggregation. If we leave it on Simply, steps 4, 5, and 6 below would not be required.
- Partitioned is ON because we want to keep partitioning in our tables; if we didn't need this we could turn it OFF.
- Windowing is not required here because we don't want to aggregate data for a given window, e.g. a week, month, quarter year, etc.
- Let's go ahead and add all our fields by clicking "Add All". This will auto-complete the schema including mapping to each field.
- Let's make session_id an identifier. To do this under the identifier column for session_id click on the tick box next to it.
- Now let's add Sesion_id and evnet_partition to the Group By.
- Next, we will wrap all of the other columns not in the Group by fields with the MAX() function.
- Finally, we will update the amount column to also include a case statement within the MAX() function. You can have further enrichment in yours if required.
- Click on Output and let's provide a name for the table. Update a Display name in the workflow.
- Save the changes by clicking tick () on the right.
- Finally, click on "Save & Lock".
Test in development
Now you're ready to test your configuration.
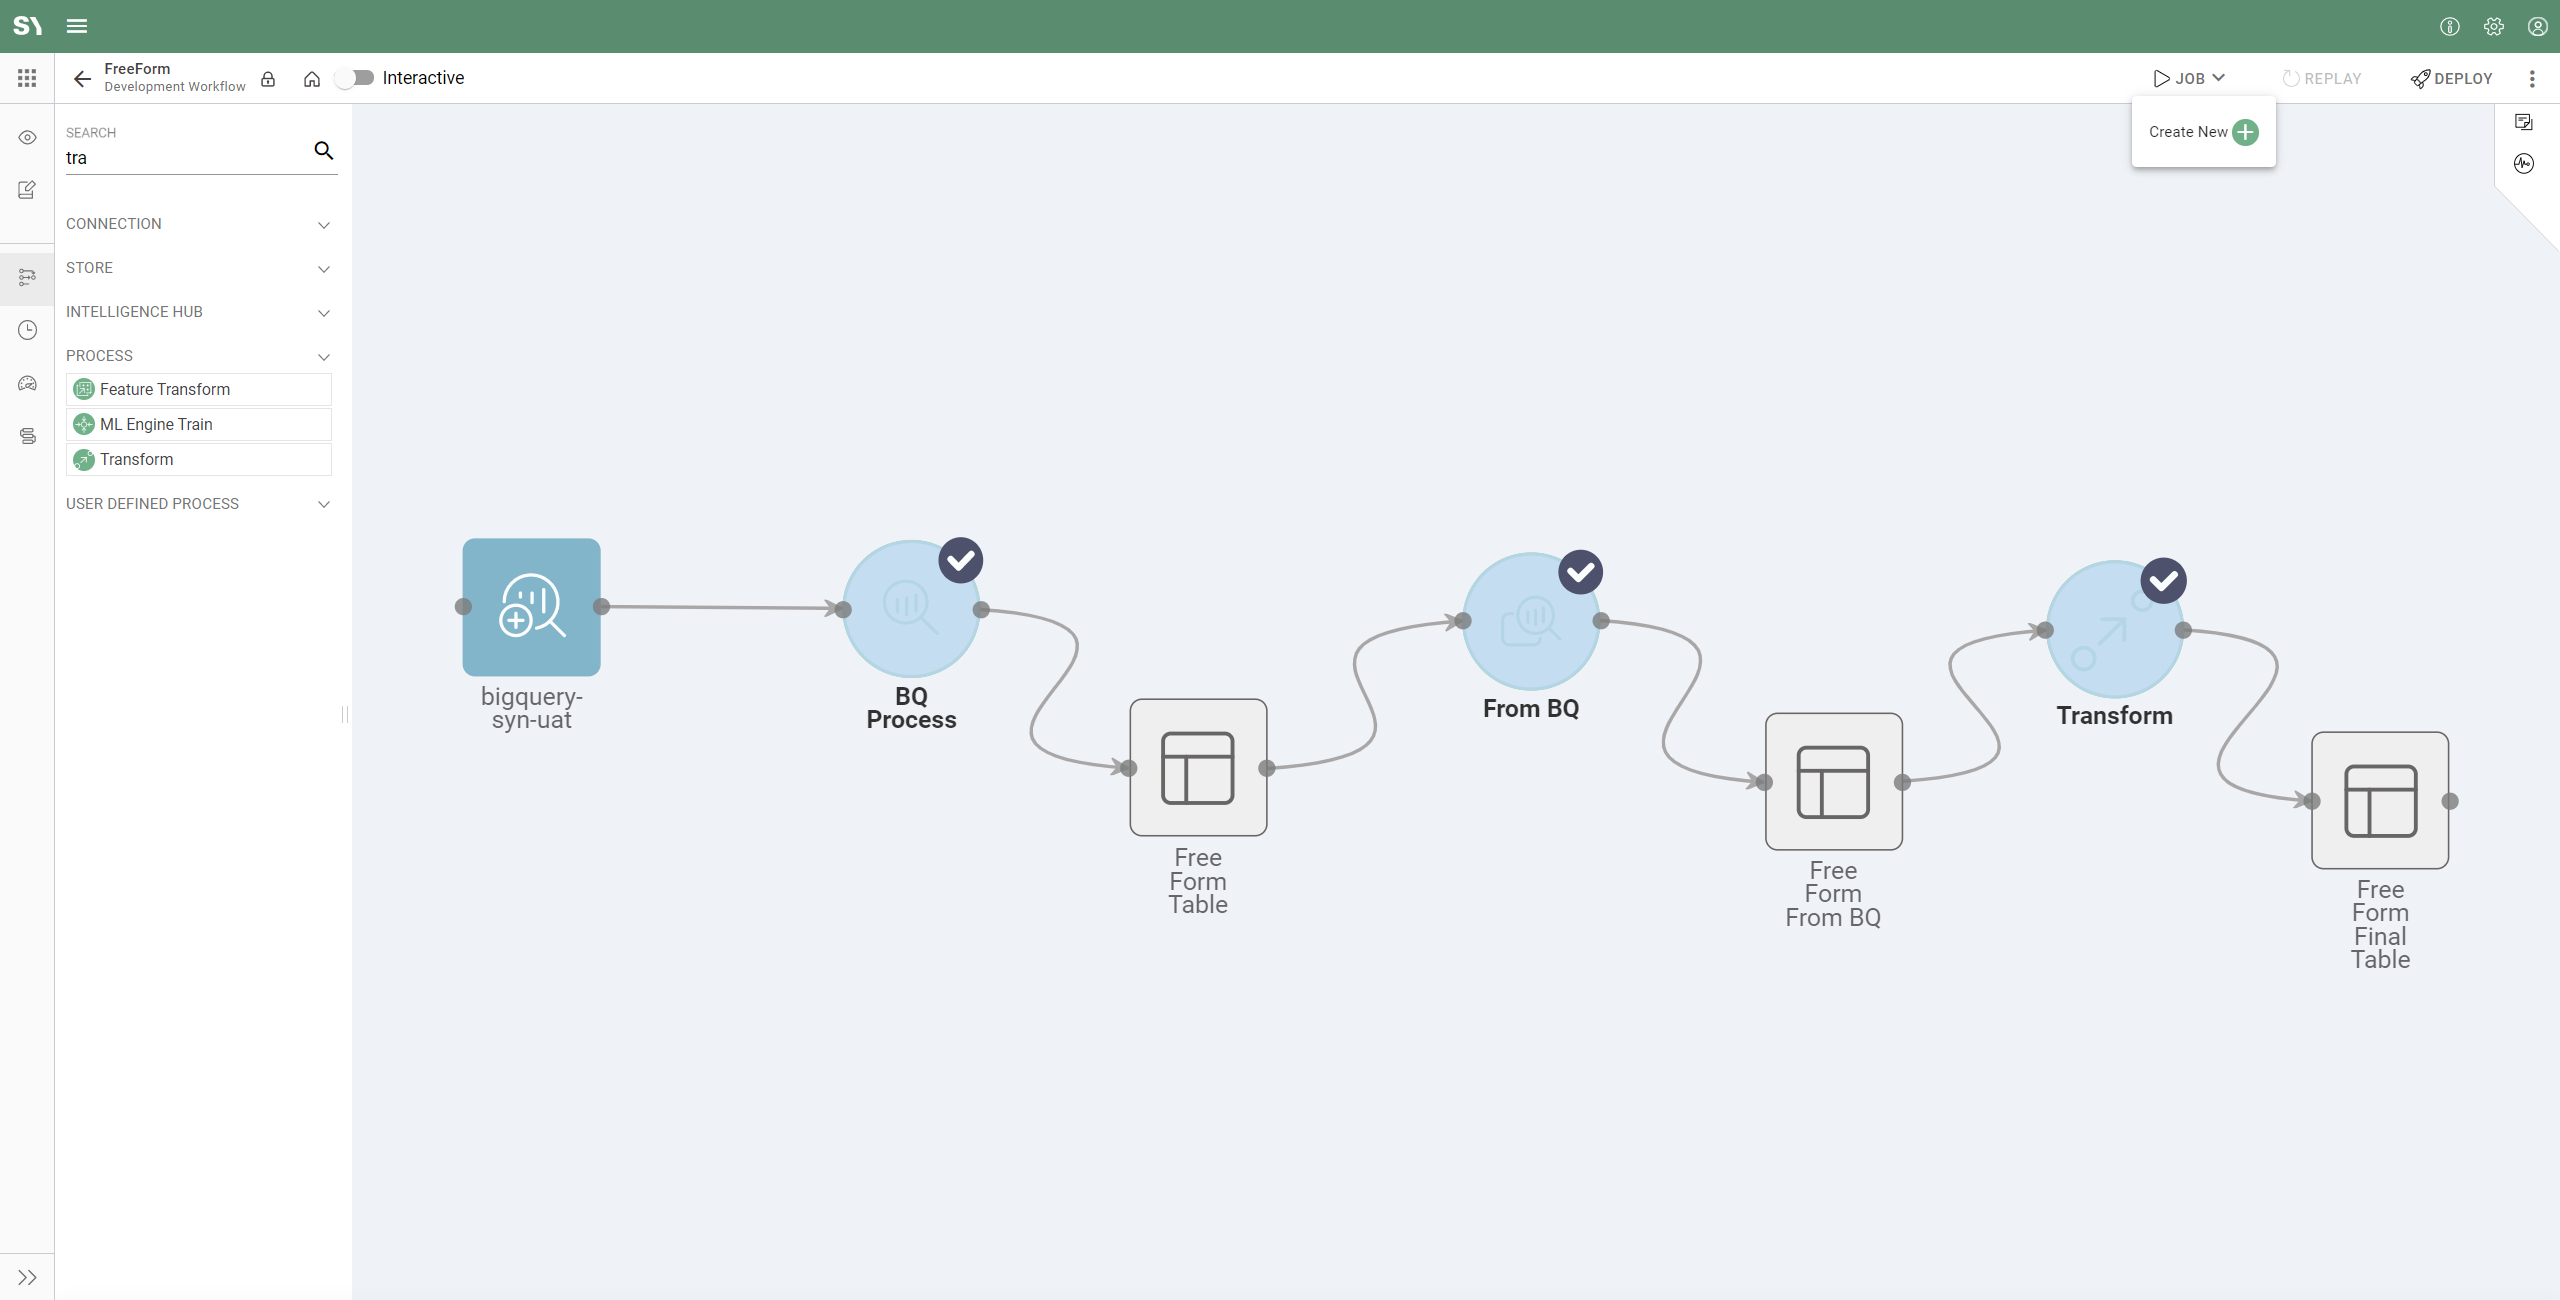
- To test the Synthesizer Free Form, click on the nodes one by one while holding the shift key. The nodes will be highlighted in grey with a tick (see the below screenshot) to indicate it's been selected.
- Now click on the"Job" button on the top-right and then click "New Job" from the dropdown (see screenshot below):
- You will now be presented with a window for configuring your job, let's populate the below:
- Name - Give the job a descriptive name.
- Description - Short description that is informative for the user.
- Tag - Tag the job.
- Process Name - Auto-populated, non-editable.
- Runtime - Runtime is a dropdown allowing us to choose the type/size of the cluster you want to use for processing.
- Process Mode - For the first run "Replace Date Range" is sufficient, however, if you are running multiple times during testing you may opt for "Drop and Replace" or "Add New and Modified". It's worth noting "Drop and Replace" is not advised for production as this will drop your data in Big Query.
- Date Range - Dropdown with several options, e.g. "Custom" that allows you to select the dates you want to process (From Date / To Date); "Last N Days" that allows you to select a relative date range. For our purposes, we are using "Custom" so we will have to enter two dates.
- Preview Record Limit - Leave default setting.
- Default Test File Limit - Leave default setting.
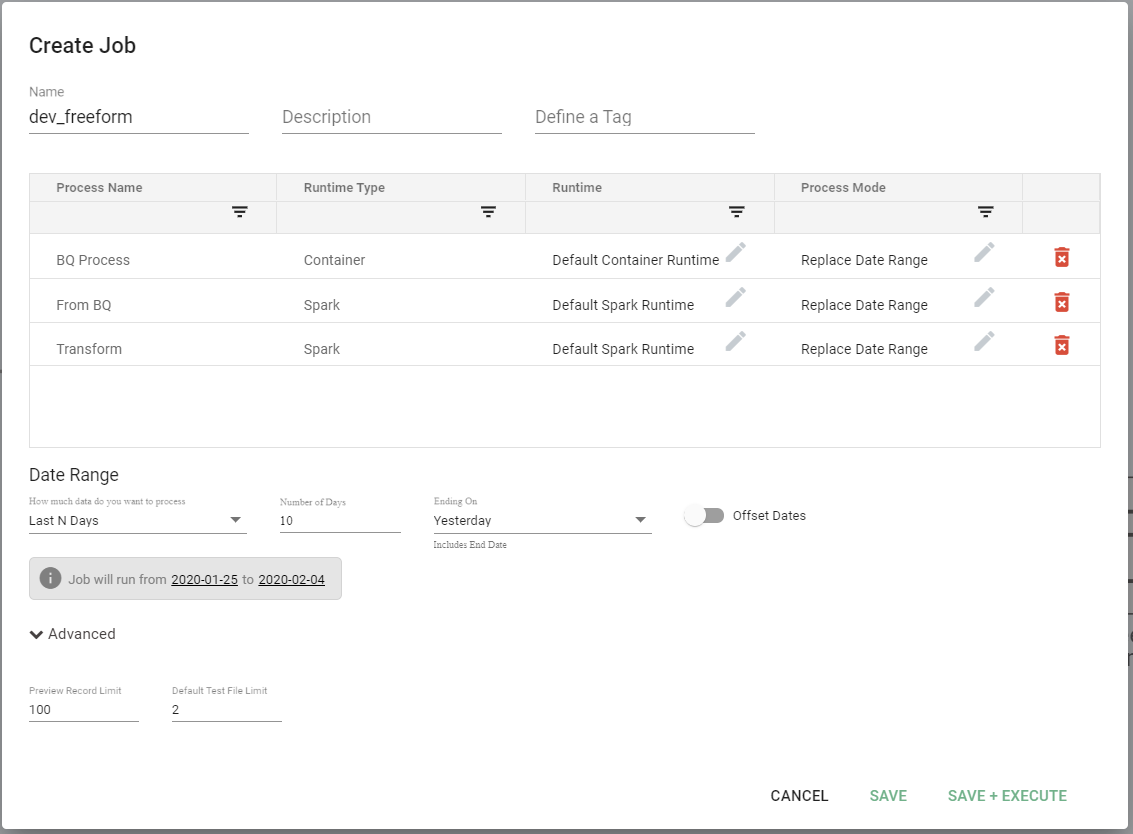
- Click on "Save & Execute" and the job will start.
- The panel on the right will have a 1 next to the Activity icon (
 ) indicating one running job. Click on Activity to expand and show job details on the right side menu:
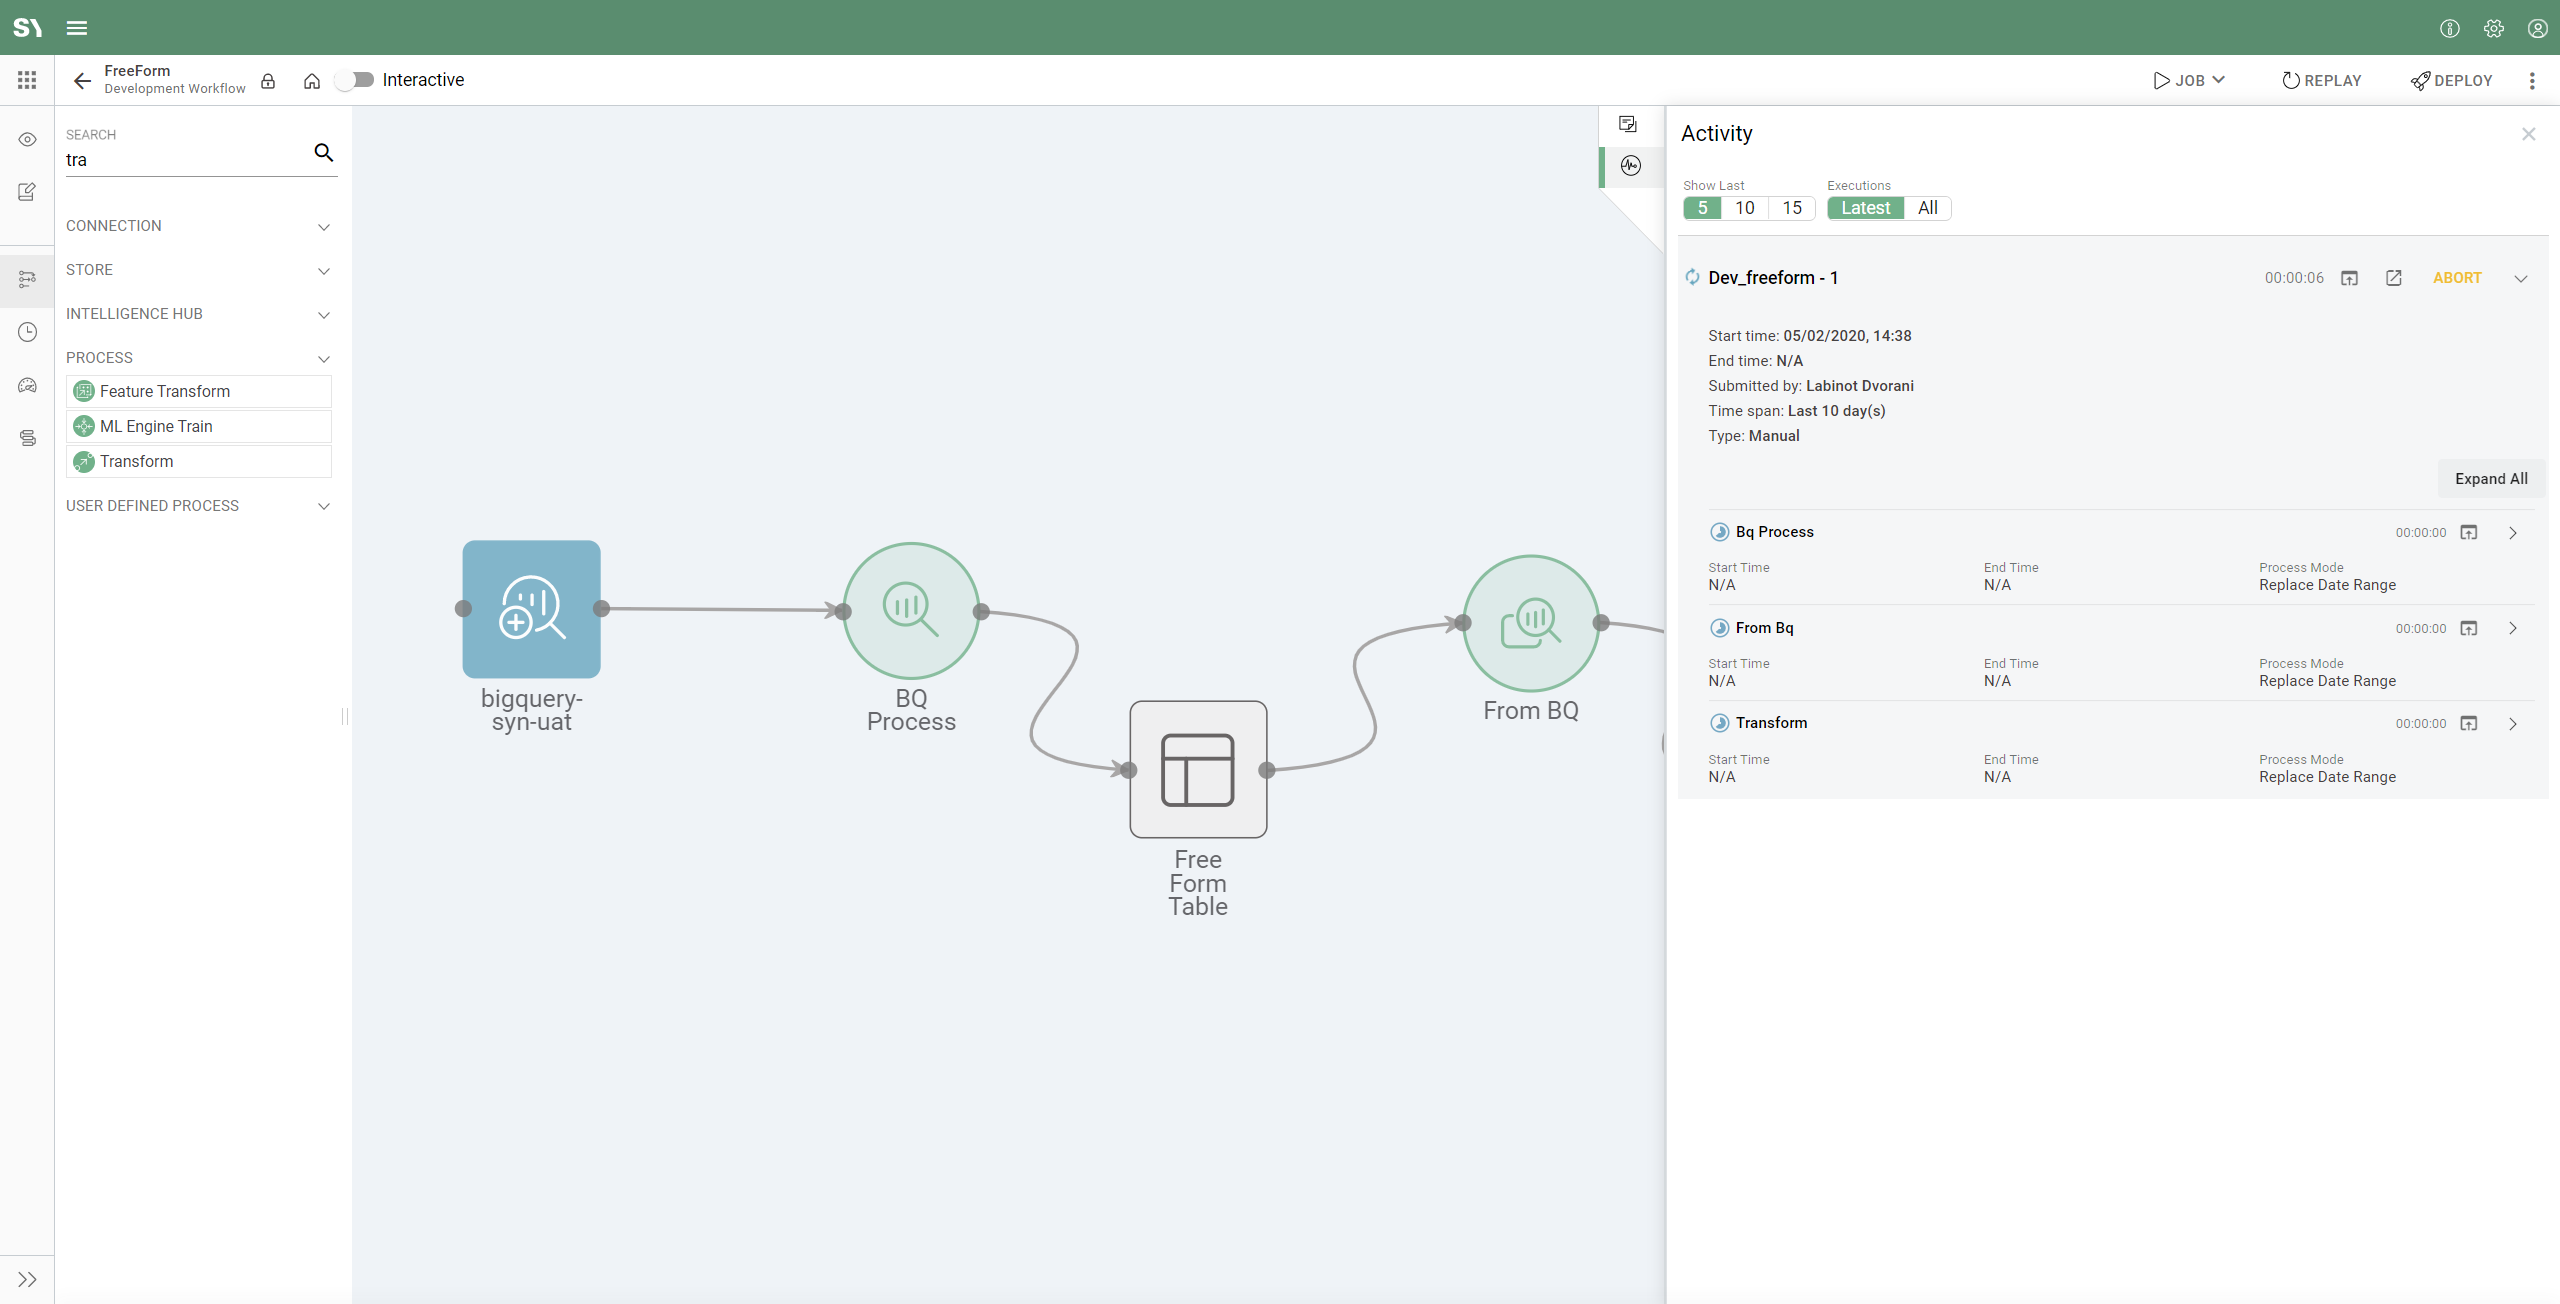
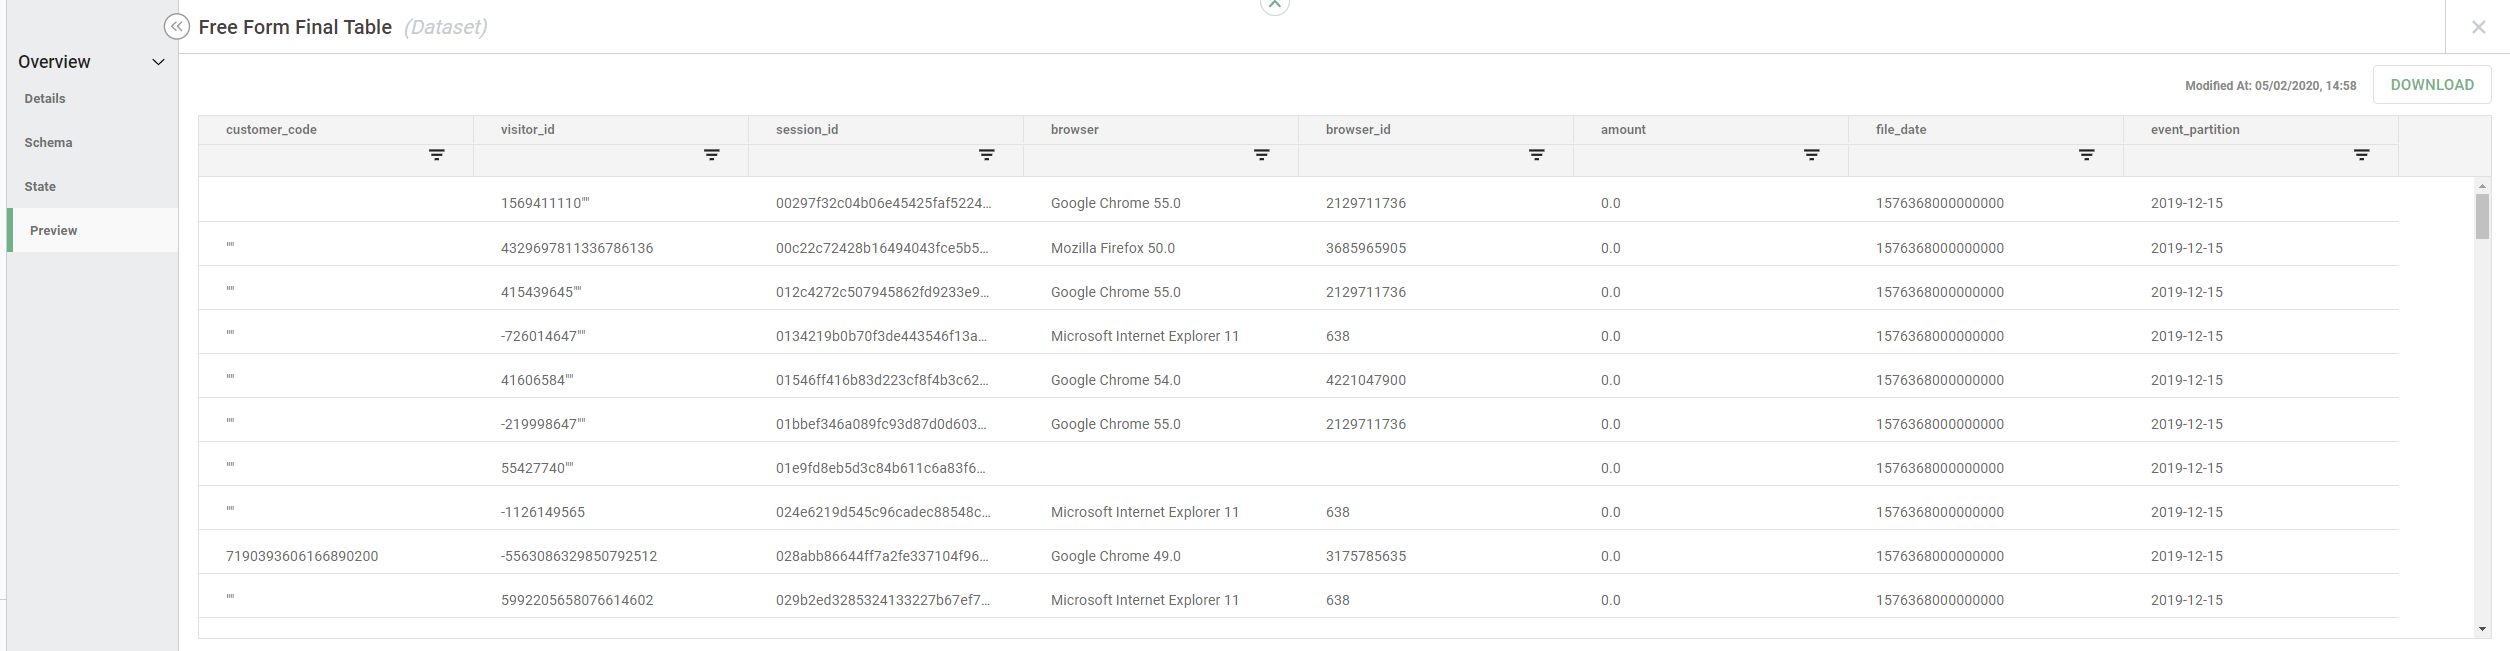
- Once the job completes, you can click on the output node. The panel will have a menu on the left. Click on "Preview":
Run job in production
Now it is time to deploy your app from the development workflow to production:
- From the development workflow, click the "Deploy" button:
- After the initial deployment, you will be required to create a snapshot name.
- Snapshot is a feature that saves the state of the app so you can track changes over time and potentially restore a previous version of the app.

- Now open the production workflow.
- Highlight the nodes you want to include in the job by holding "Shift" then clicking on the Unified Event Enrich processes.
- Click on the Job button on the top-right menu; choose "New Job" in the sub-menu; fill in the name, description and date range; click "Save and Execute", which will start the job.
- The panel on the right will have a 1 next to the Activity icon () indicating one running job. Click on Activity to expand and show job details on the right side menu.
- Once the job completes, you can click on the output node. The panel will have a menu on the left. Click on "Preview".