Now that the Syntasa software is installed, there's a bit of setup needed before you can take advantage of the platform. The high-level steps of system configuration are described in the article System Configuration Guide.
This article dives into the details of the first of those steps, Infrastructure, if your Syntasa environment has been installed within Amazon Web Services (AWS):
- Locating prerequisite information
- Identifying and entering Infrastructure information for the following sections:
- Final review of Infrastructure information
Locating prerequisite information
You will need access to the Amazon Web Services Console with admin-level permissions. We suggest opening the AWS Console in one tab and the Syntasa Infrastructure page in another. We will be finding the information in AWS Console and inputting it into the Syntasa Infrastructure screen for the rest of this guide.
Prerequisite - The Syntasa application needs to already be installed in AWS.
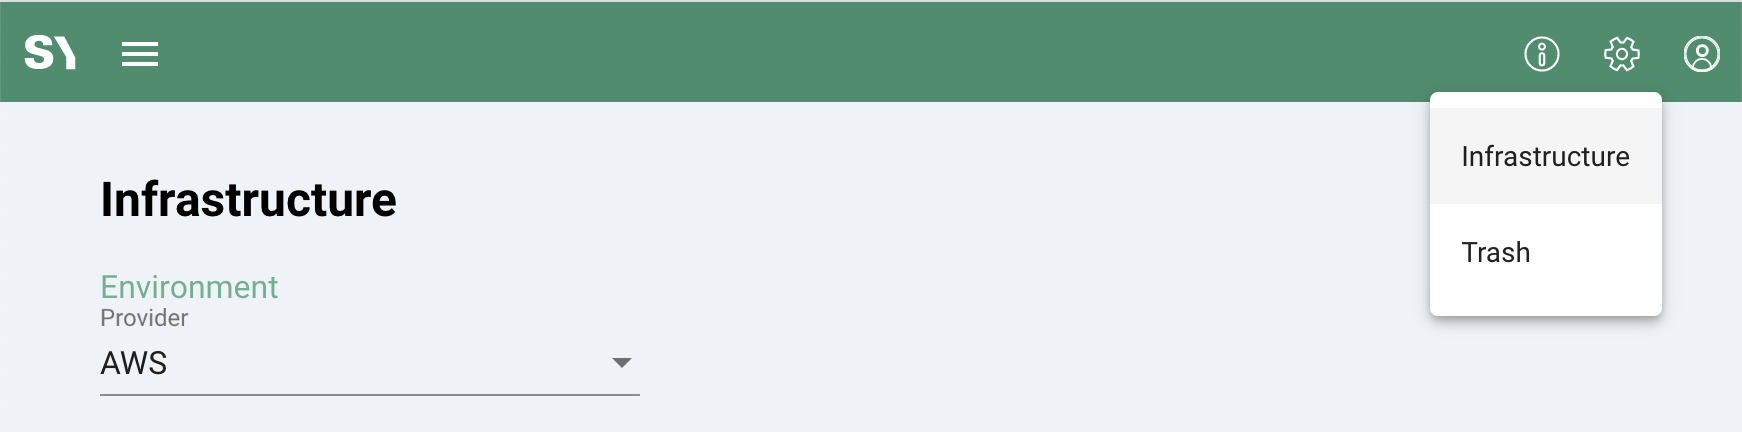
The Infrastructure screen is available from the settings menu gear icon (![]() ). Only users with the role System Admin have access to this menu.
). Only users with the role System Admin have access to this menu.
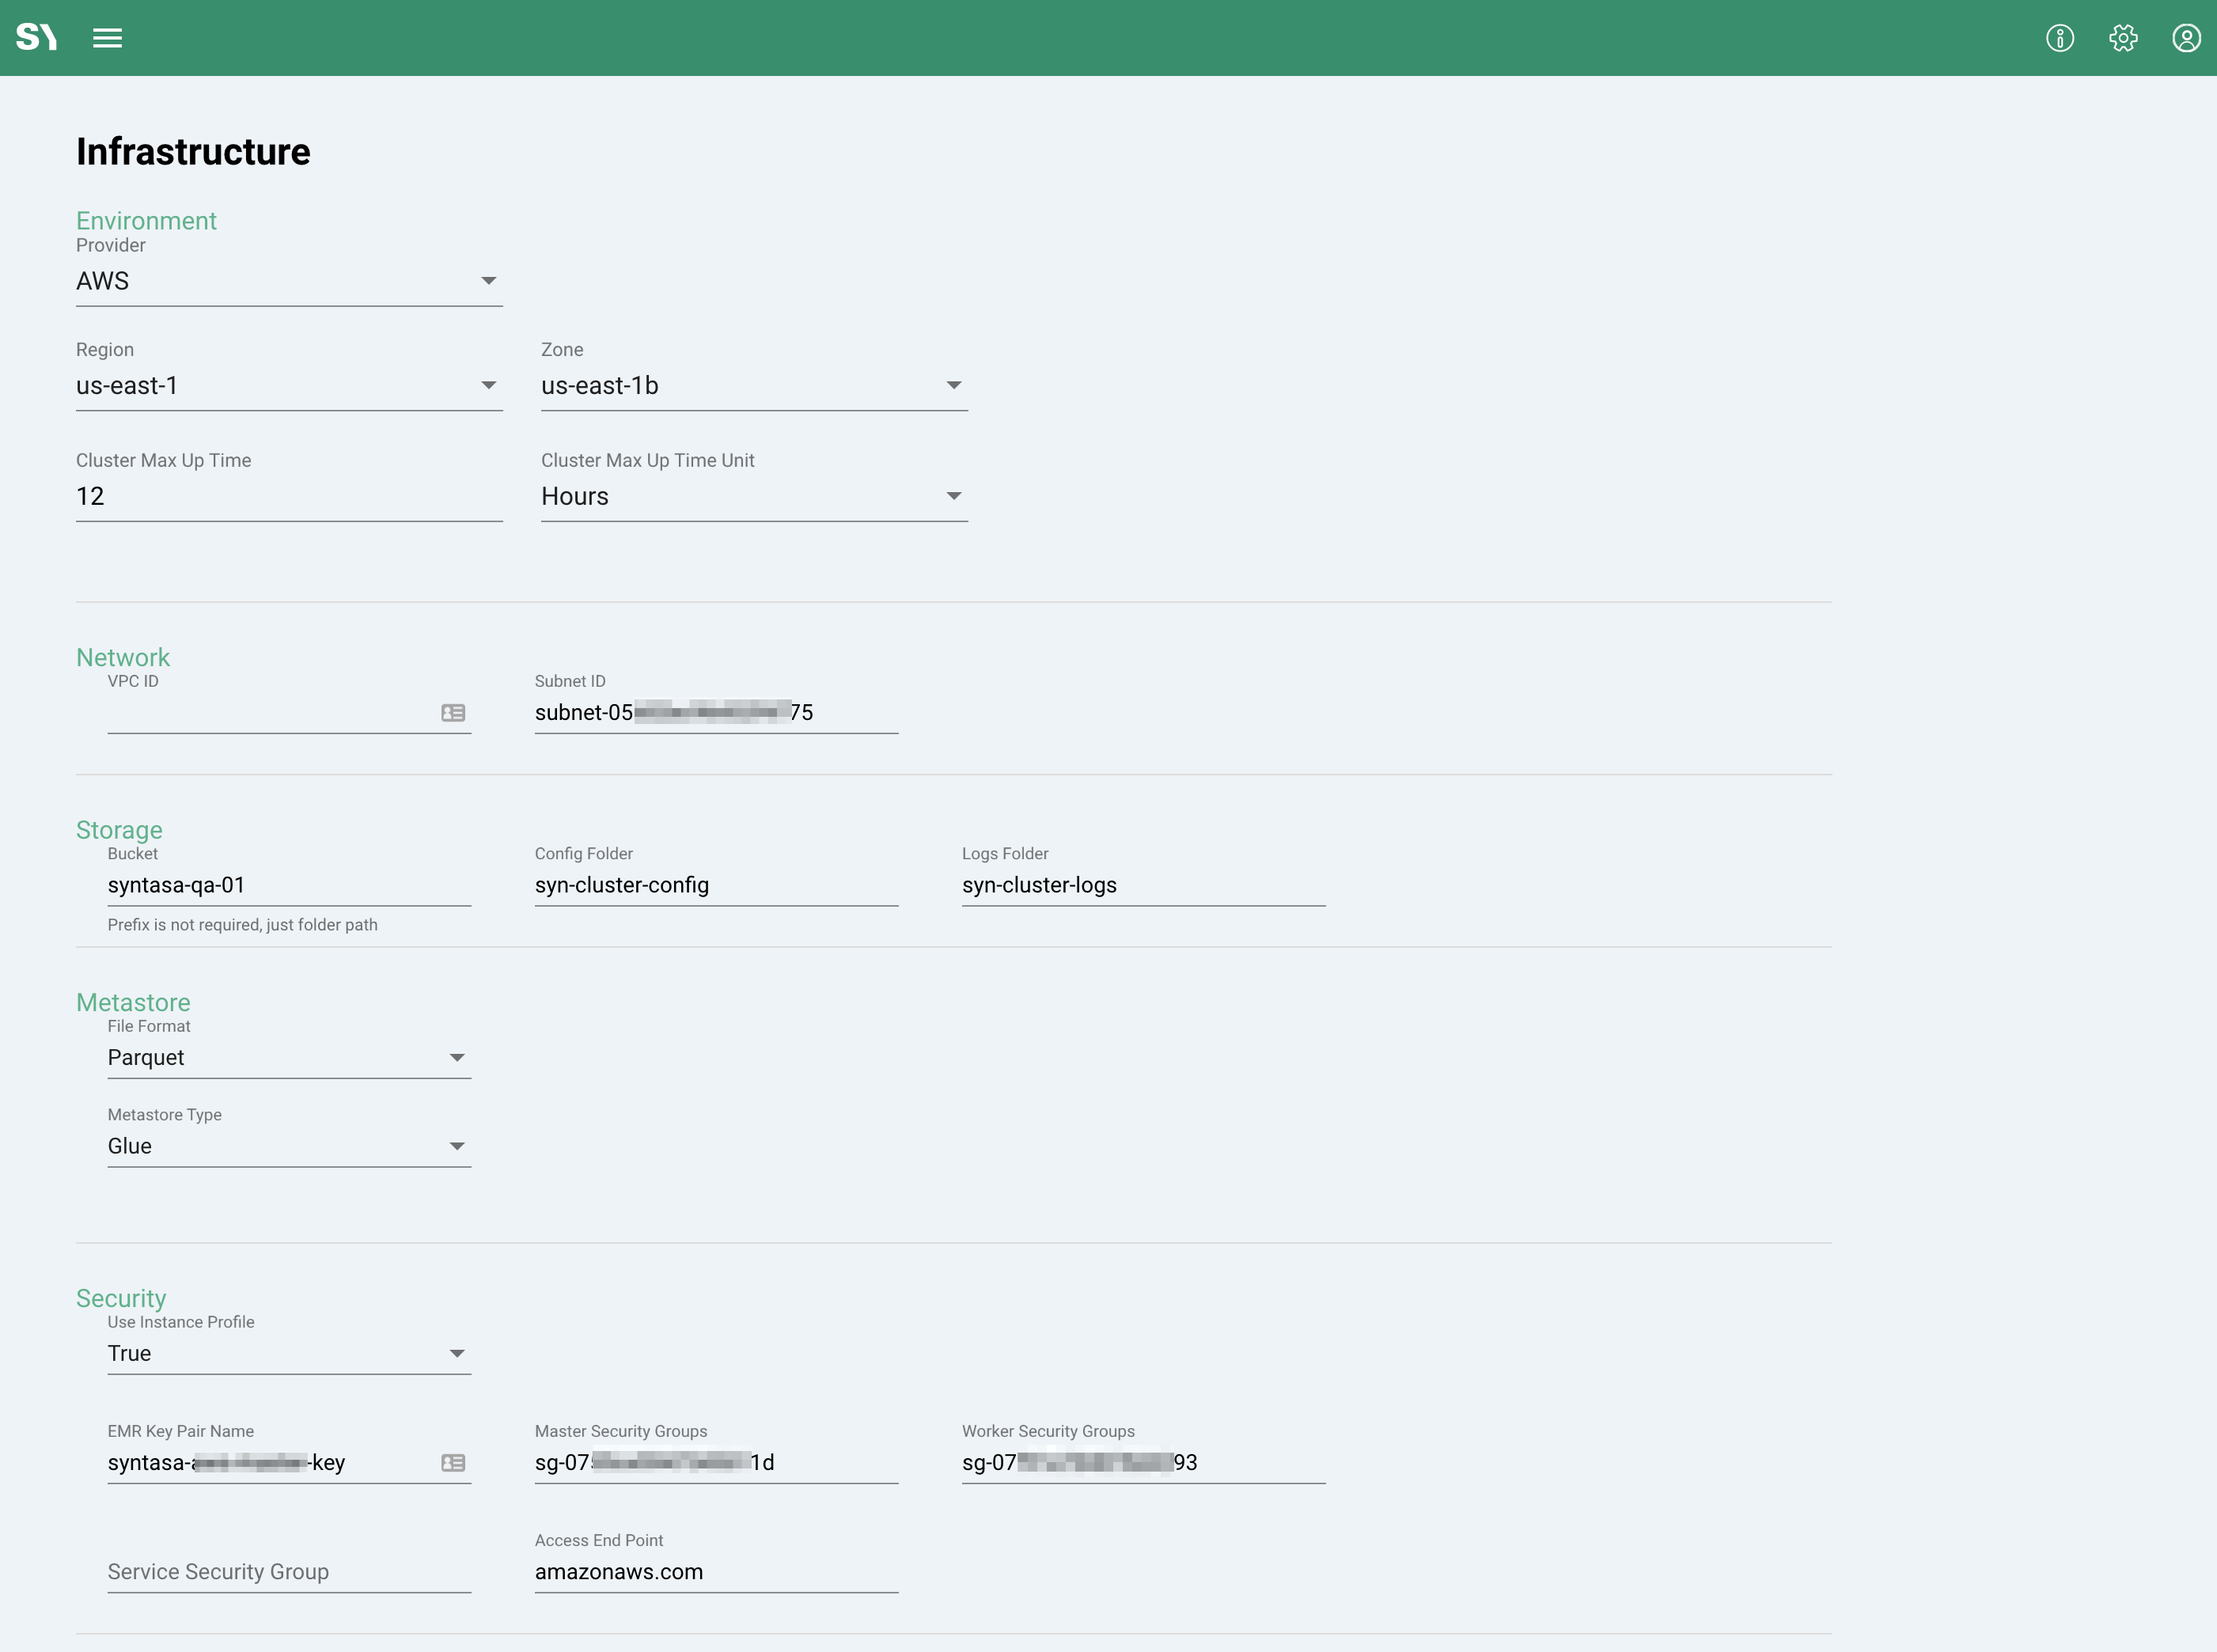
Environment
The fields in the Environment section of the Infrastructure page should be filled out according to the settings within your AWS environment. The below screenshot shows the values from the example, please follow the instructions for each field to apply the correct values for your environment.
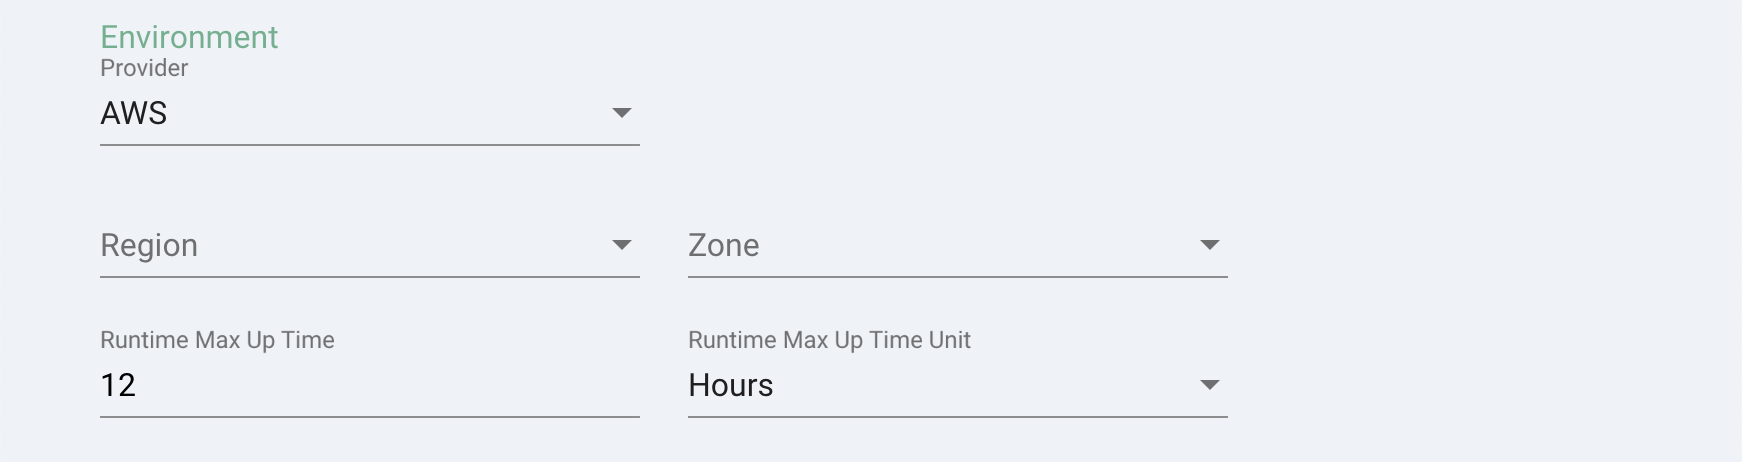
Provider - Select AWS from the drop-down.
Region:
We will find the region and zone information by referencing the VPC that is hosting the Syntasa application.
- Navigate to the "VPC" AWS service.
- Choose "Subnets" from the left-hand menu to view the configured VPC subnets.
- There will be a subnet with "EMR" in the subnet name. Note the "Availability Zone" associated with this subnet.
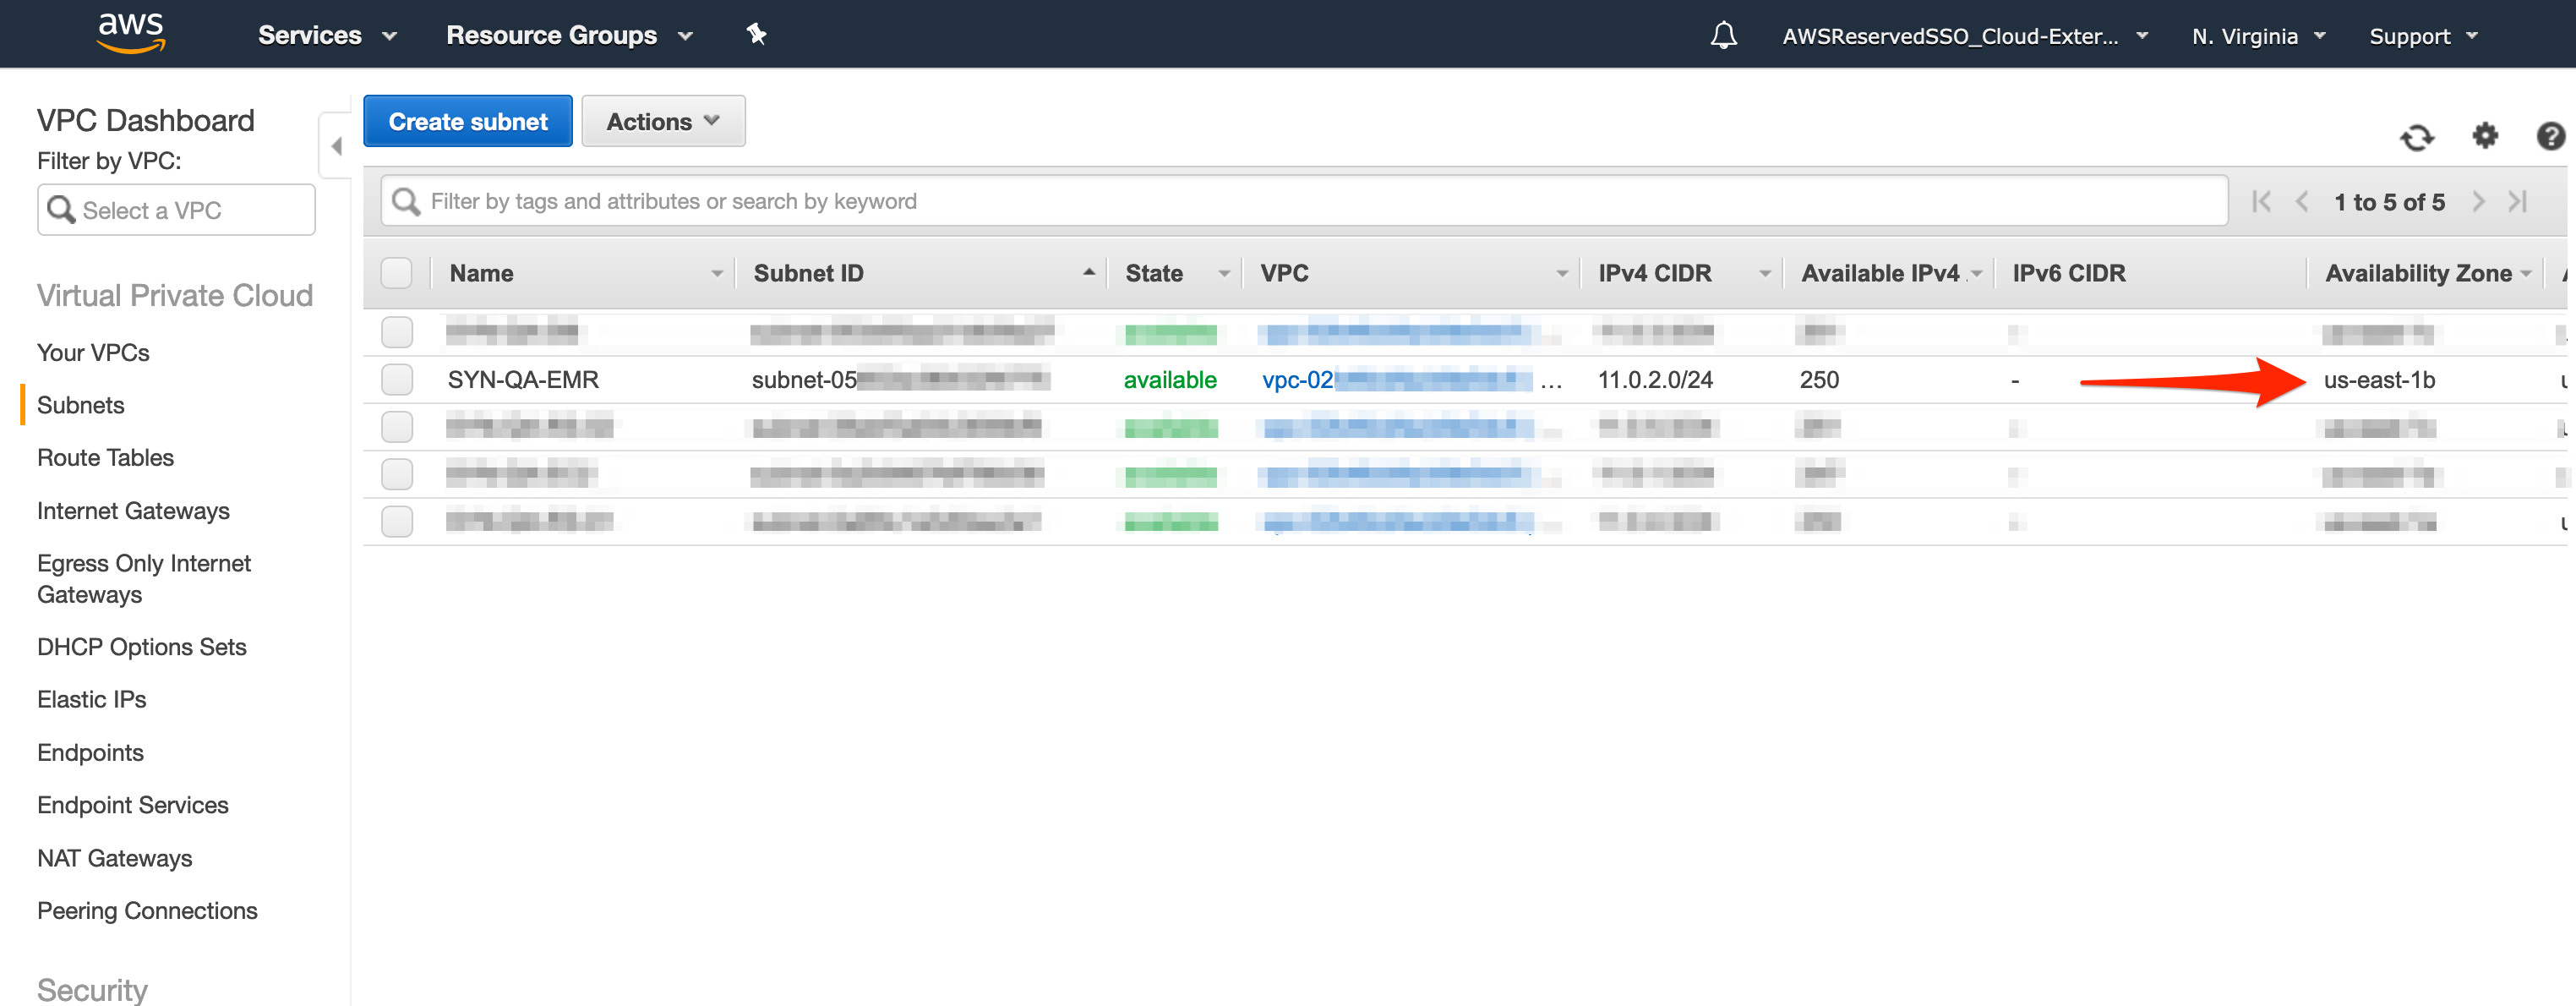
- Choose "us-east-1" from the Zone dropdown in the Syntasa Infrastructure screen.
Zone - Referencing the step above and the example above, find the zone "us-east1-b" in the Zone dropdown.
Runtime Max Up Time - This configuration is a cost-control measure. A cluster will be automatically deleted after this threshold has been passed, even if a job is still running. We recommend setting this to 12 hours.
Runtime Max Up Time Unit - Syntasa recommends setting the time unit to Hours.
Network
In this section, we tell Syntasa about the VPC settings in your AWS environment. The below screenshot shows the values from the example, please follow the instructions for each field to apply the correct values for your environment.

In this section, we tell Syntasa about the VPC settings in the AWS account that is hosting Syntasa.
VPC ID - Leave blank
Subnet ID:
- Navigate to the "VPC" AWS service.
- Choose "Subnets" from the left-hand menu to view the configured VPC subnets.
- If there is a subnet with "EMR" in the subnet name or you know the subnet associated with EMR clusters, note the "Availability Zone" associated with this subnet.
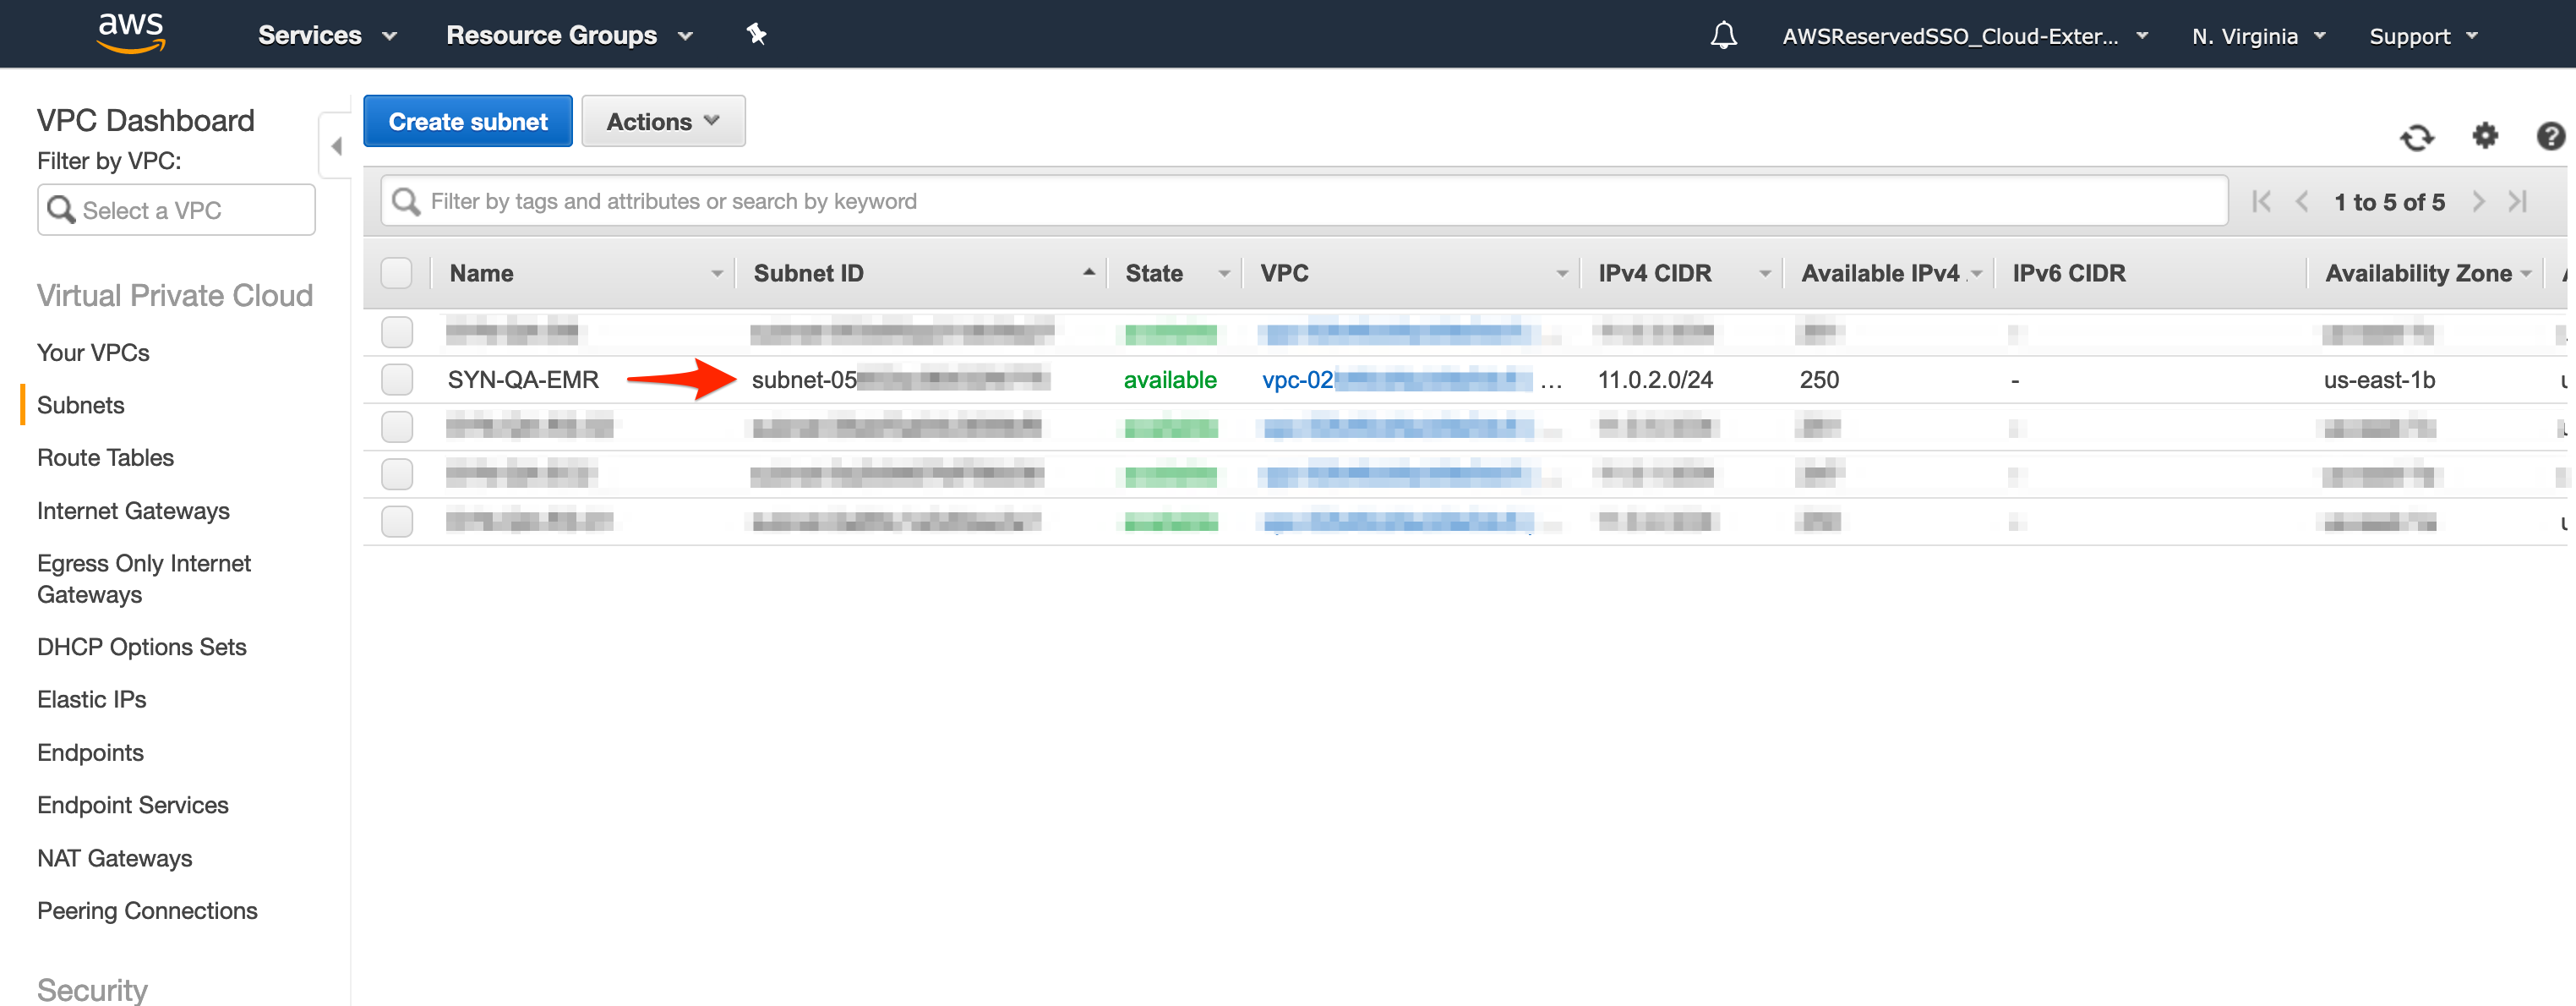
- Add this Subnet ID to the Subnet ID in the Syntasa Infrastructure screen.
Storage
The fields in the Storage section of the Infrastructure page should be filled out according to the settings within your AWS environment. The below screenshot shows the values from the example, please follow the instructions for each field to apply the correct values for your environment.

Bucket
- Navigate to the "S3" AWS service.
- Create a top-level bucket for this project using the "+Create bucket" button at the top of the page. The name can be anything, but we recommend the name being short in length.
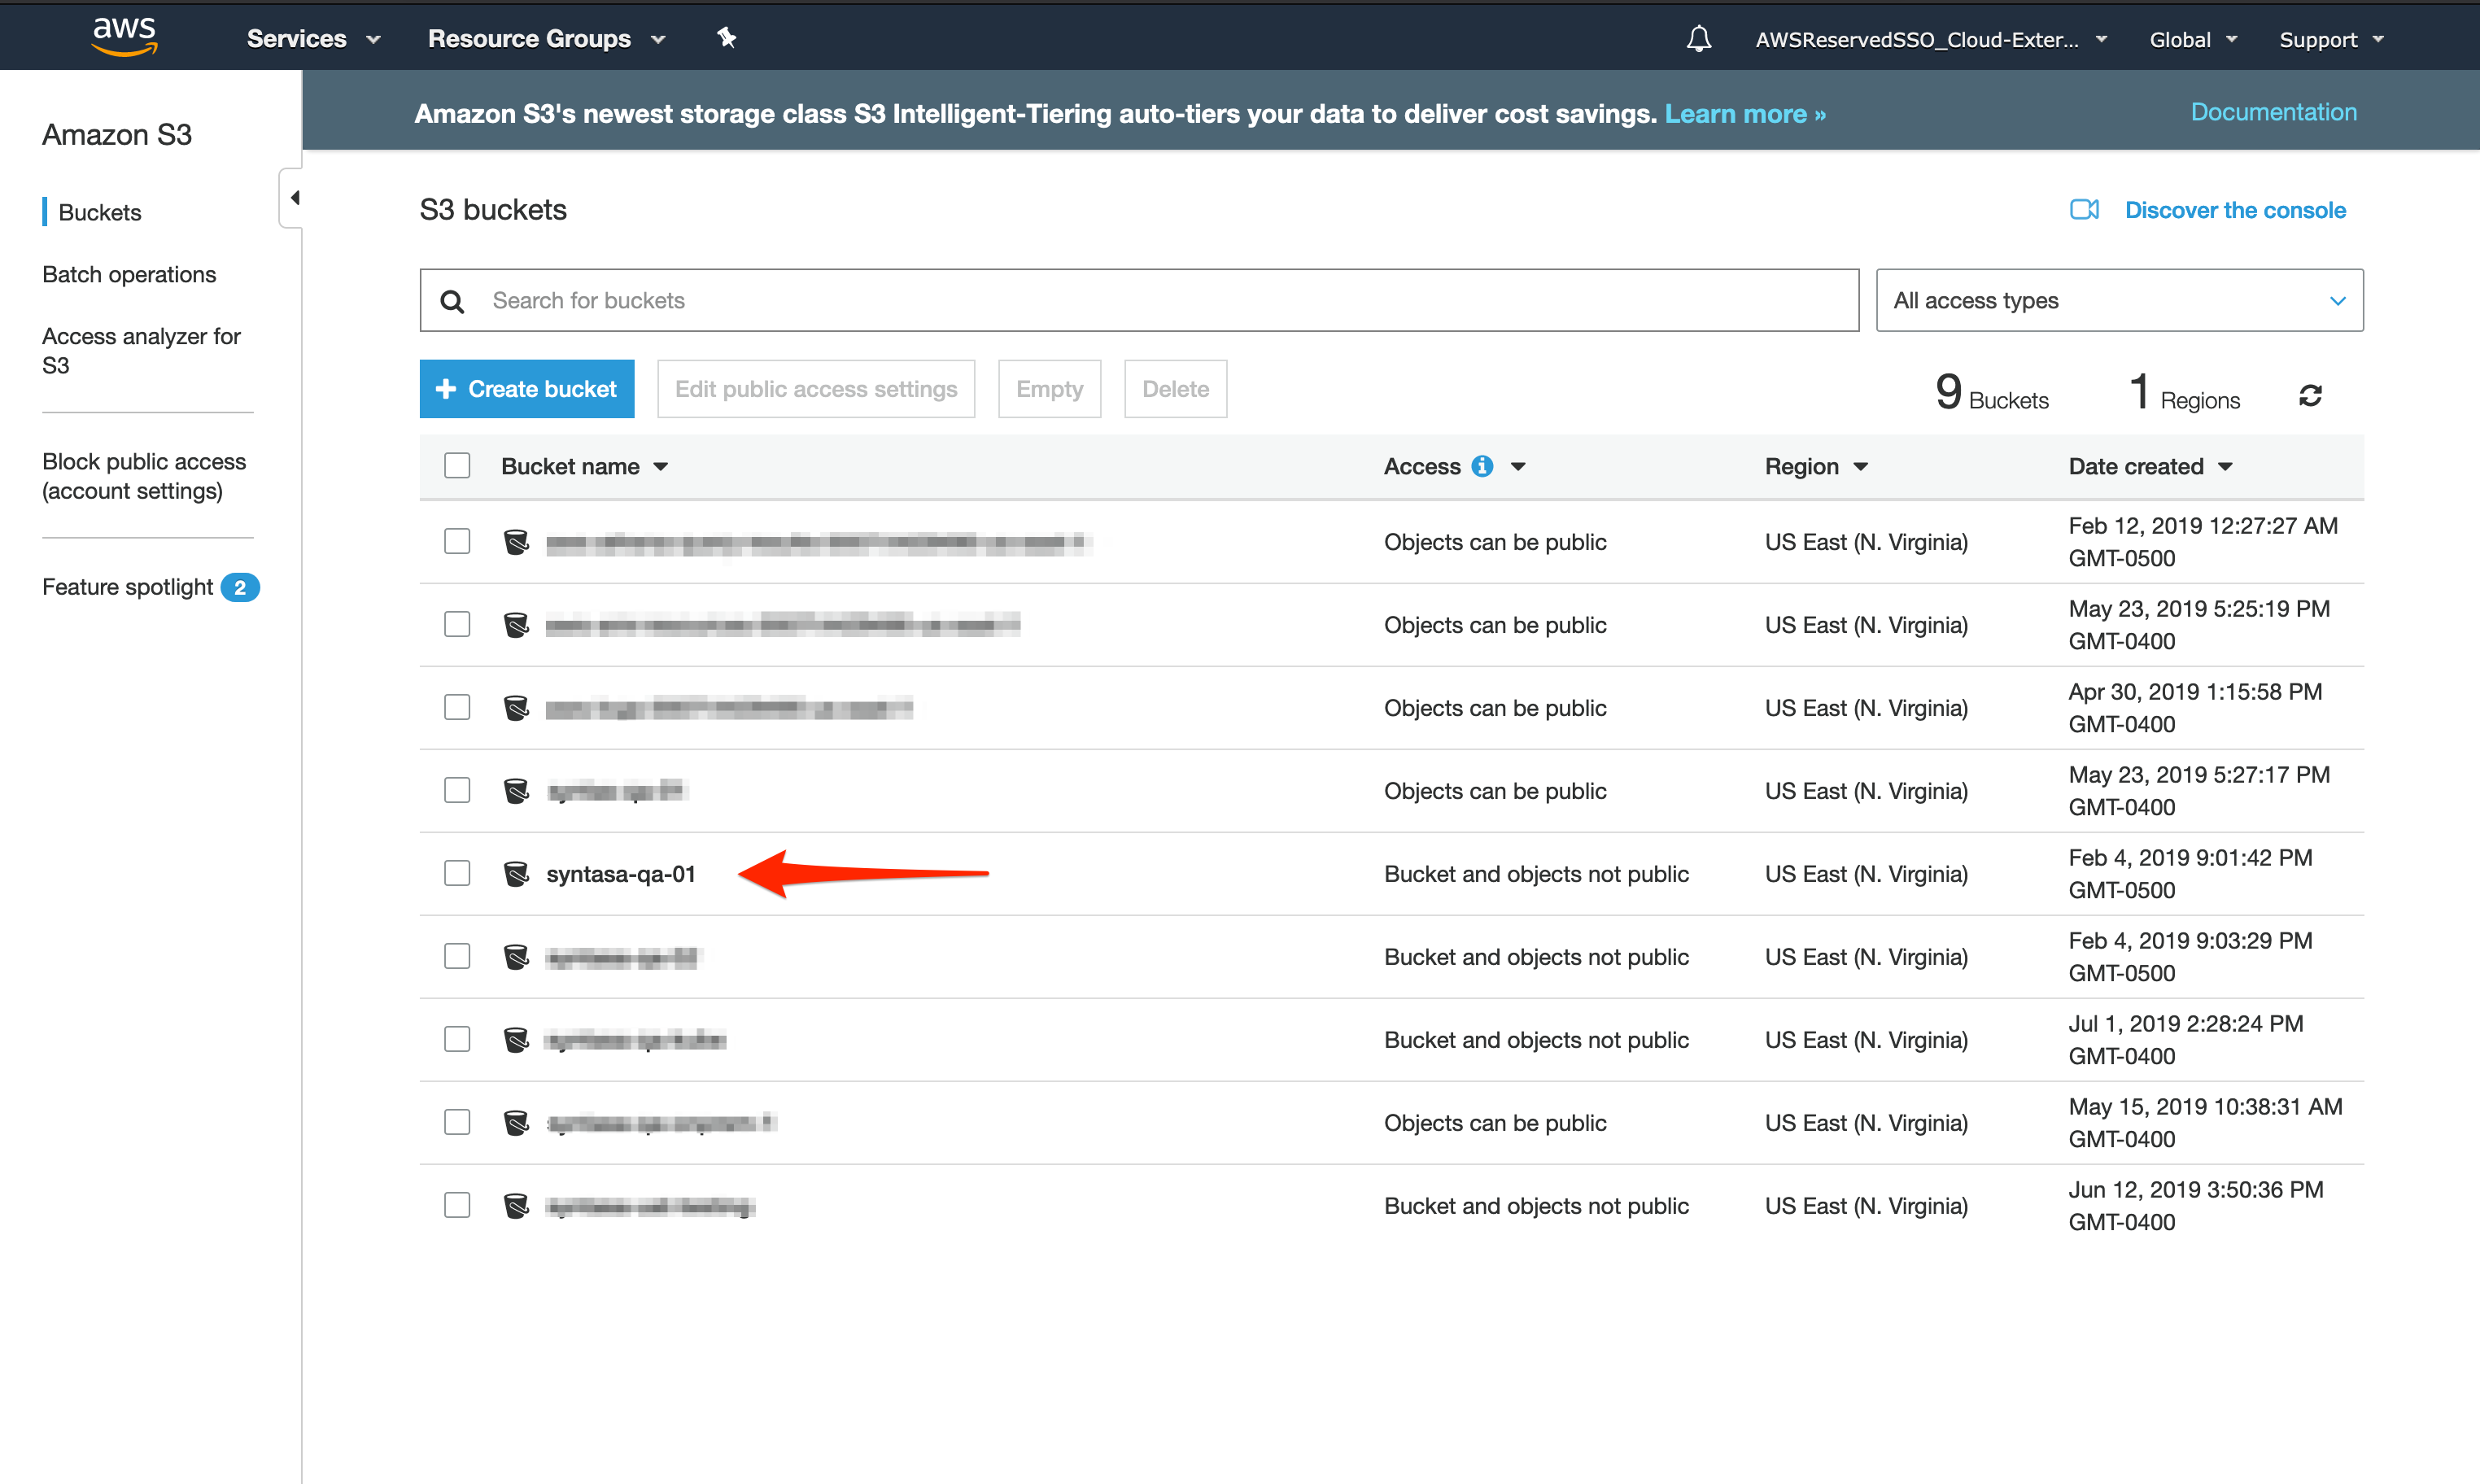
- Add this bucket name to this field in the Infrastructure screen.
Config Folder
This can be set to any valid AWS sub bucket, but we recommend:
syn-cluster-config
Logs Folder
This can be set to any valid AWS sub bucket, but we recommend:
syn-cluster-logs
Metastore
This section refers to configuration options for the Apache Hive Metastore we will use for this Syntasa installation.

File Format - We suggest picking "Parquet" from the drop-down menu.
Metastore Type - Unless otherwise instructed by the support staff, pick "Glue" from the drop-down menu.
Security
The fields in the Security section of the Infrastructure page should be filled out according to the settings within your AWS environment.
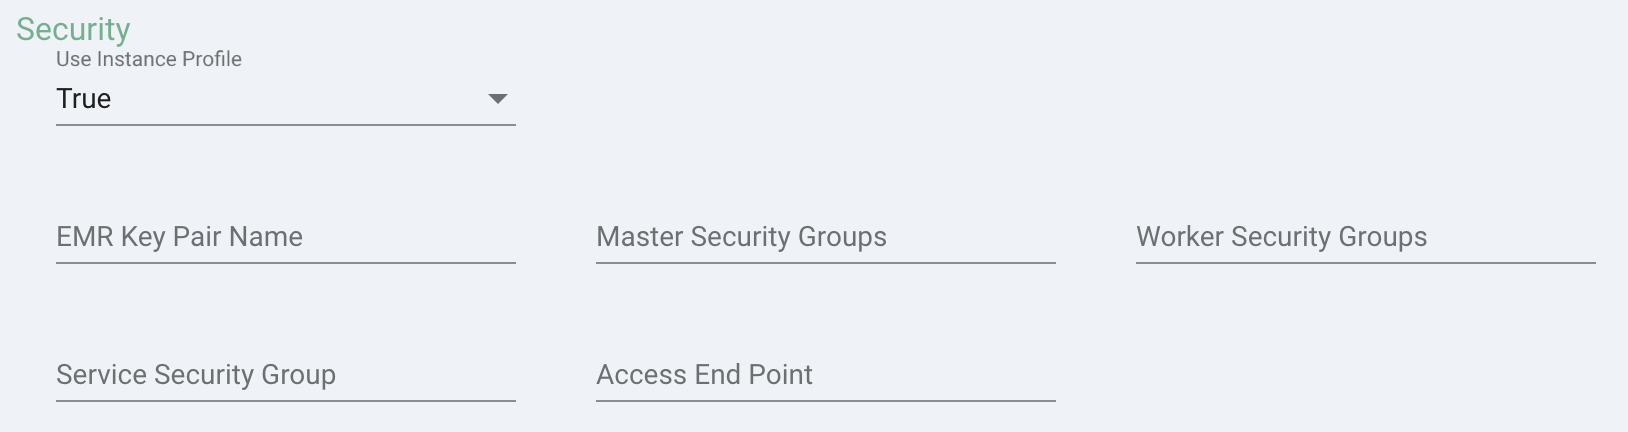
Use Instance Profile
If this drop-down is set to True, it means we will use the credentials associated with the machine that Syntasa is installed and running on. If this is set to False, we have a dialog that lets us enter an AWS access key and secret key.
The default setting here is True.
EMR Key Pair Name:
- Navigate to the "EC2" AWS service.
- Using the left-hand menu, choose "Key Pairs" under the "NETWORK & SECURITY" subgroup.
- Locate the key pair that has been generated for use with EMR (Elastic Map Reduce).
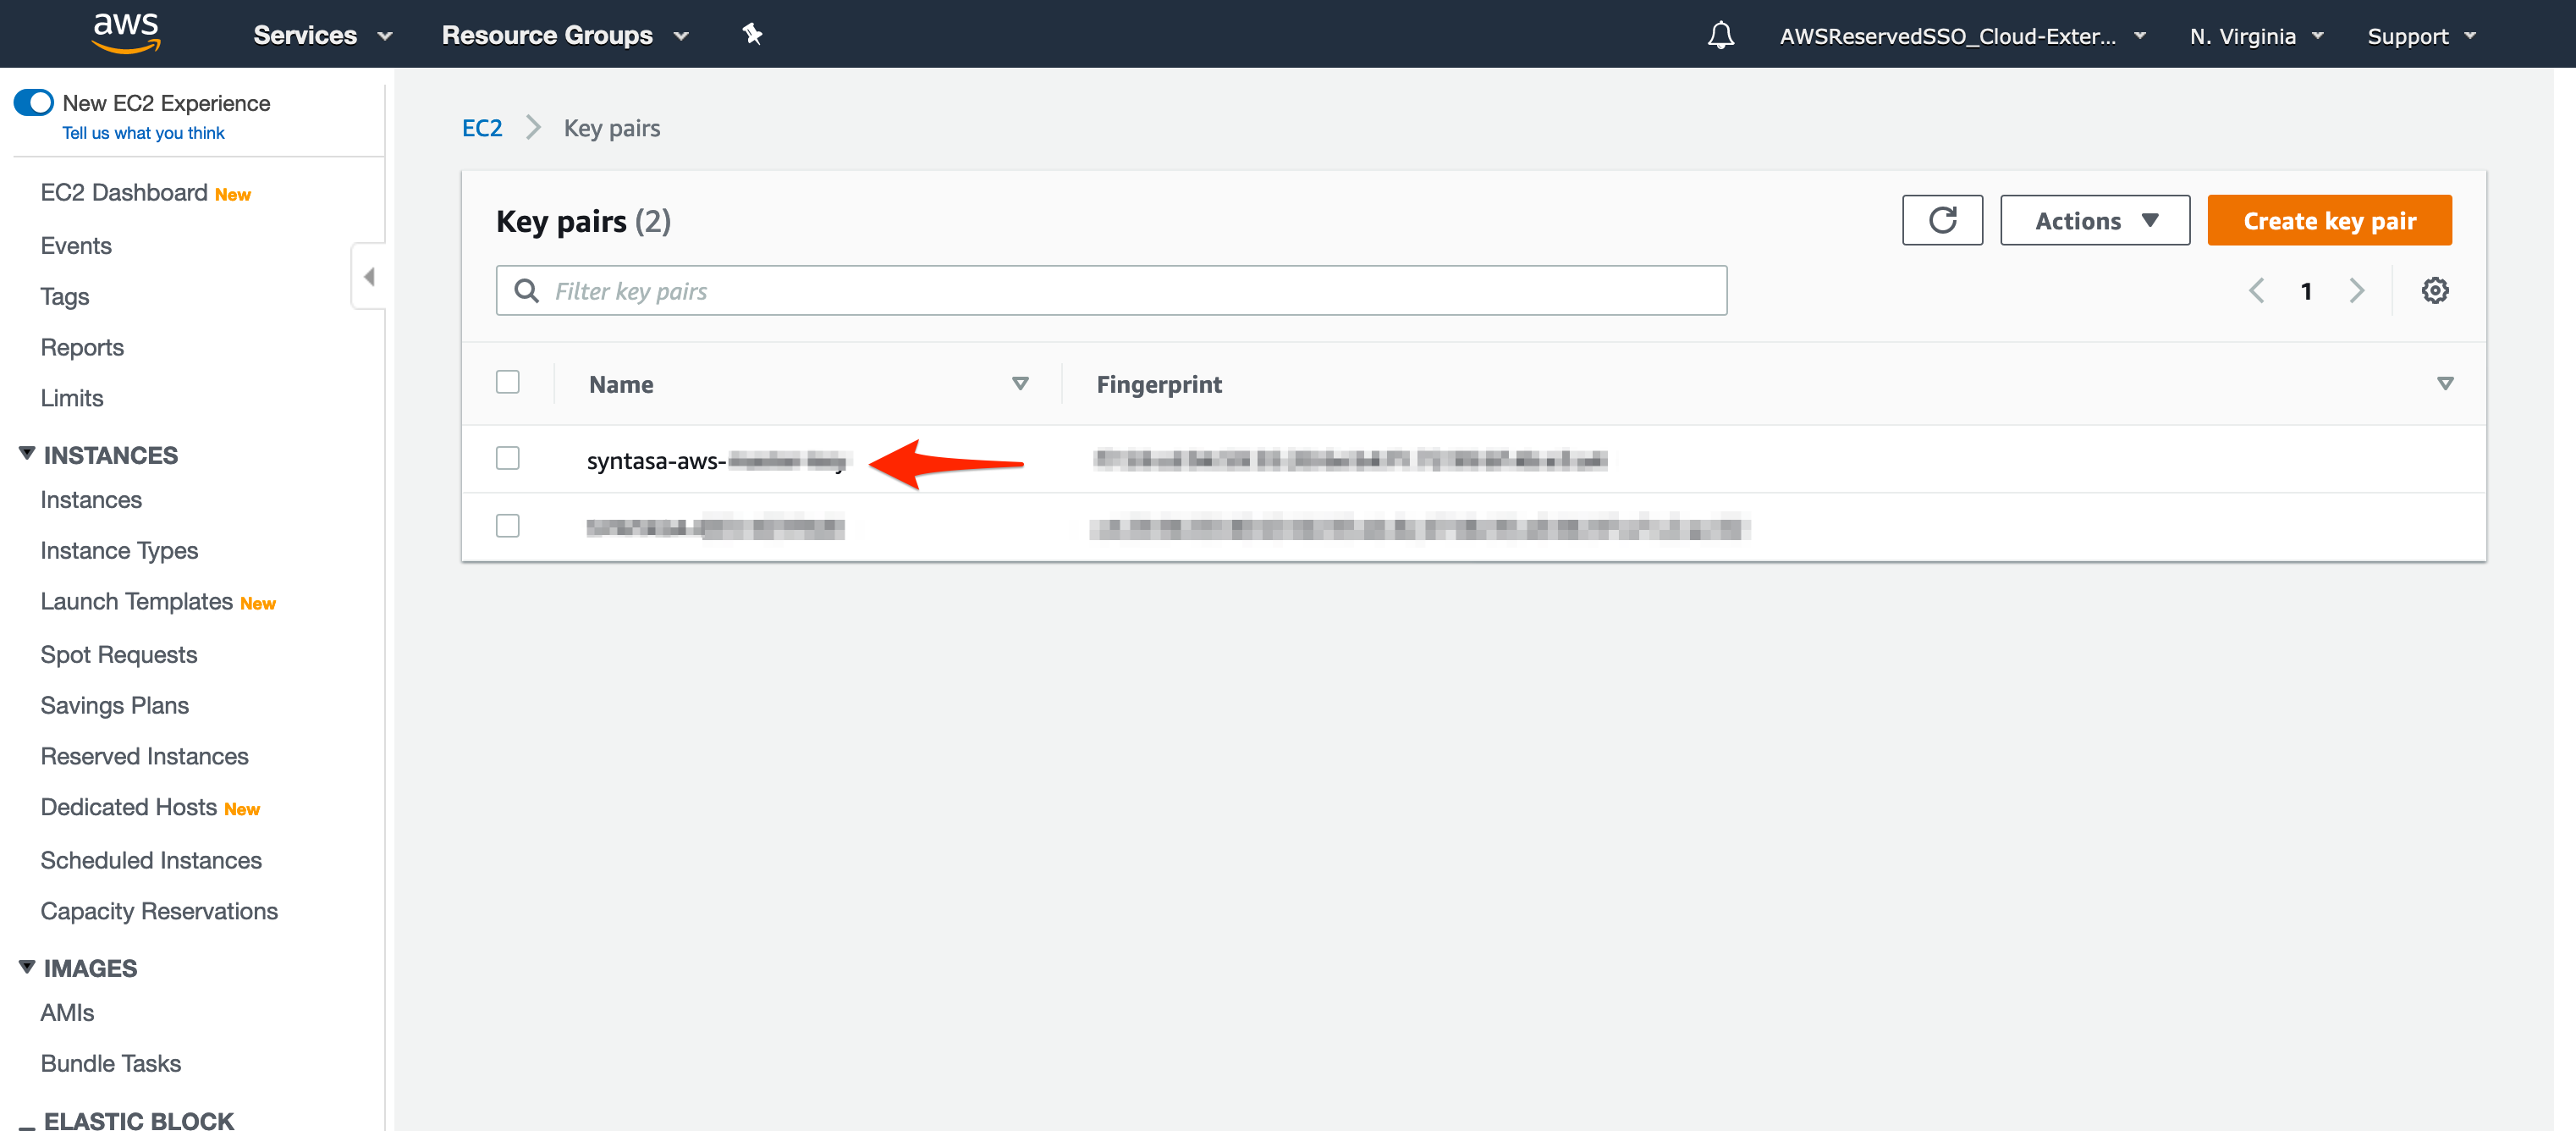
- Enter the name of this key pair in the Syntasa Infrastructure screen.
Master Security Groups:
- Navigate to the "EC2" AWS service.
- Using the left-hand menu, choose "Security Groups" under the "NETWORK & SECURITY" subgroup.
- Locate the security group named to indicate it is for EMR master nodes.
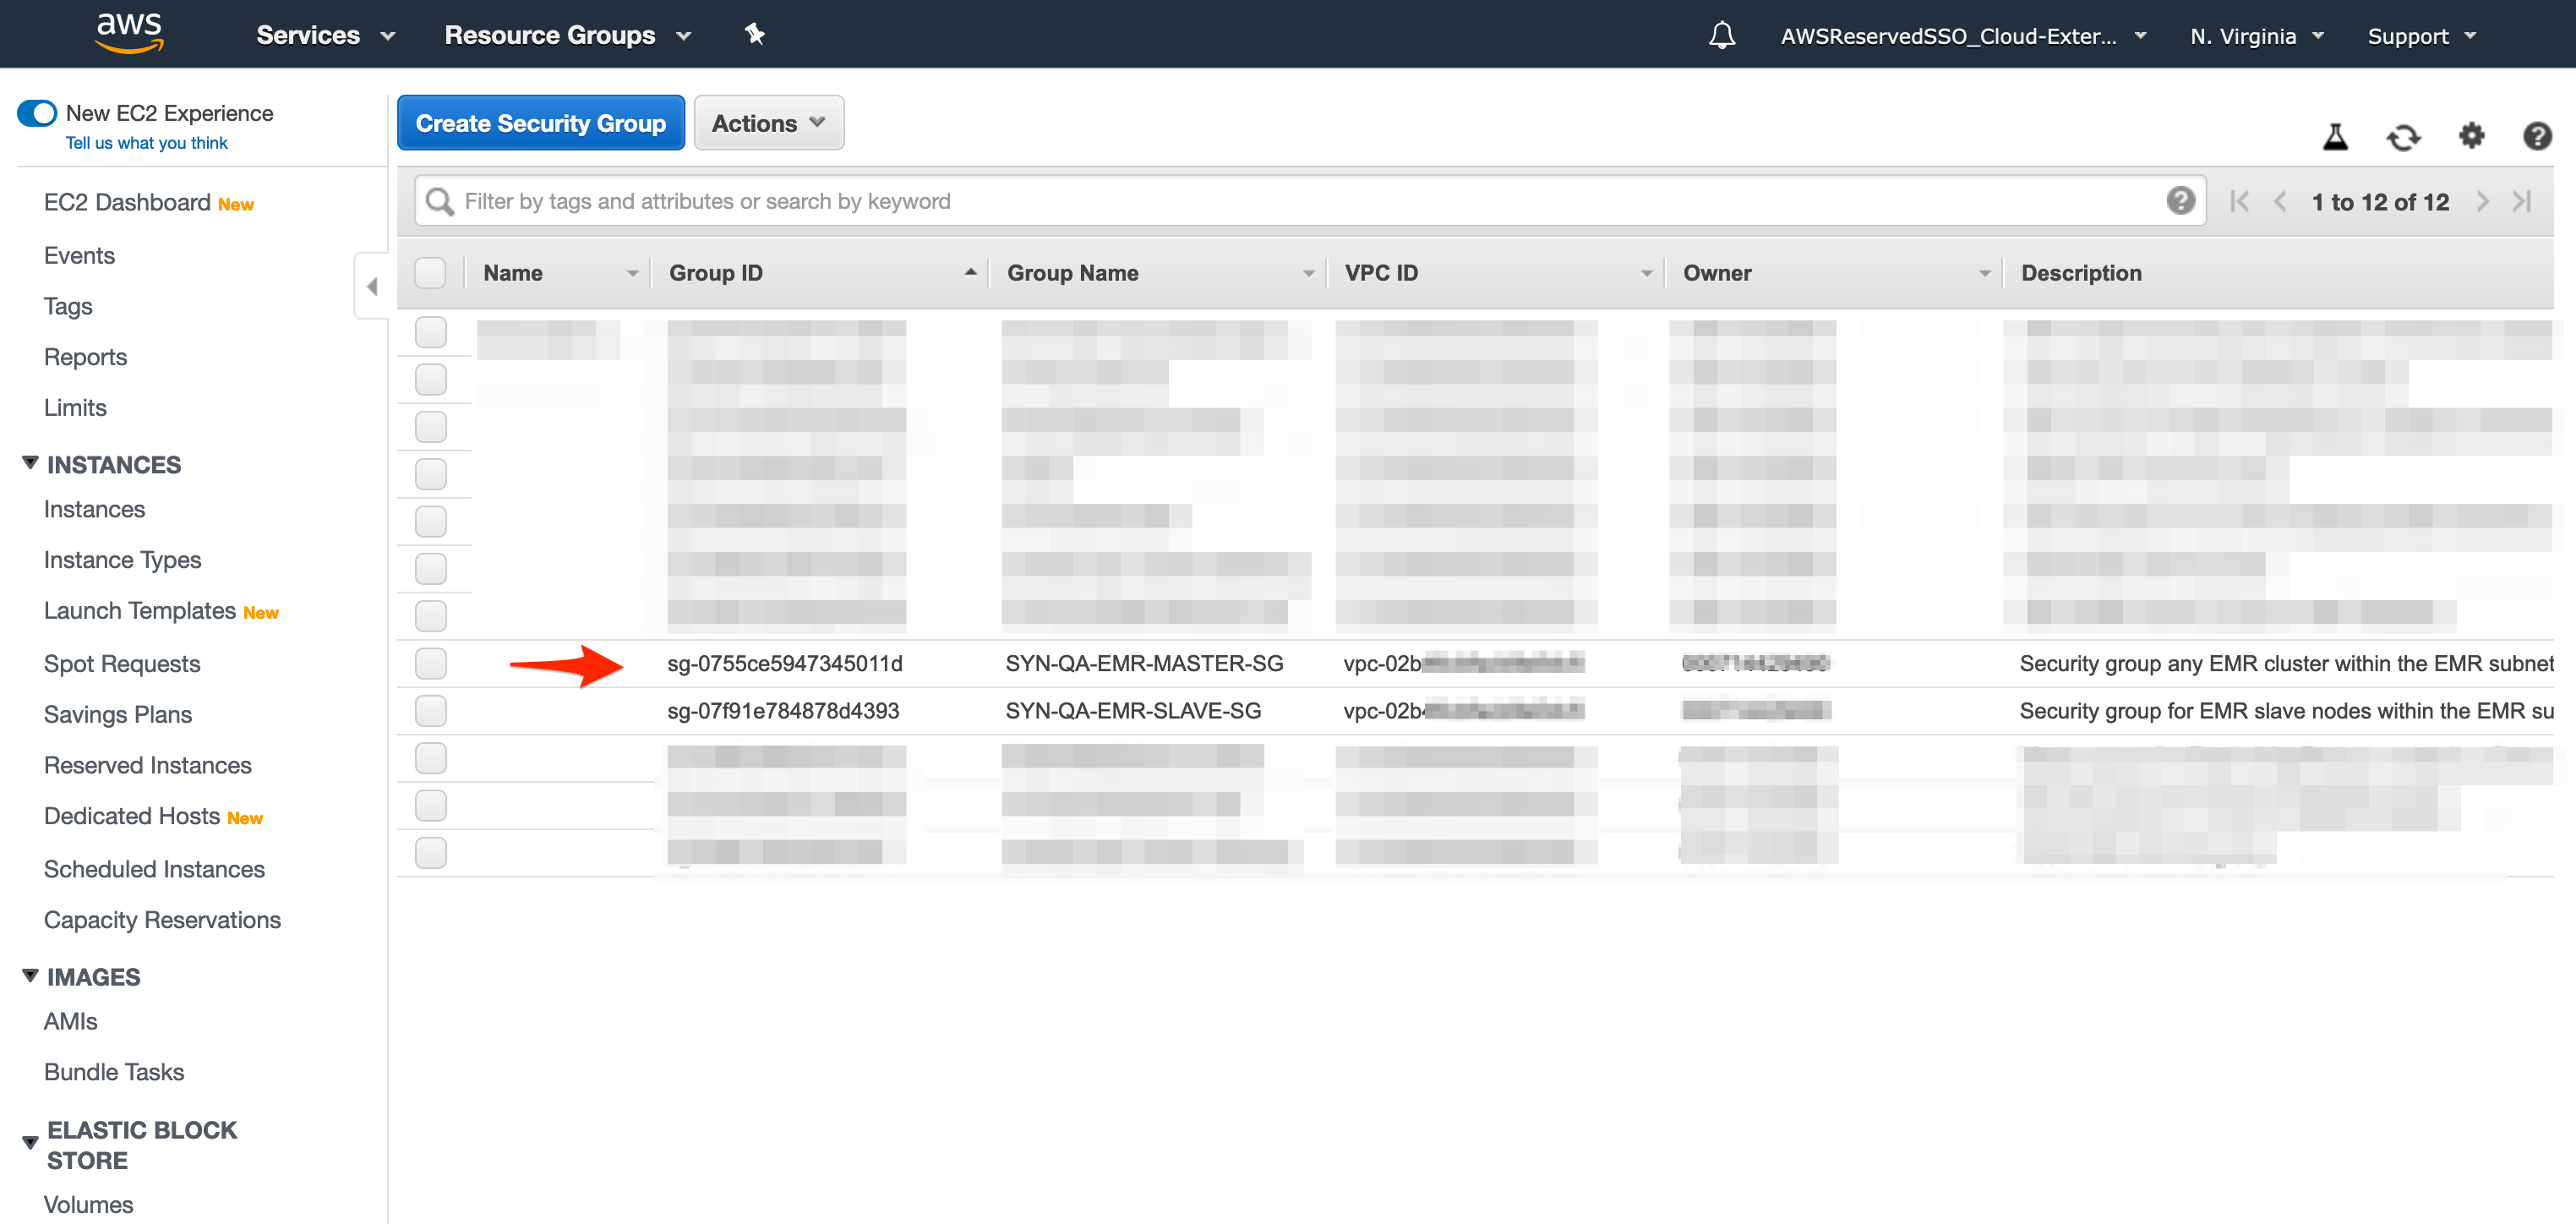
- Note the "Group ID" and add that to the field in the Syntasa Infrastructure screen.
Worker Security Groups:
- Navigate to the "EC2" AWS service.
- Using the left-hand menu, choose "Security Groups" under the "NETWORK & SECURITY" subgroup.
- Locate the security group named to indicate it is for EMR worker (or slave) nodes.

- Note the "Group ID" and add that to the field in the Syntasa Infrastructure screen.
Service Security Group - For standard installations, leave this blank.
Access End Point - For standard installations, please use the following:
amazonaws.com
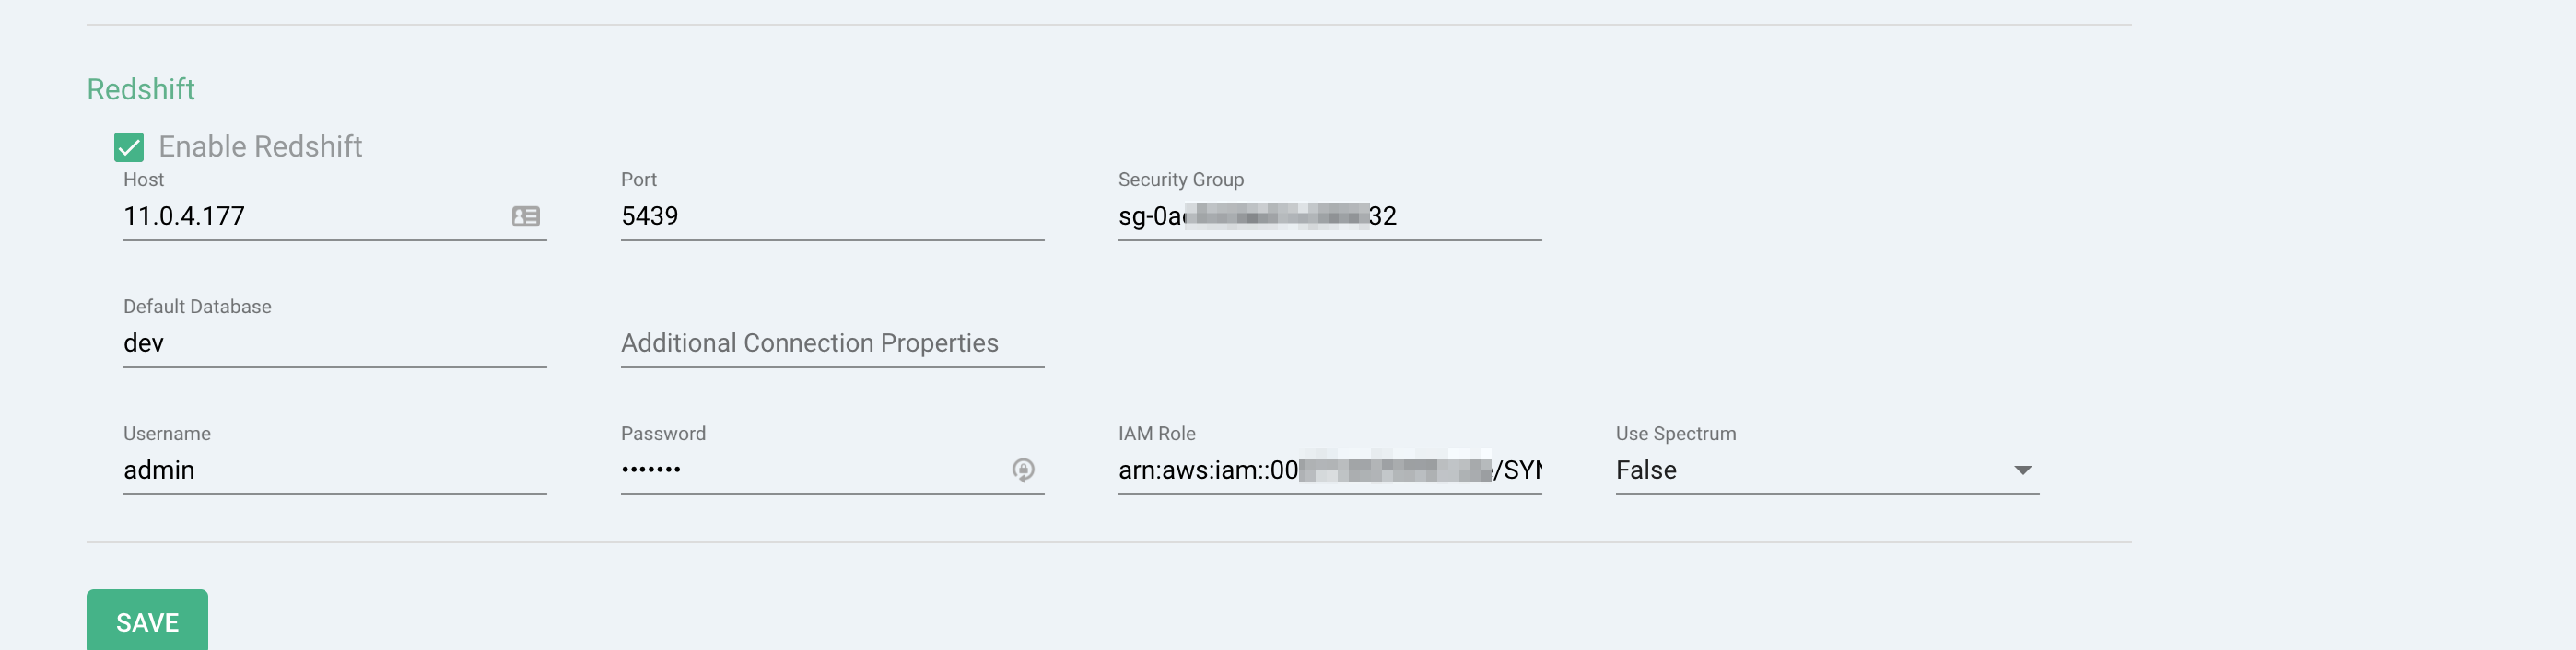
Interactive Engine
The fields in the Interactive Engine section of the Infrastructure page should be filled out according to the settings within your AWS environment.
Prerequisite - A Redshift cluster needs to be created during Syntasa installation and configuration.
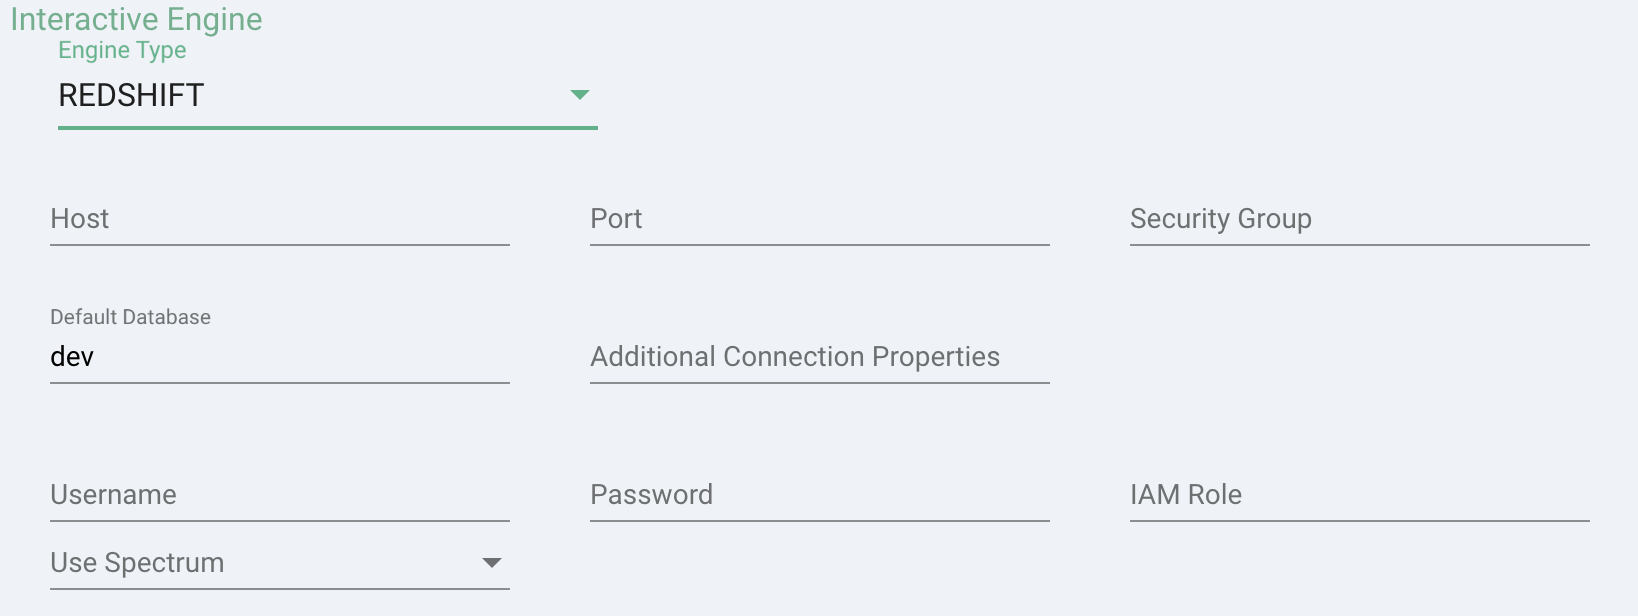
Engine Type - Drop-down indicates the query engine we will use. For the purposes of this guide, the selection is Redshift.
Host:
- Navigate to the "Redshift" AWS service. Make sure to select the correct region from the drop-down menu in the top right of the screen.
- Choose "Clusters" from the left-hand menu.
- Click on the cluster name you intend to use with Syntasa.
- Choose the "Properties" tab.
- In the "Connection details" card, expend "View all connection details."
- In the "Node IP Addresses" section, note the "Private IP Address"
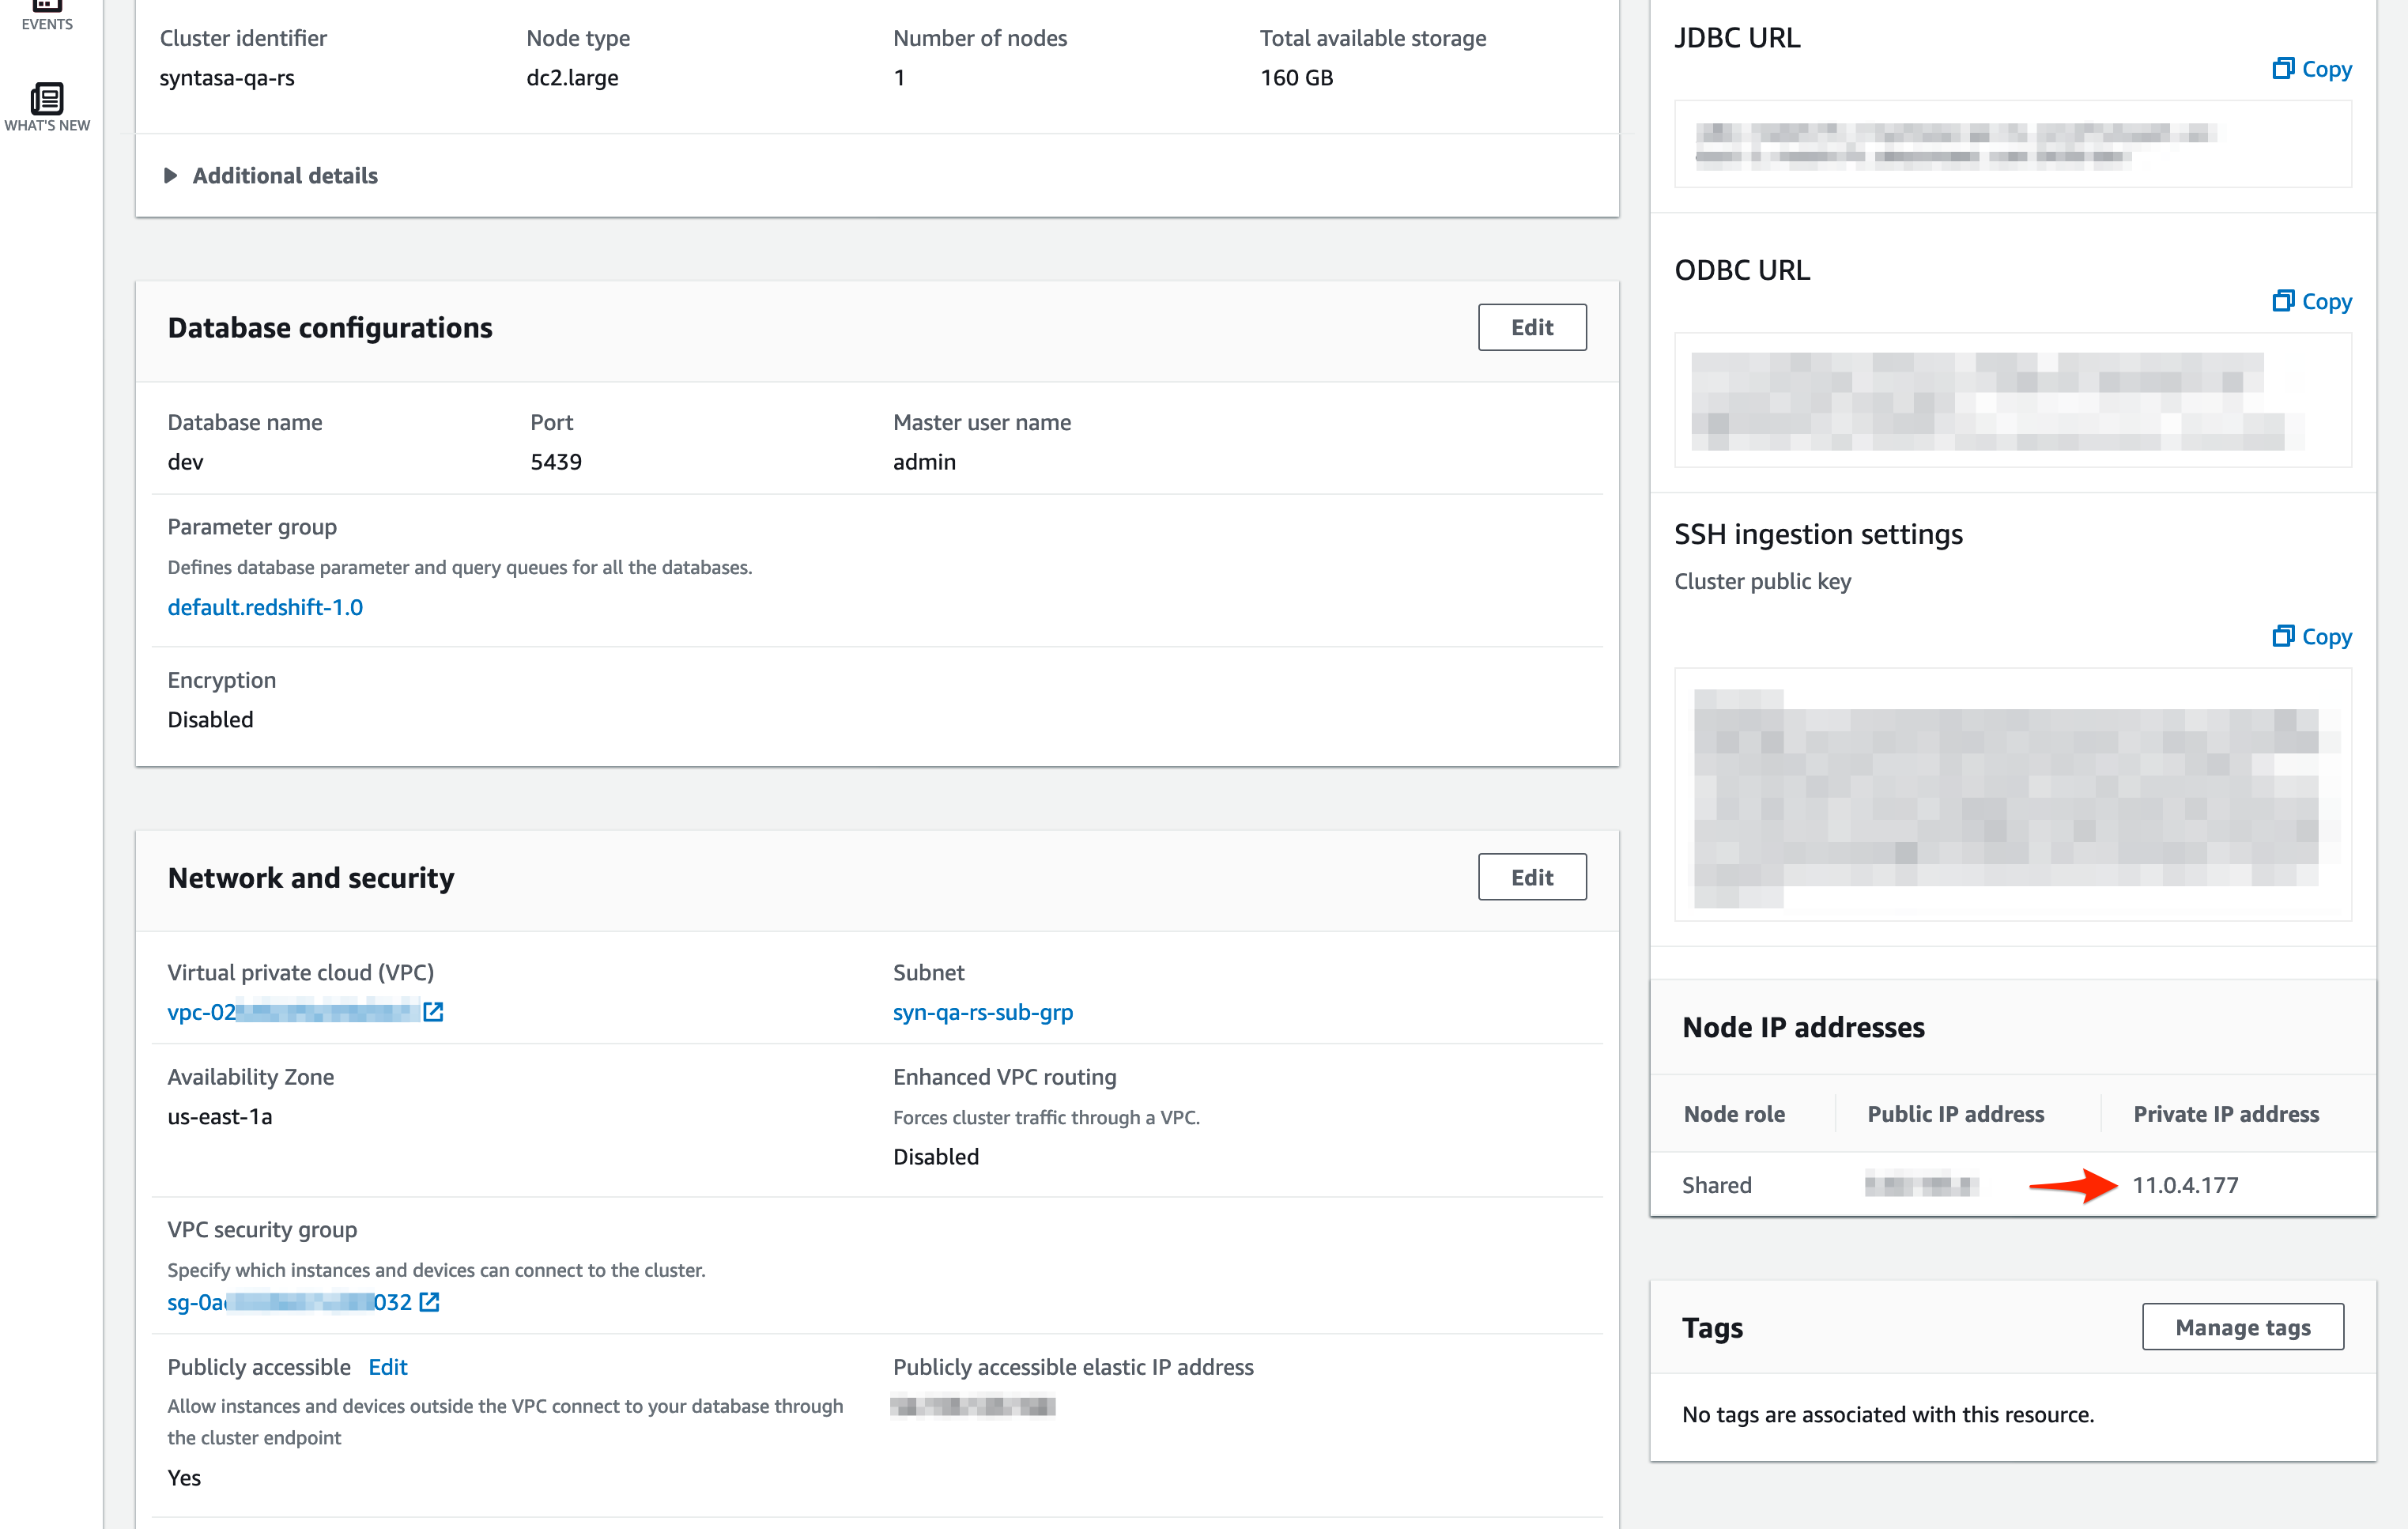
- Add this private IP to the Syntasa Infrastructure screen for Host.
Port:
- Navigate to the "Redshift" AWS service. Make sure to select the correct region from the drop-down menu in the top right of the screen.
- Choose "Clusters" from the left-hand menu.
- Click on the cluster name you intend to use with Syntasa.
- Choose the "Properties" tab.
- Find the port in the "Database configurations" section.
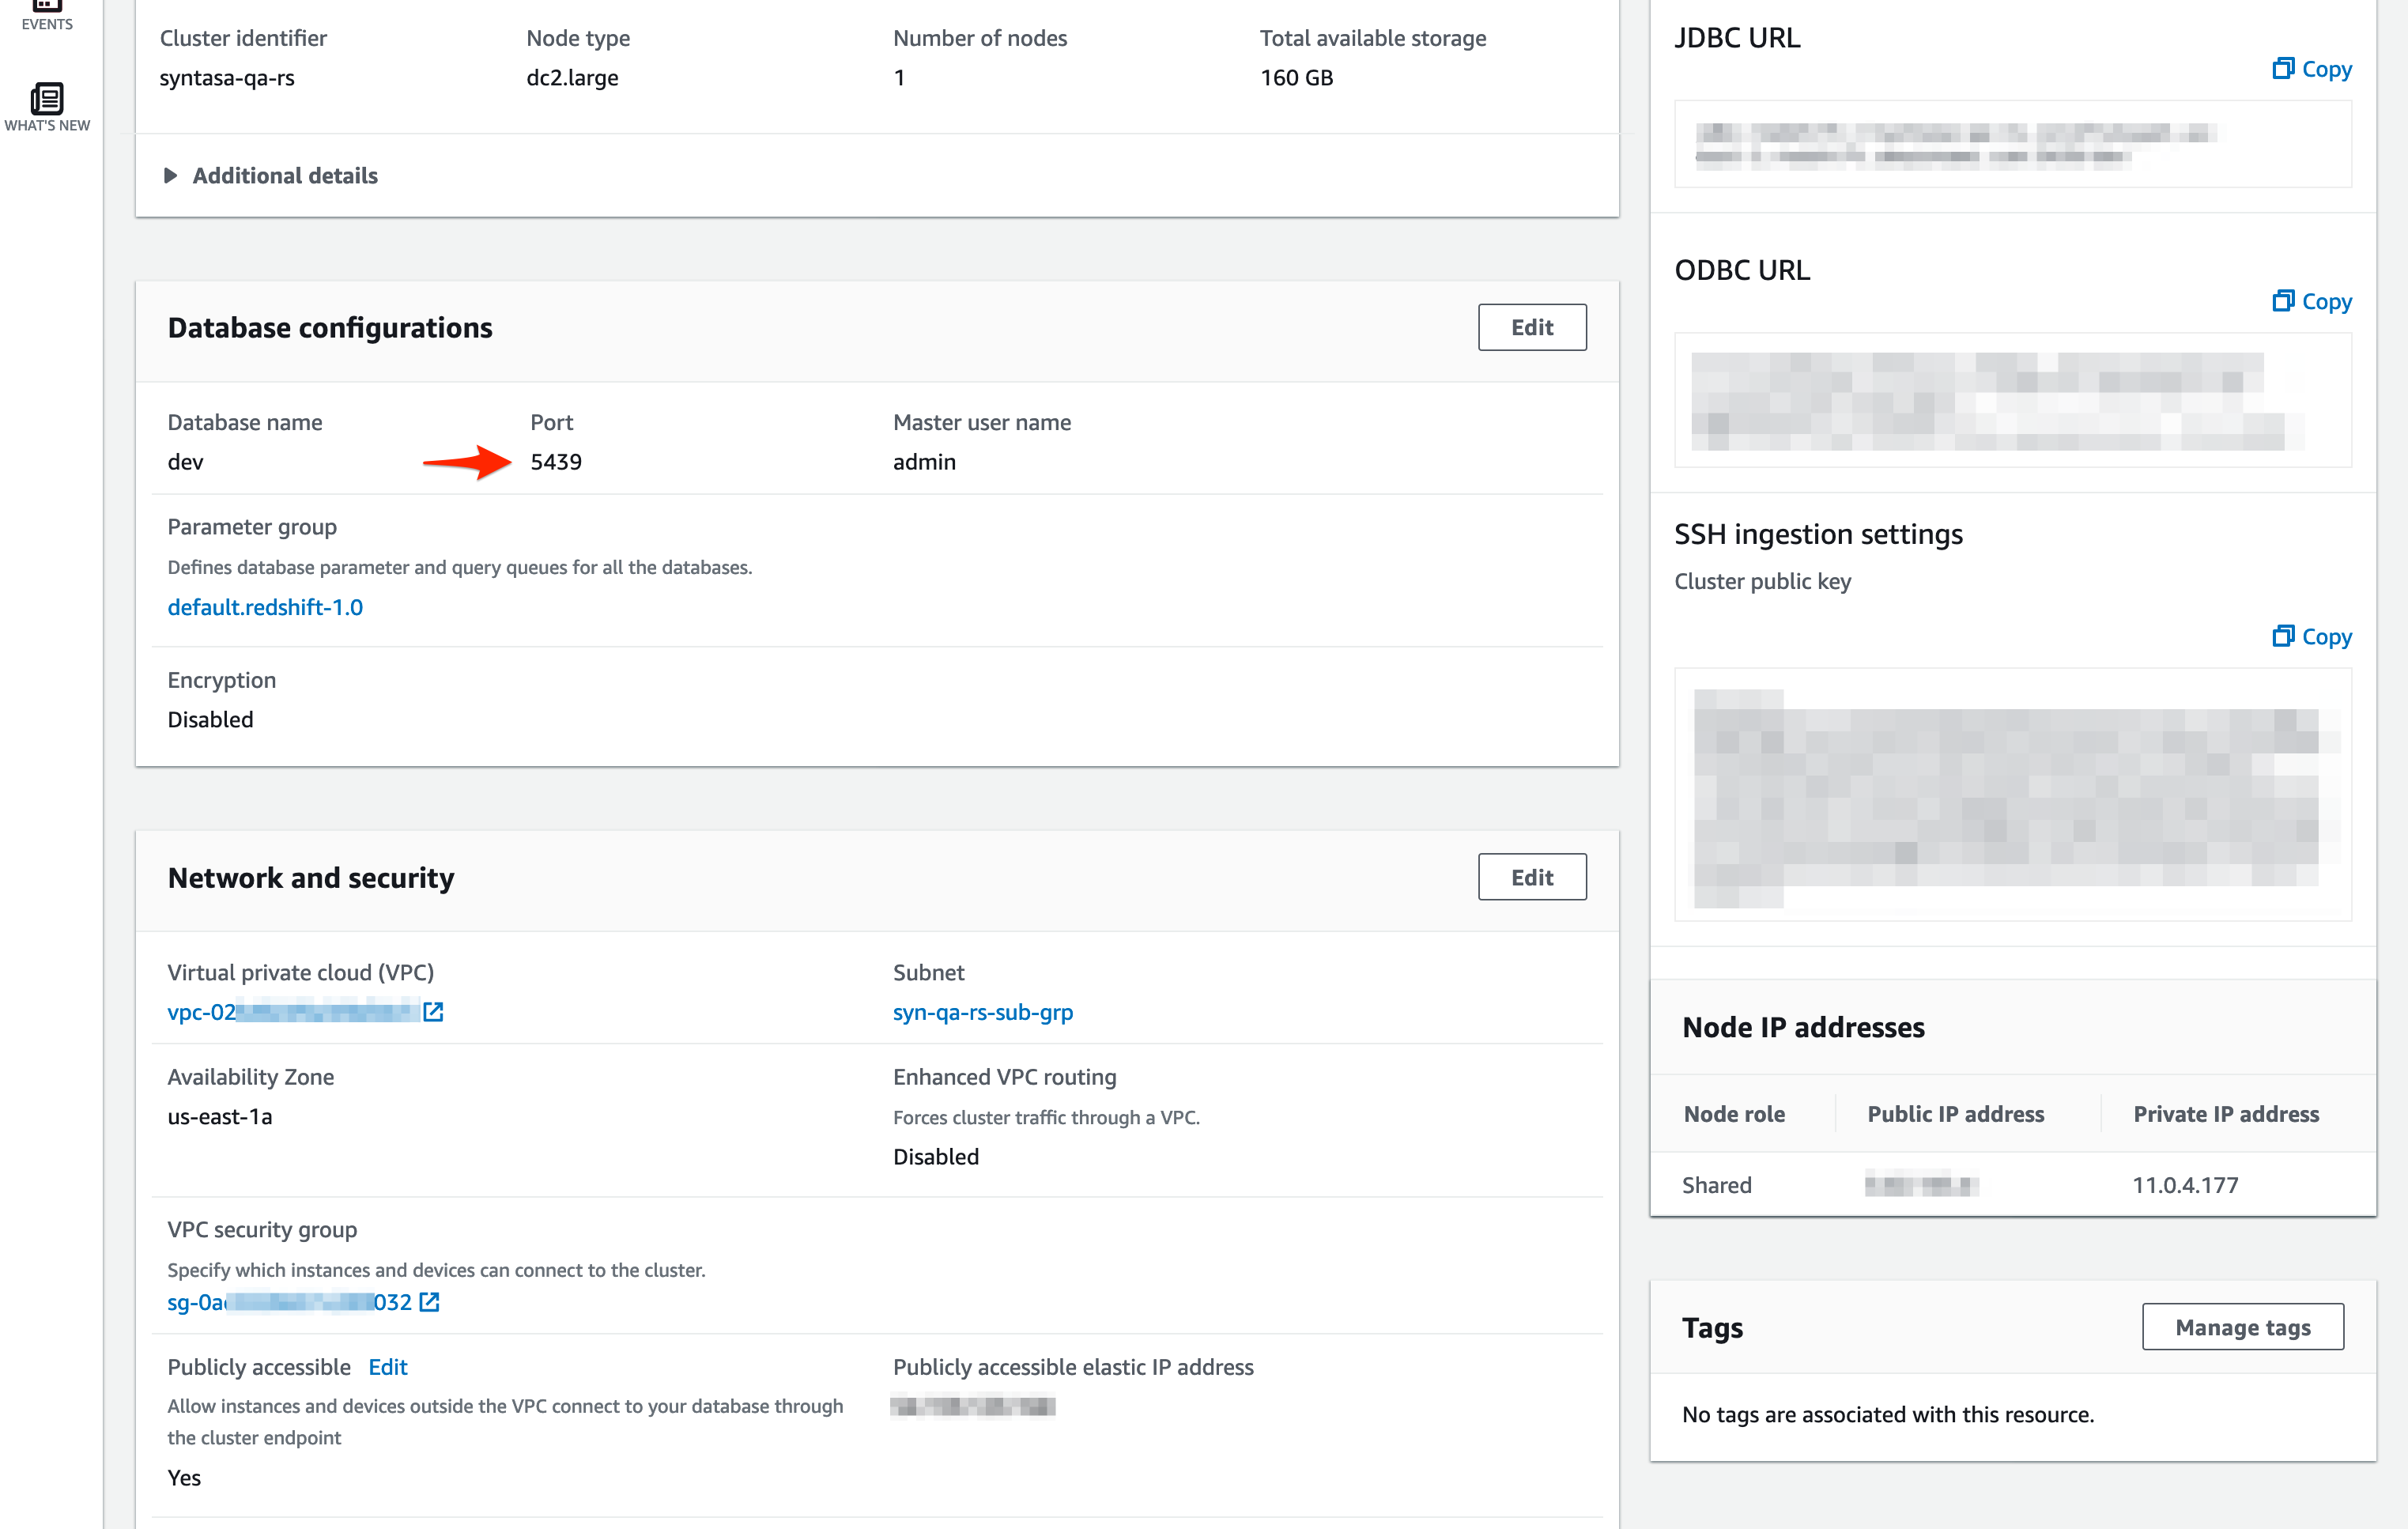
- Add this port number to the Port field in the Syntasa Infrastructure screen.
Security Group:
- Navigate to the "Redshift" AWS service. Make sure to select the correct region from the drop-down menu in the top right of the screen.
- Choose "Clusters" from the left-hand menu.
- Click on the cluster name you intend to use with Syntasa.
- Choose the "Properties" tab.
- Find the port in the "Network and Security" section.
- Find the security group listed in the "VPC security group" section.
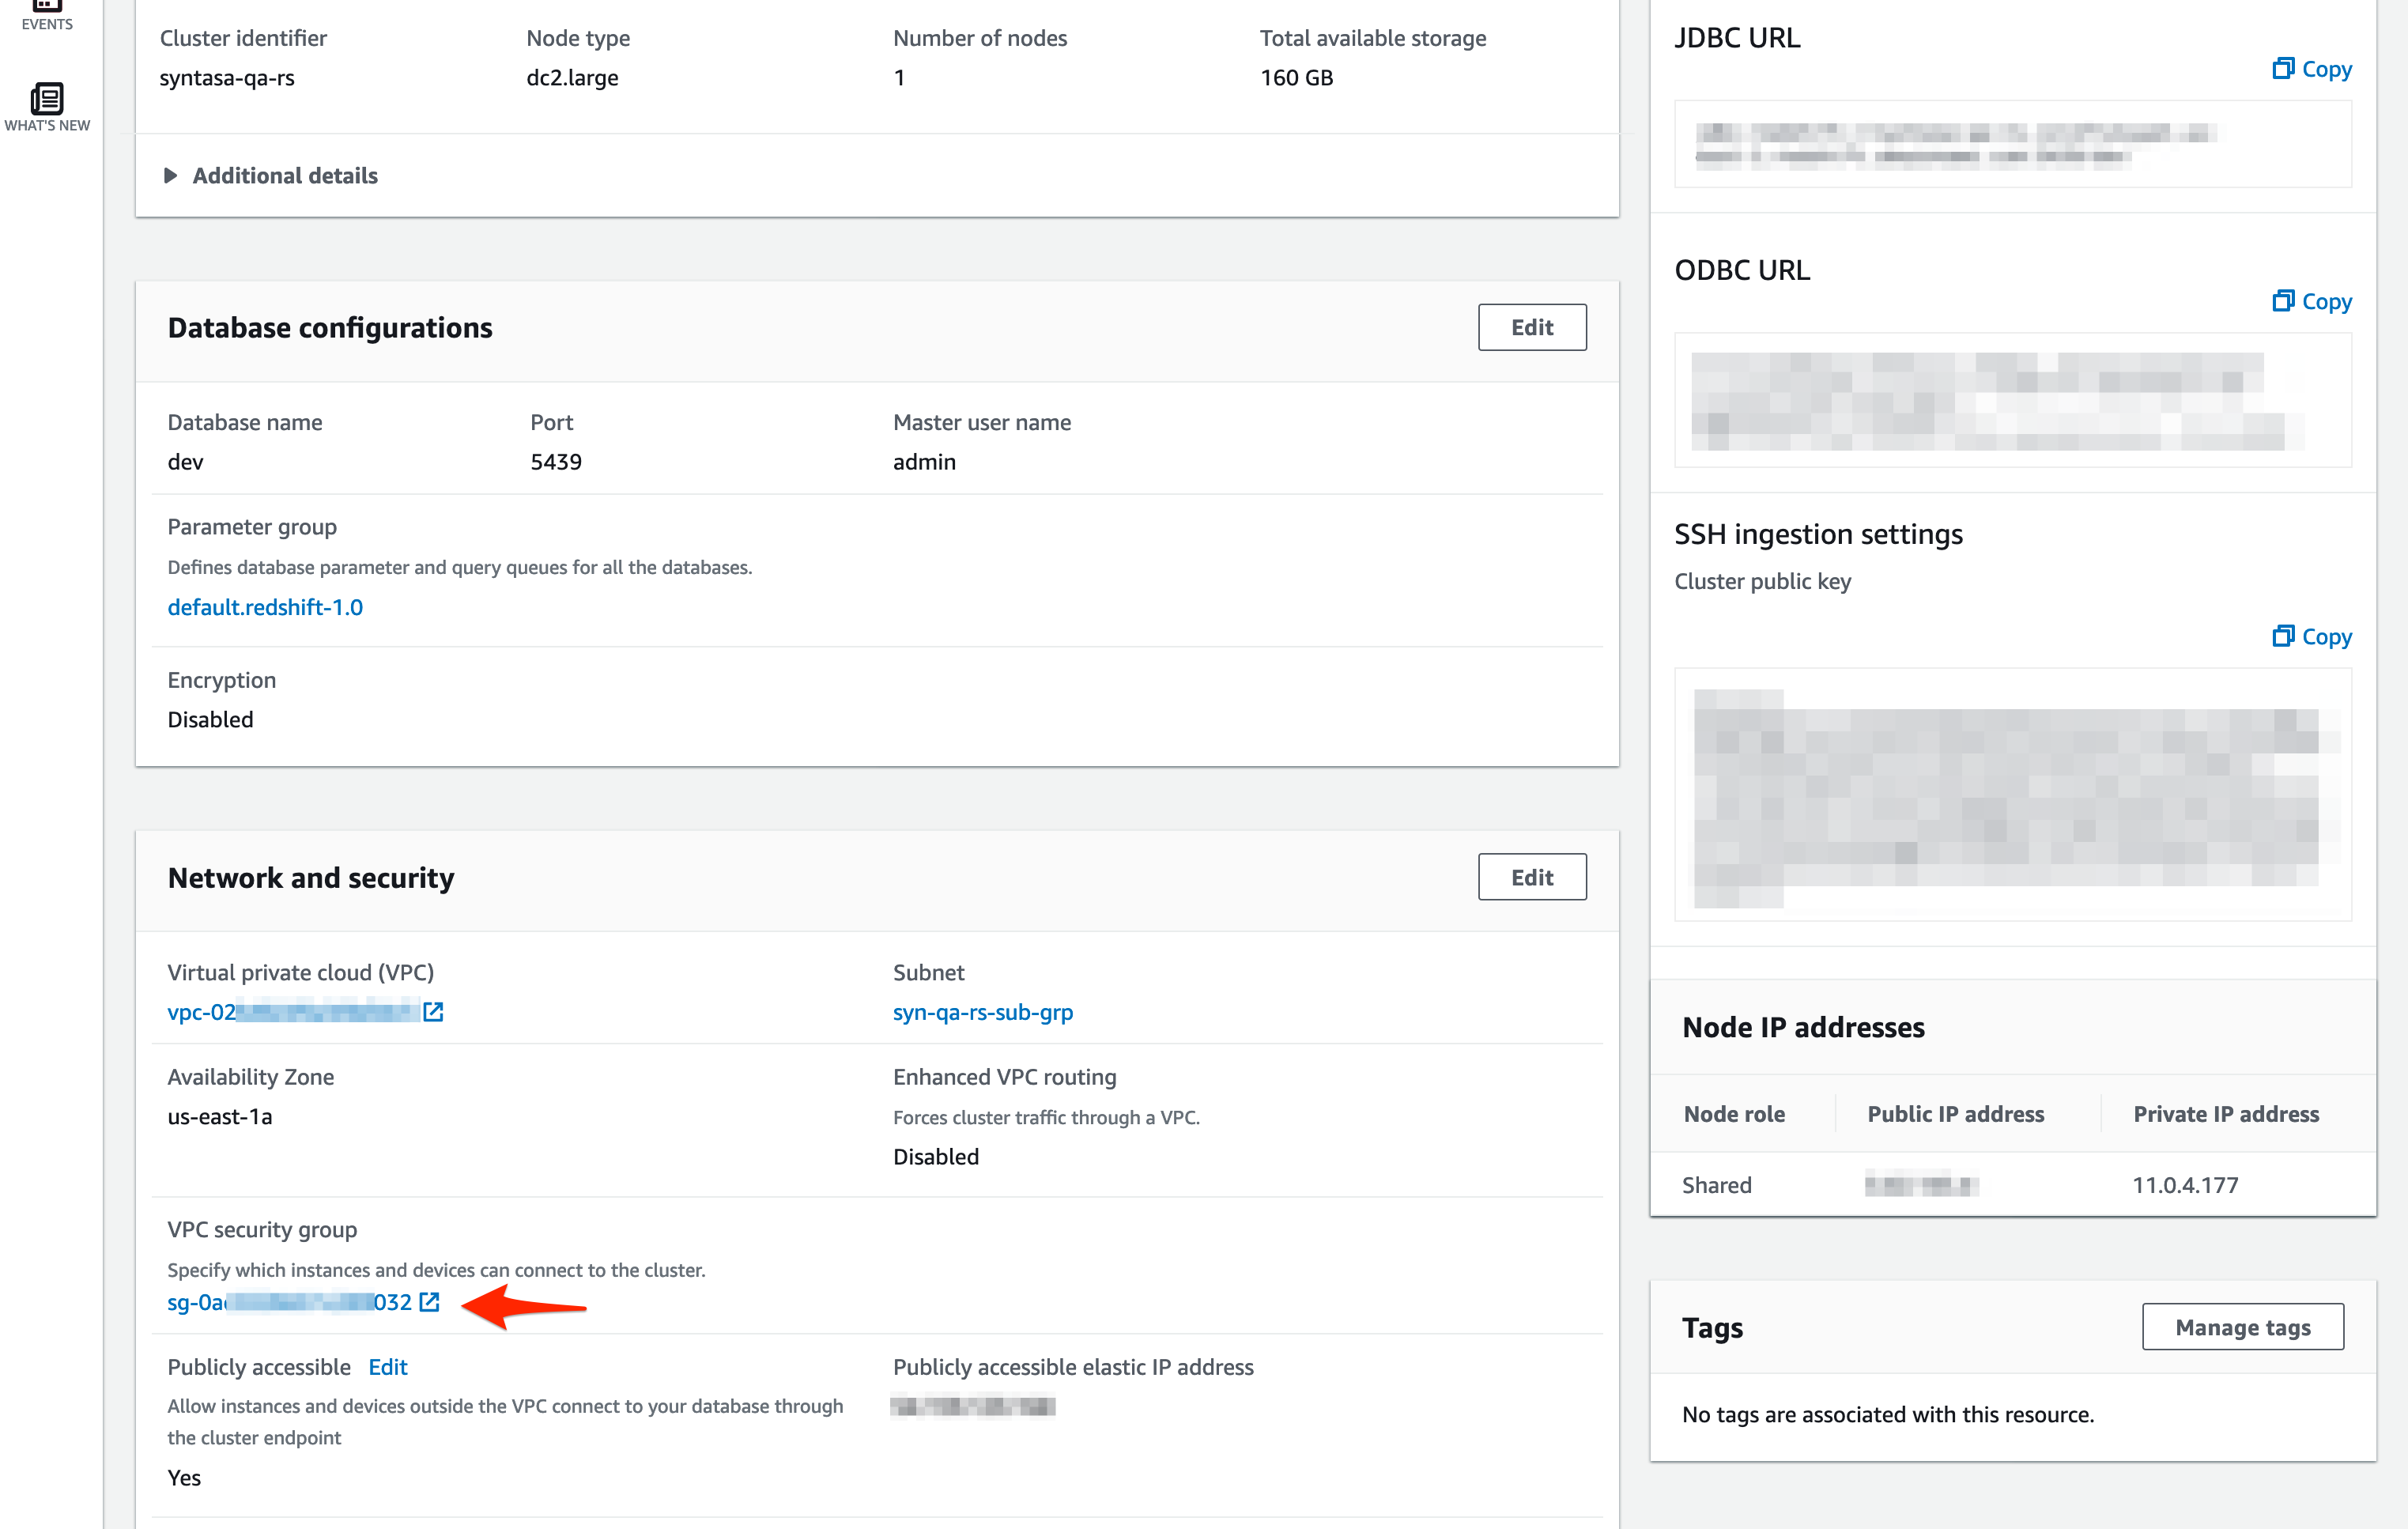
- Add this security group to the Security Group field in the Syntasa Infrastructure screen.
Default Database - For standard Syntasa installations set this field to:
dev
Additional Connection Parameters - Leave empty for a standard Syntasa installation.
Username:
Set when creating the Redshift cluster.
- Navigate to the "Redshift" AWS service. Make sure to select the correct region from the drop-down menu in the top right of the screen.
- Choose "Clusters" from the left-hand menu.
- Click on the cluster name you intend to use with Syntasa.
- Choose the "Properties" tab.
- Find the "Master user name" in the "Database configurations" section.
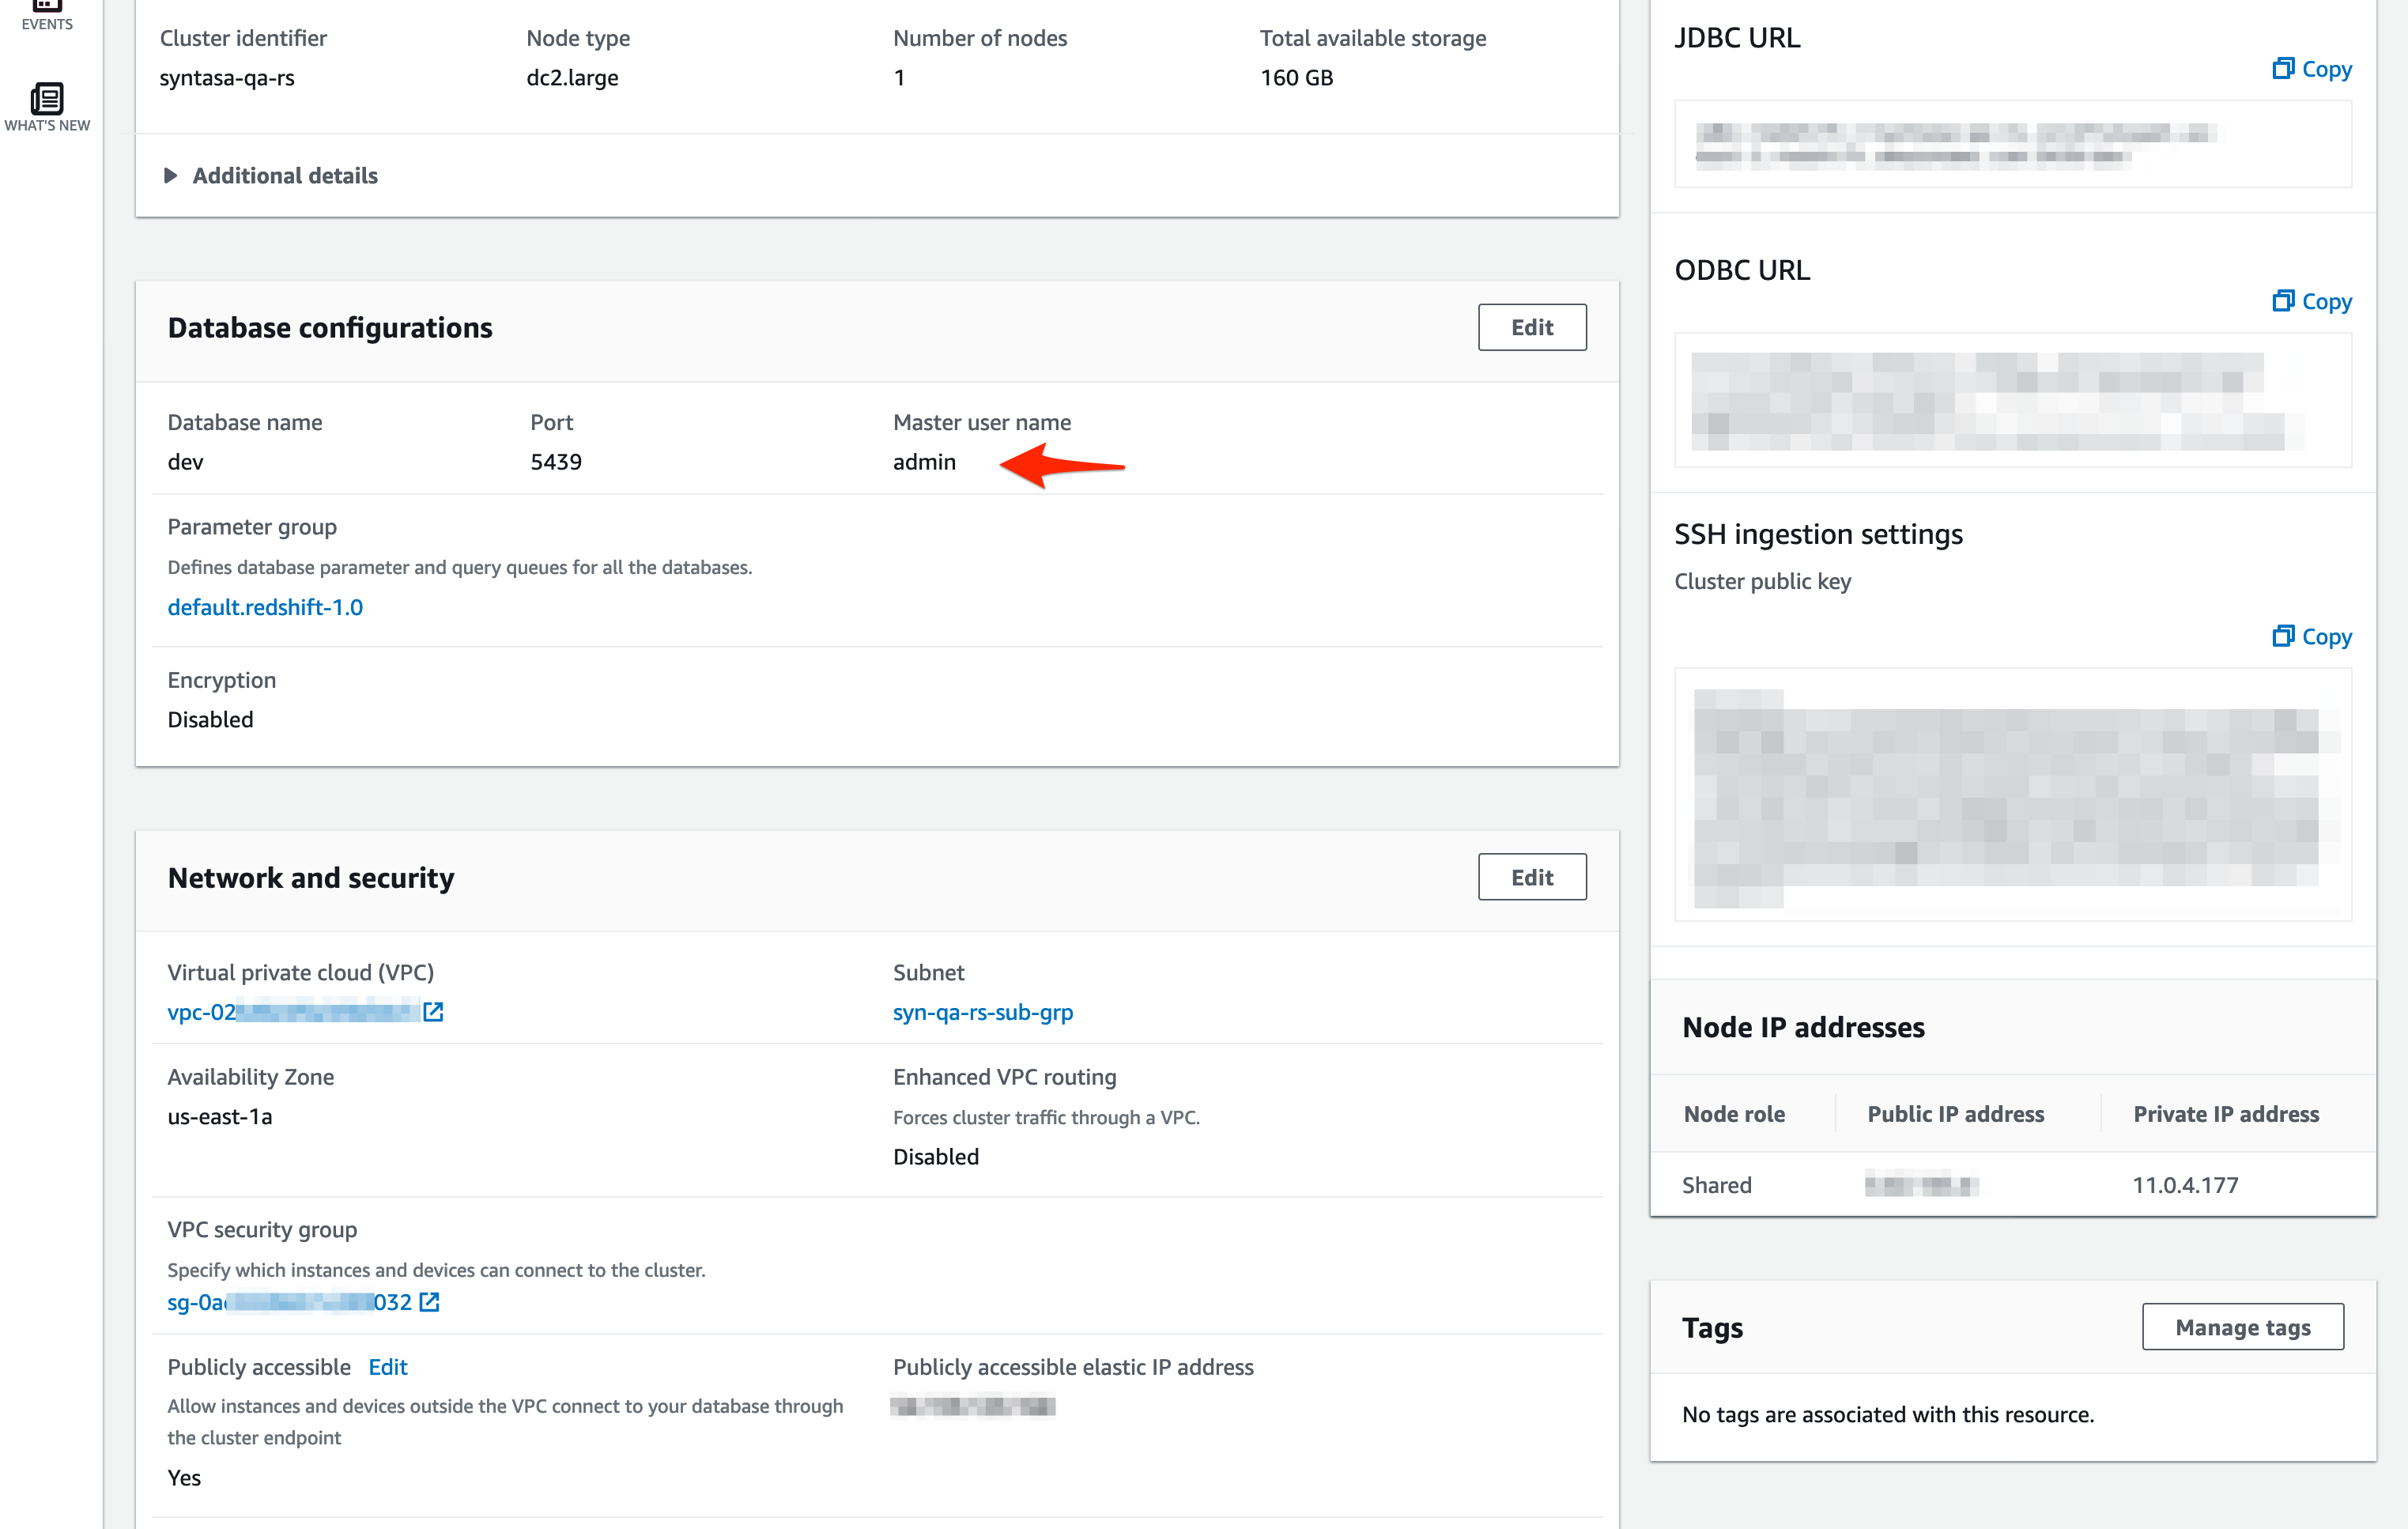
- Set this username in the Syntasa Infrastructure field.
Password - Set when creating the Redshift cluster.
IAM Role:
- Navigate to the "Redshift" AWS service. Make sure to select the correct region from the drop-down menu in the top right of the screen.
- Choose "Clusters" from the left-hand menu.
- Click on the cluster name you intend to use with Syntasa.
- Choose the "Properties" tab.
- Find the "Attached IAM Roles" in the "Cluster Permissions" section.
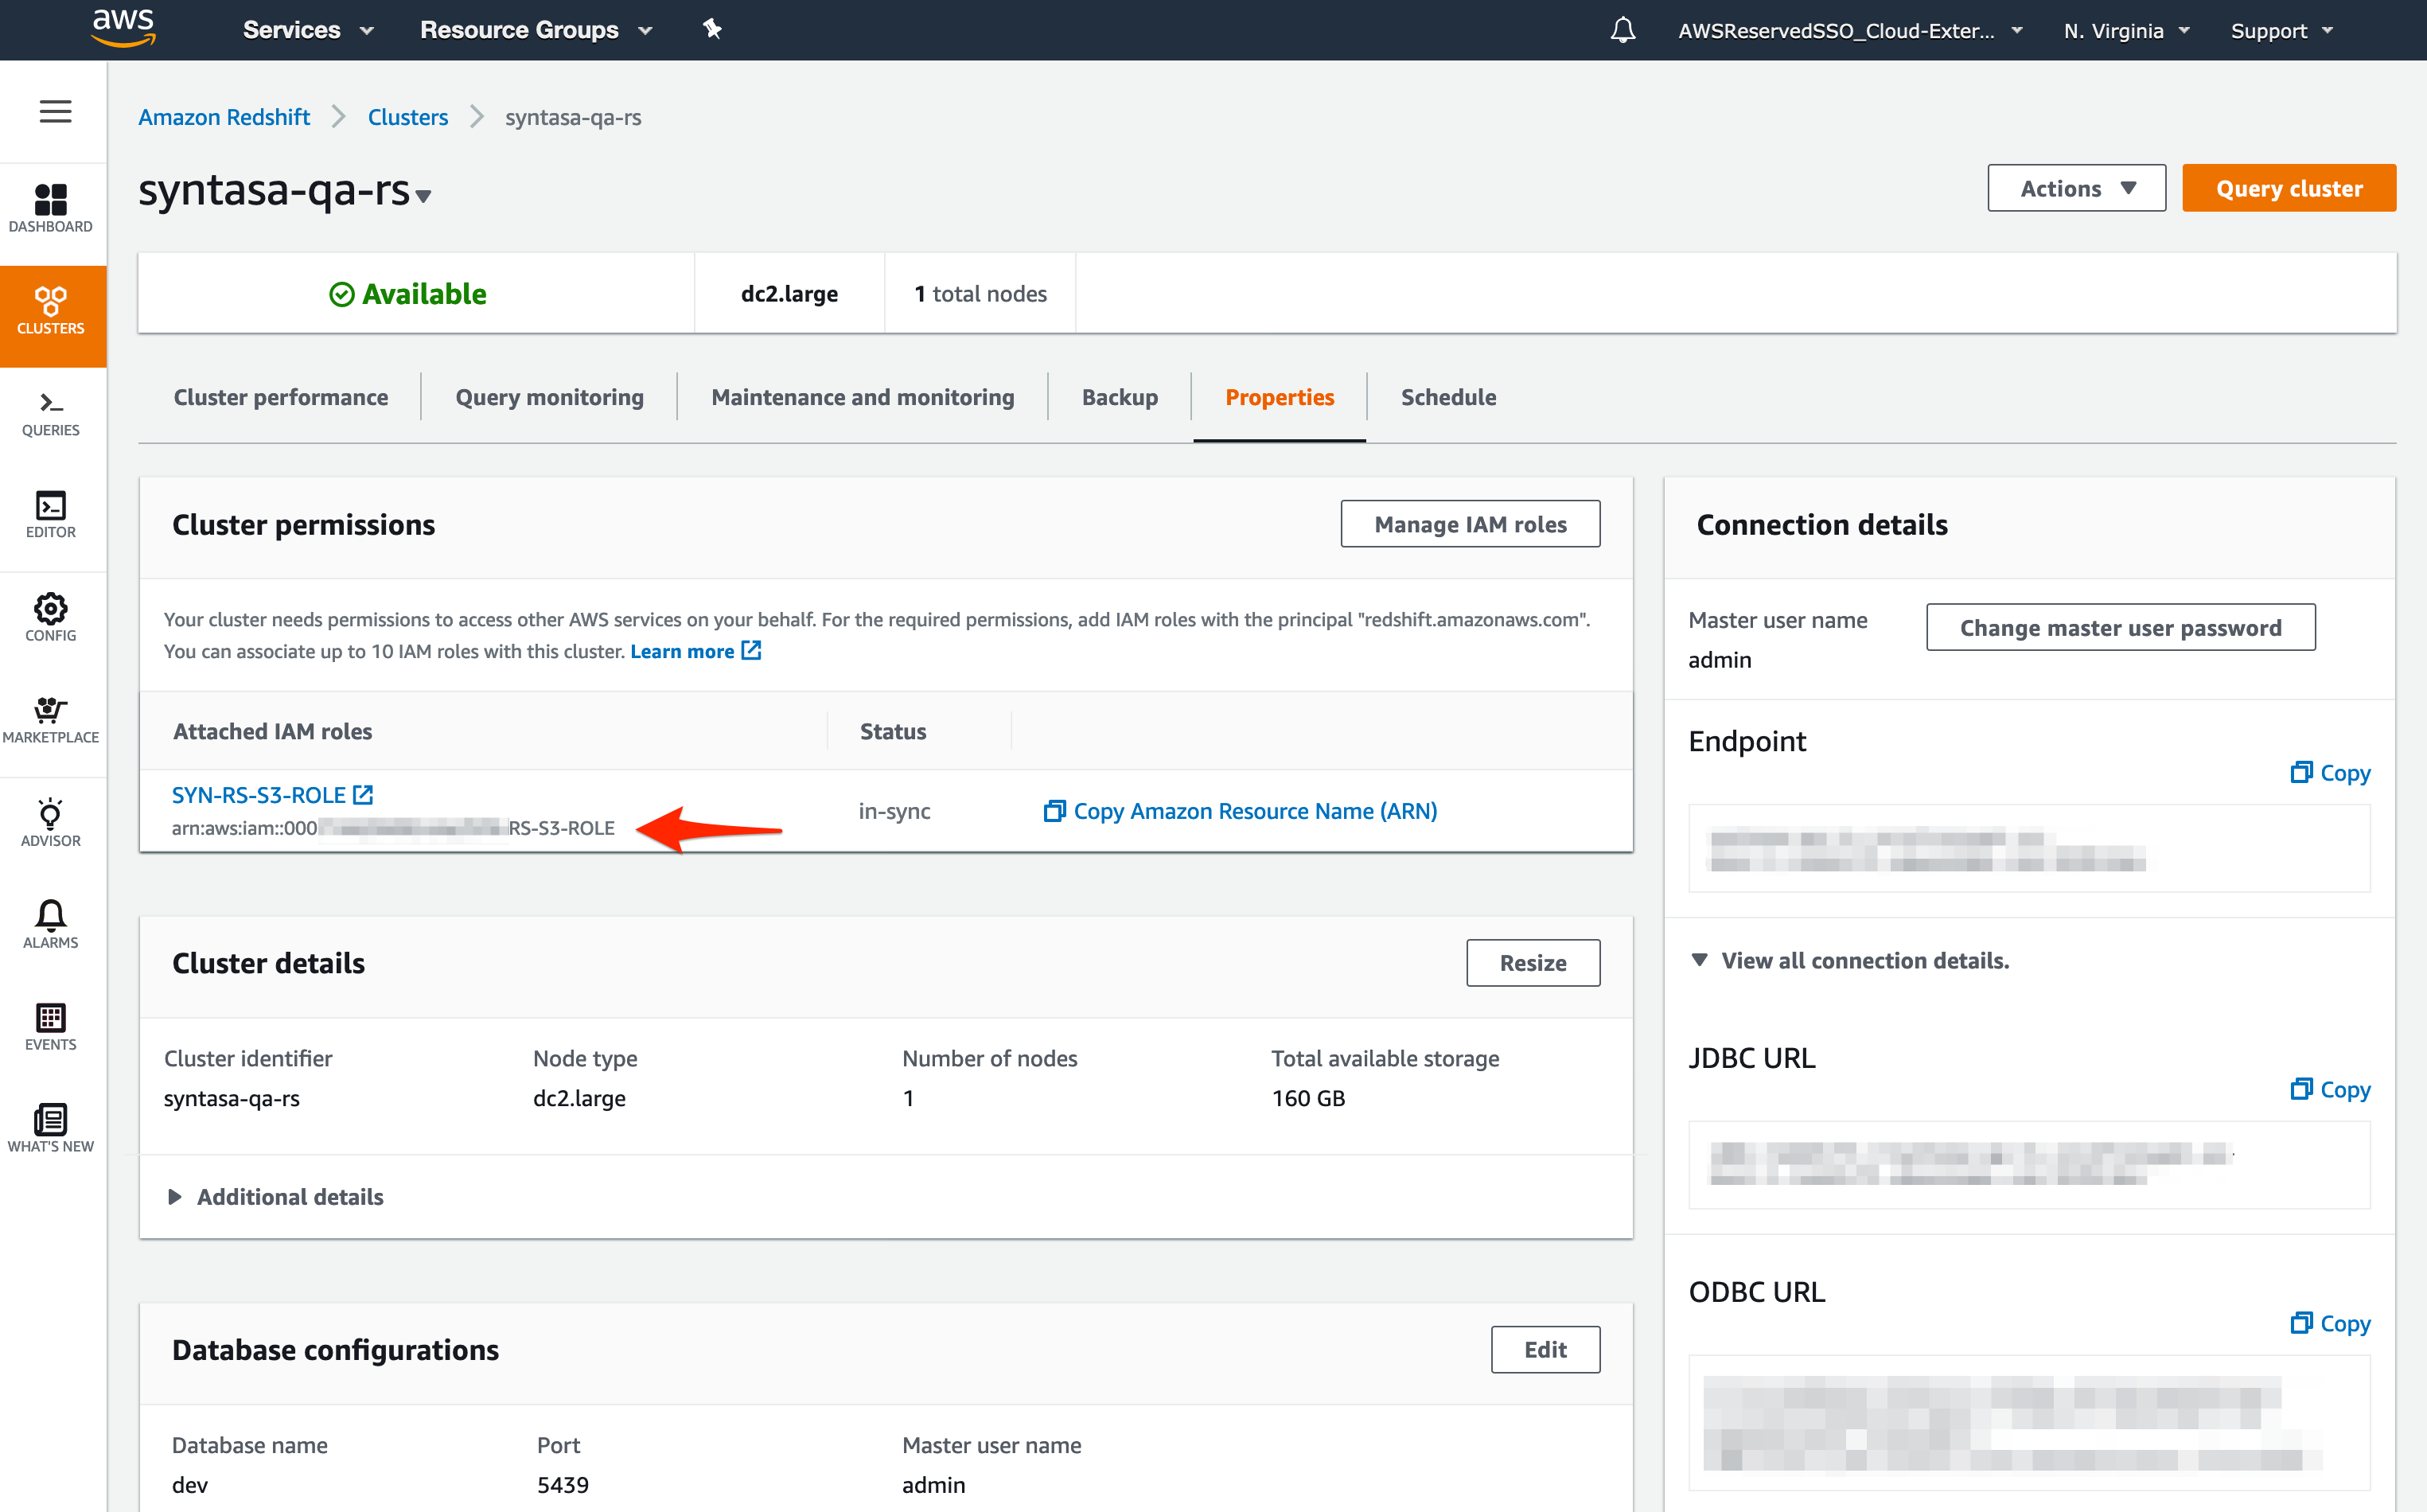
- Now add the ARN to the Syntasa Infrastructure field.
Use Spectrum - Choose to enable Redshift Spectrum. This is False by default.
Final review of Infrastructure information
Final Syntasa Infrastructure screen for an AWS installation: